
Oven hot wings are chicken wing pieces baked until browned, then coated with a spicy sauce. For a straightforward batch, dry thawed wings thoroughly, spread them on an oven-safe rack and bake at 425°F (220°C) in a conventional oven, usually for 40-50 minutes, before adding sauce. Start checking earlier and use a thermometer to confirm at least 165°F (74°C) inside the meat; the clock and skin color cannot confirm safety.
What do you need to prepare wings that crisp instead of steam?
Start with 2 pounds (about 900 g) of thawed, skin-on, bone-in drumettes and flats. Buying the wings already separated keeps this method simple and gives pieces that are easier to arrange and check. Boneless chicken pieces, whole wings with tips attached and pre-cooked frozen wings need their own directions; they are not interchangeable with this batch.
Set out a large rimmed metal baking sheet, a wire rack specifically rated for oven use, paper towels, a mixing bowl, tongs, measuring spoons and an instant-read food thermometer. The rack needs to sit securely inside the pan so it catches drips. A decorative cooling rack with an unknown coating is not suitable just because it fits.
This quantity makes roughly four appetizer portions or two generous main-dish portions, depending on wing size and the rest of the meal. These are serving estimates, not a fixed number of pieces. Keep the cooking method separate from guest calculations: appetite, side dishes and whether the wings are an appetizer all change how much to buy.
- Wings: 2 lb (900 g) separated chicken wings.
- Dry coating: 2 level teaspoons aluminum-free baking powder, 1/2 teaspoon fine salt, 1/2 teaspoon garlic powder, 1/2 teaspoon paprika and 1/4 teaspoon black pepper. Use less salt if the wings contain an added salt solution.
- Simple hot sauce coating: 1/3 cup (80 ml) cayenne-style hot sauce plus 2 tablespoons (28 g) unsalted butter. This makes more than a very light coating needs; add it gradually.
- For the rack: a light wipe of cooking oil. Foil under the rack is optional for easier pan cleanup.
Thaw cold, then remove surface water
Frozen wings can work well after they are fully thawed. Place them in a leakproof container on a low refrigerator shelf at 40°F (4°C) or below, with enough time for the centers to thaw; a tightly packed batch can take longer than overnight. The relevant distinction is icy versus fully thawed meat, not whether the package was ever frozen. Safe thawing guidance excludes leaving poultry on the counter.
Do not wash raw wings. Splashing spreads raw juices without making the chicken safe, as explained in the poultry handling guidance. Keep raw meat away from finished food, wash hands after handling it, and clean the work surface and utensils before using them for cooked wings.
Lay the thawed wings on paper towels over a washable tray. Press another towel over the top, turn the pieces and blot folds around the joints. Replace soaked towels instead of pushing the same water around. The checkpoint is skin without visible droplets or a slick film of package liquid; it does not need to feel completely dehydrated. Discard the towels and wash your hands before touching clean equipment.
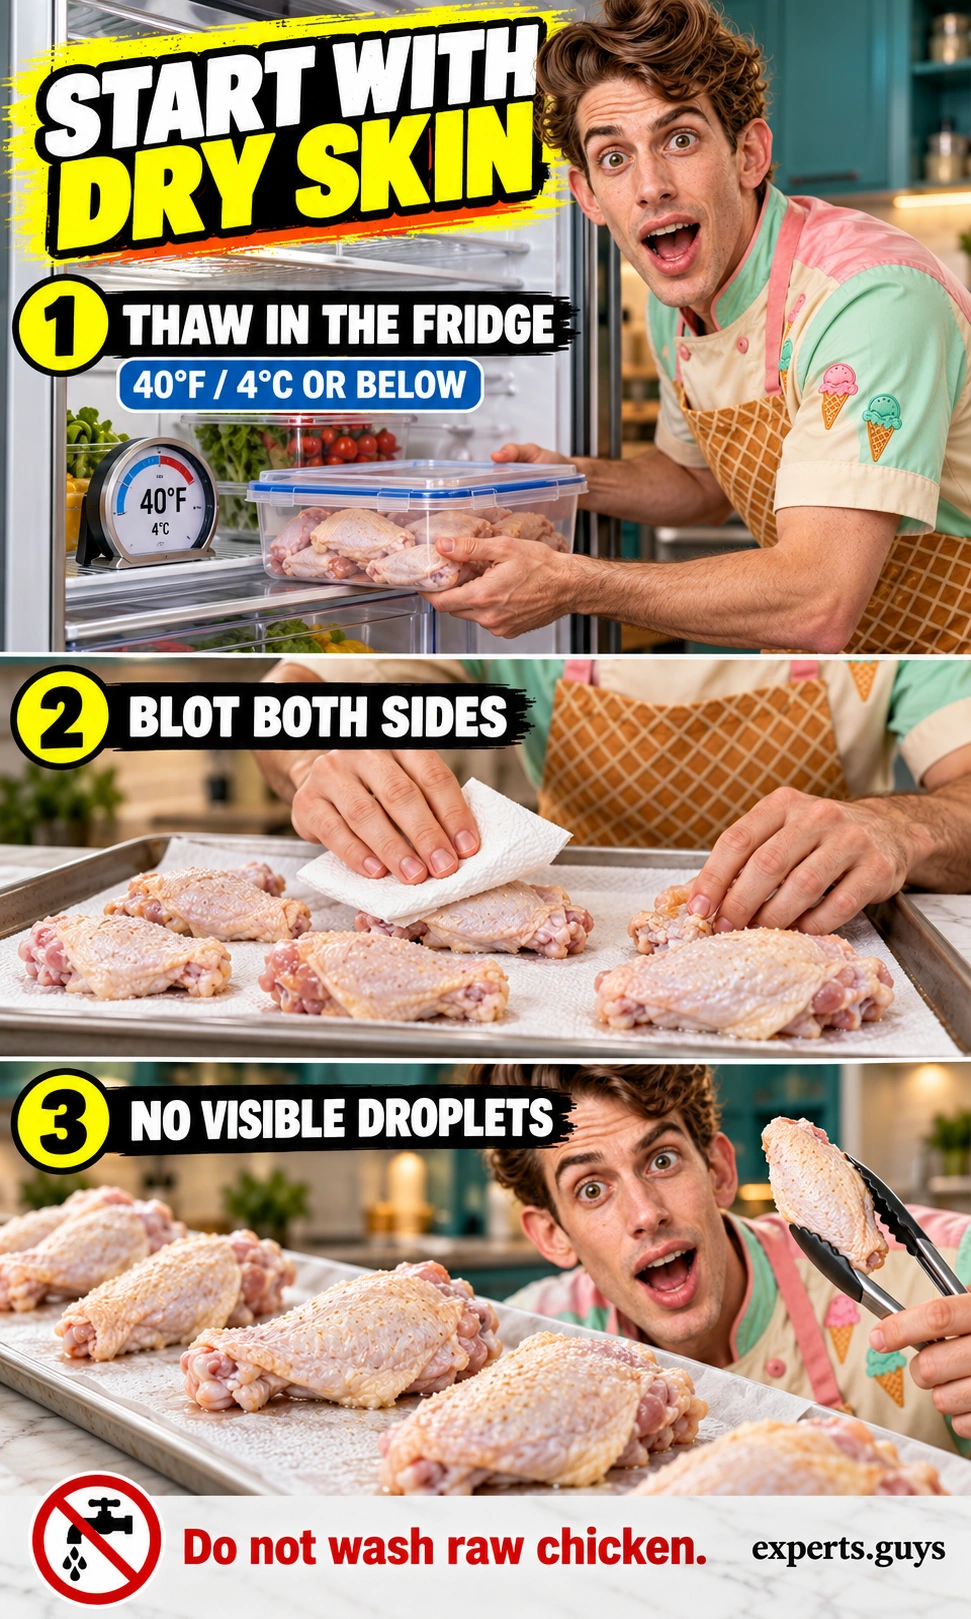
Drying matters because the oven must first evaporate surface water before exposed skin can brown efficiently. An extra spoonful of powder cannot compensate for a puddle of thawing liquid. Keep this a short preparation step and move straight into coating and baking rather than leaving raw chicken out to air-dry.
Measure a thin coating, not a flour crust
Mix the baking powder, salt, garlic powder, paprika and pepper in a small dry bowl before sprinkling them over the wings. Add the mixture in two passes while turning the pieces with tongs. Look for a light, even dusting; break up any visible white clumps instead of adding more powder. Do not rinse the coating off or wet it with hot sauce.
Use baking powder, not baking soda. They behave differently, and a spoon-for-spoon swap can leave an unpleasant alkaline flavor. Baking powder can help create a more blistered surface, but the measured amount is an aid rather than a guarantee of crunch. Aluminum-free powder is a useful flavor preference; accurate measurement still matters. If you do not have baking powder, omit it and keep the drying and spacing steps, accepting a less blistered finish.

What oven setting and tray arrangement should you use?
Preheat the oven fully to 425°F (220°C), conventional bake, with a shelf around the upper-middle position and adequate clearance from the top element. Line the rimmed pan with foil if desired, fit the lightly oiled rack, and place the wings in one layer. Start with the broader skin surface facing upward; no piece should sit on top of another.
Leave visible gaps between the pieces, roughly 1/2 inch (1 cm) where space allows. This is a practical spacing guide, not a laboratory threshold. A smaller batch with exposed edges is more useful than a crowded tray whose wings touch all around. If the batch will not fit, cook it in separate batches and keep the uncooked portion refrigerated until needed.
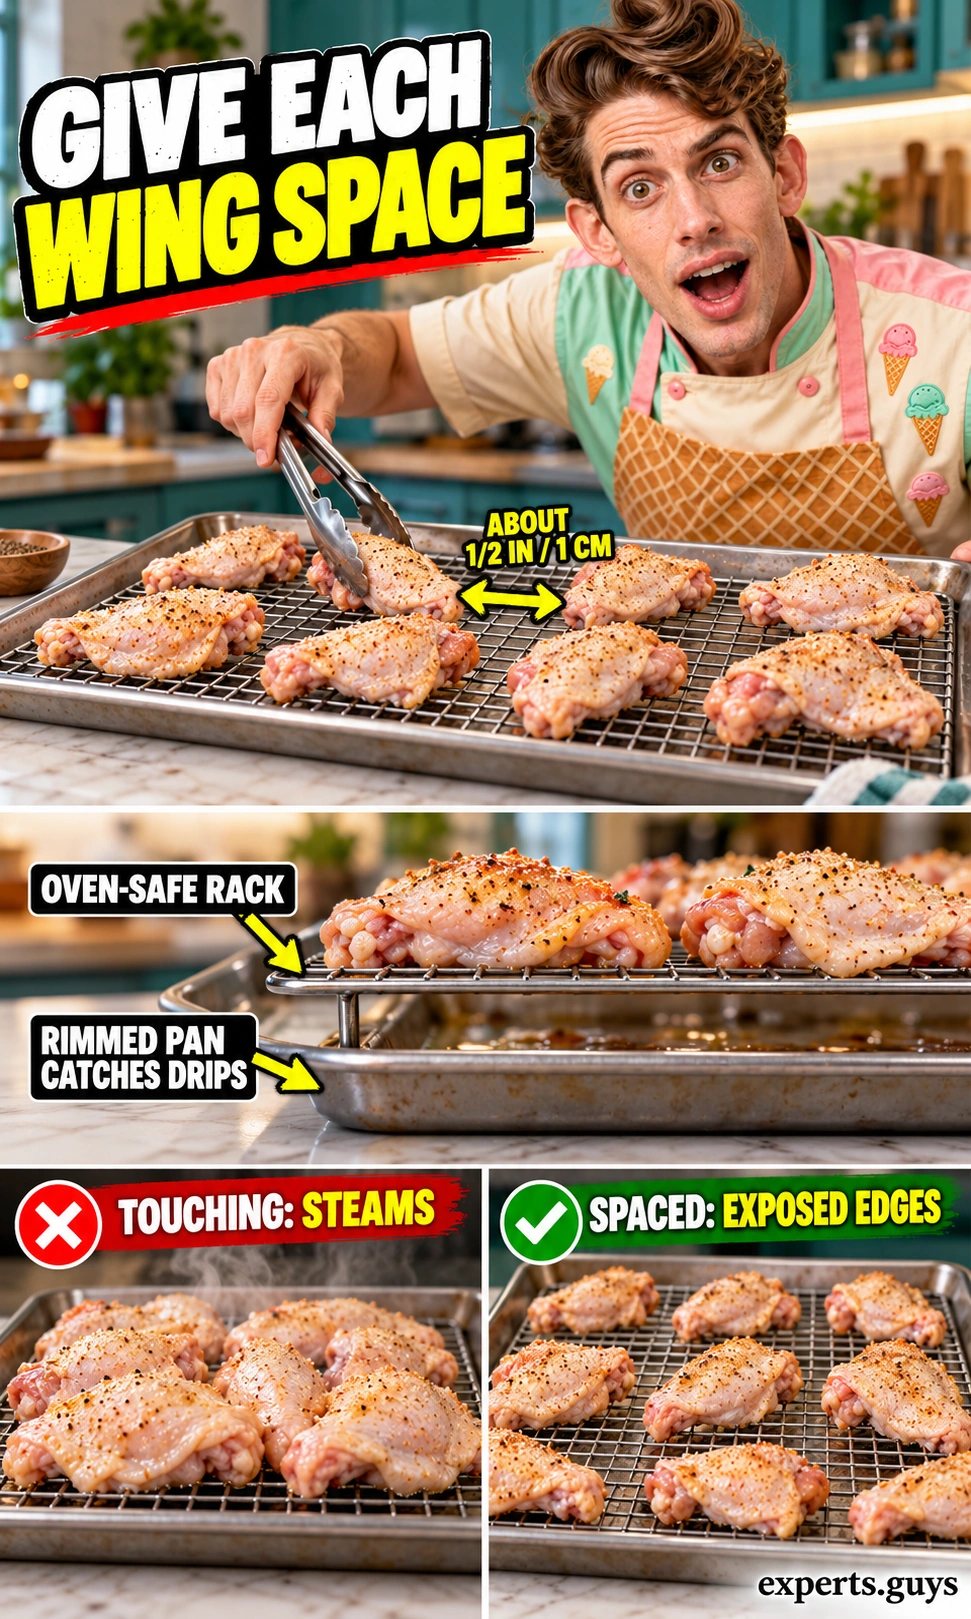
The rack separates the meat from drippings, but it does not make every part of the oven equally hot. A dark pan, a close top element or an oven that runs hot may brown one side early. A fan helps move air, yet it cannot open gaps between touching wings. Check the food itself rather than assuming a convection setting fixes overcrowding.
If your oven uses fan-assisted cooking without automatic temperature conversion, begin around 400°F (200°C) and check sooner. If it automatically lowers the temperature when convection is selected, follow its manual rather than applying a second reduction. Cooking ranges below are planning estimates for thawed separated wings; size, oven behavior and loading can move the finish outside them.
| Setup | Starting setting | When to check |
|---|---|---|
| Conventional oven, one rack | 425°F (220°C) | Turn around 20 minutes; begin temperature checks around 35 minutes. Many batches finish in 40-50 minutes. |
| Fan oven, no automatic conversion | 400°F (200°C) | Turn around 15-20 minutes; begin temperature checks around 30 minutes. Use doneness, not a promised finish time. |
| No oven-safe rack | 425°F (220°C), lightly oiled rimmed metal pan | Spread pieces apart and turn at about 20 minutes. Expect more contact browning and potentially softer undersides. |
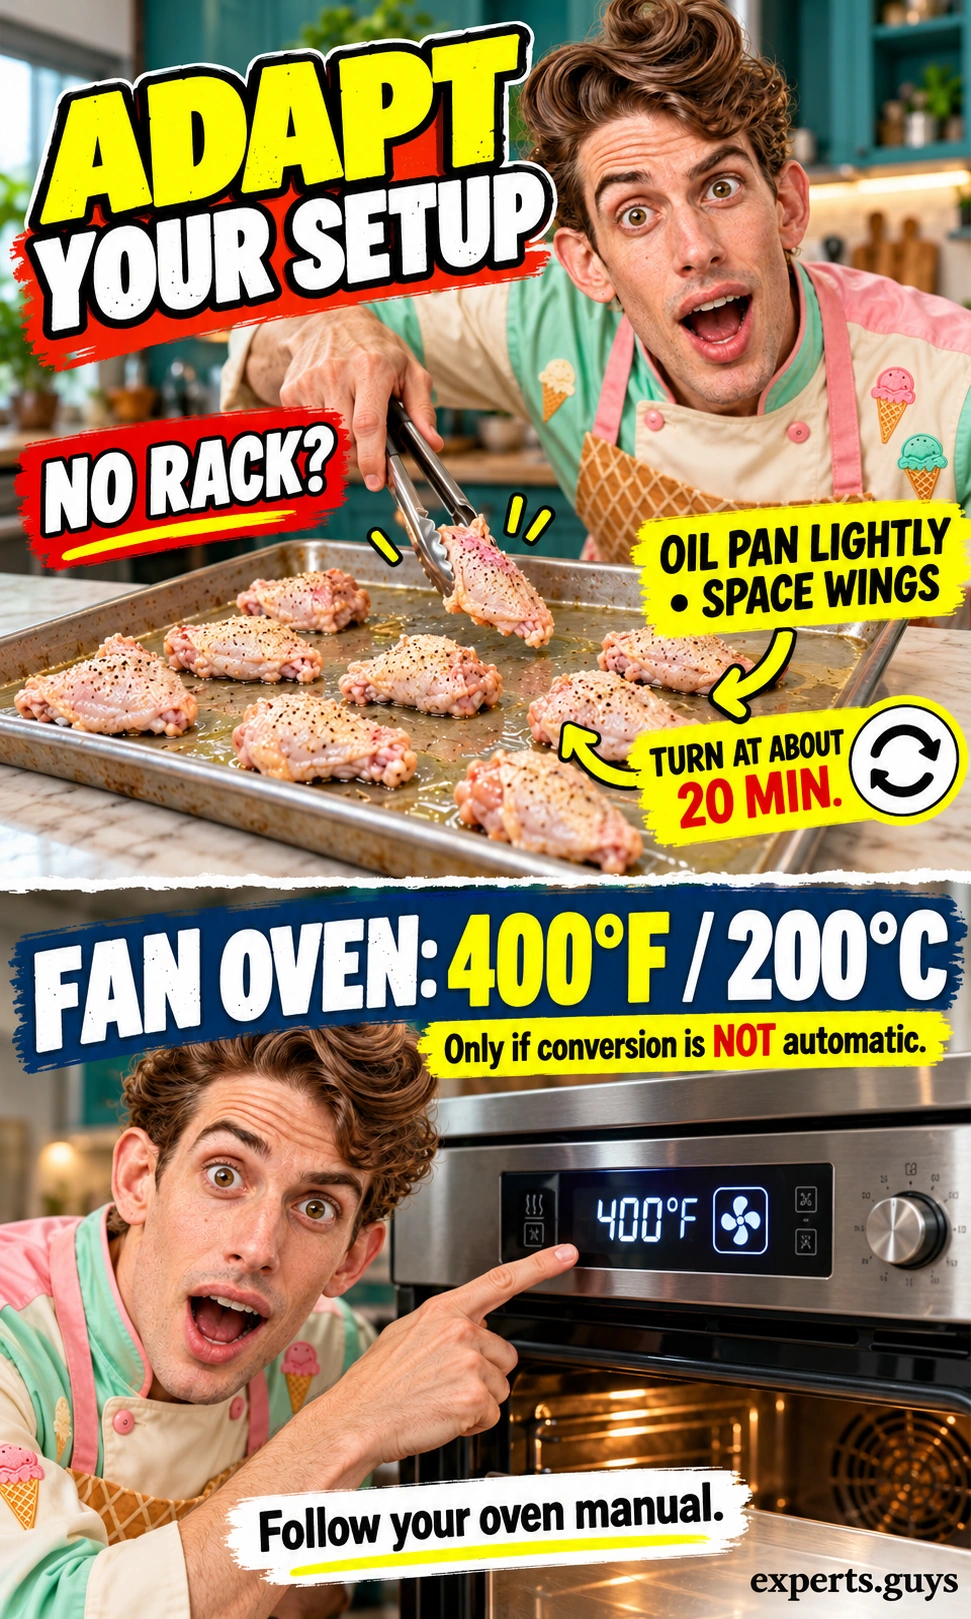
Turn the wings and correct uneven browning
At about 20 minutes, make a turning check rather than leaving the tray untouched until the end. For a fan oven, check a little earlier if the edges already look well browned. Keep your hands clear of the hot rack and pooled fat throughout the sequence.
- Use dry oven mitts to remove the tray and set it on a stable heatproof surface.
- Turn each wing with tongs so its other side is exposed.
- With mitts on, rotate the tray front to back and return it to the oven.
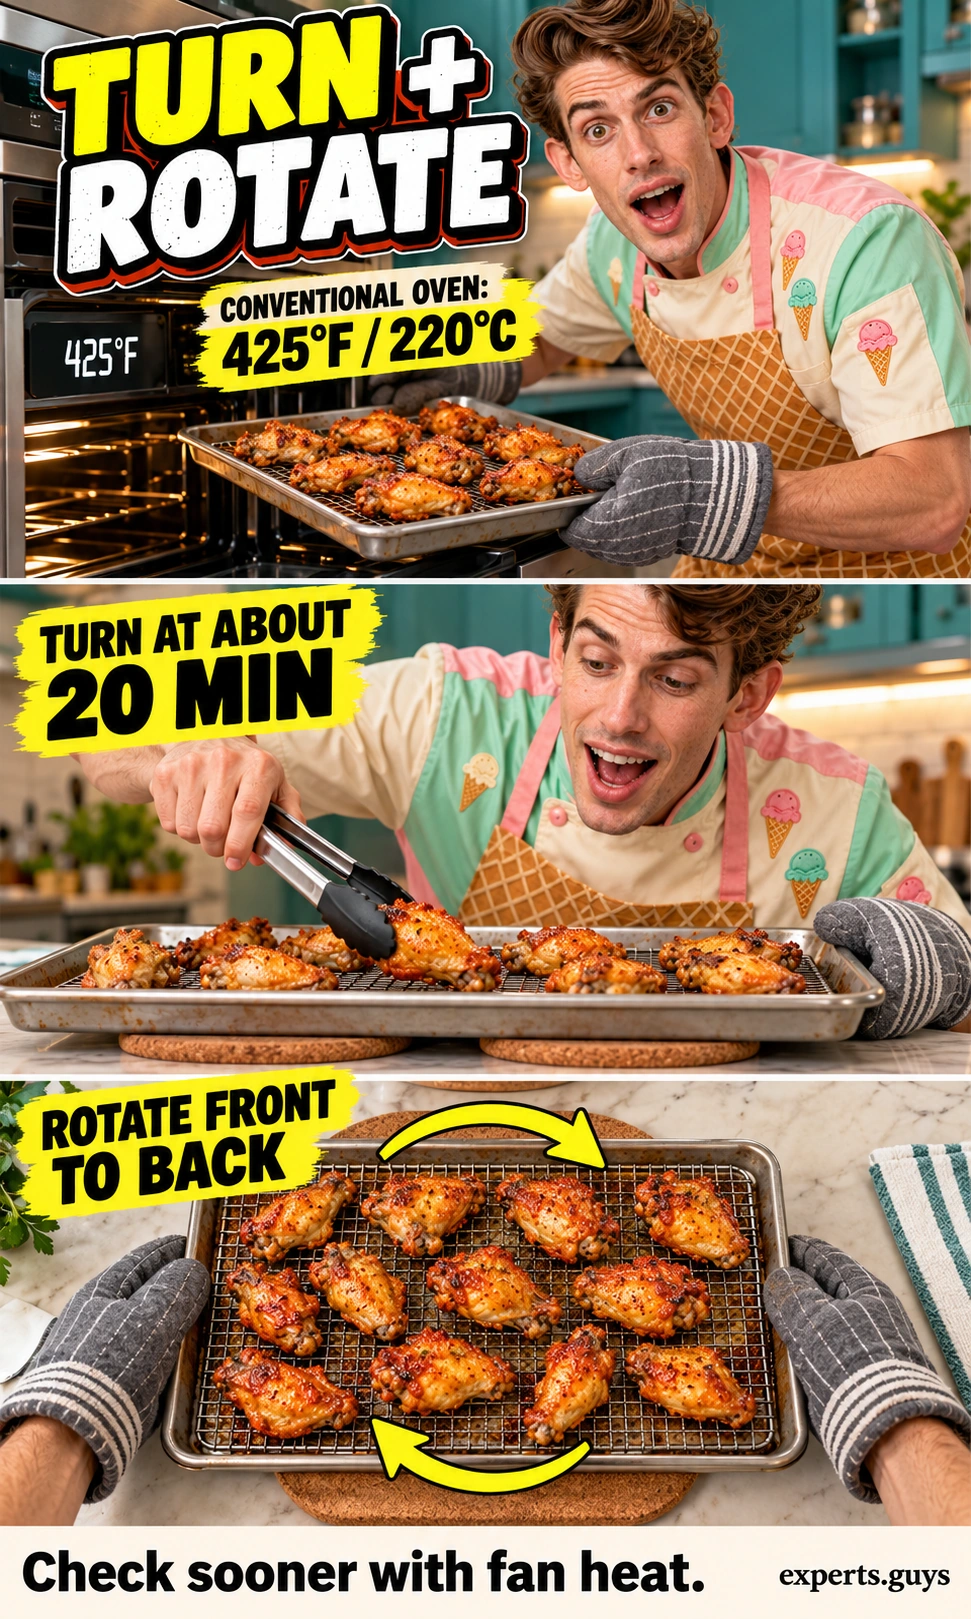
If a wing sticks, slide the tong tips gently under an edge instead of tearing the skin off. On the no-rack version, contact with the pan creates more direct browning, so watch the underside when turning. Do not pour off hot fat while juggling the pan, and do not wipe cooked wings with a towel as a substitute for giving the skin more dry oven time.
A second dish changes how freely heat moves around the wings. If you want an oven-baked potato alongside them, plan its timing separately and leave space around both dishes. Two crowded pans require more attention and possibly longer cooking; doubling the food does not mean doubling the temperature.
How can you tell whether wings are cooked but still need crisping?
Check two different things: the temperature inside the meat and the condition of the skin. Chicken can reach a safe temperature while the surface is still soft. Conversely, a wing can look dark because its seasoning browned while a thicker portion remains undercooked. Neither crispness nor clear juices replaces a thermometer.
Measure the meat, away from the bone
Remove the tray to a heatproof surface. Hold a thick drumette steady with clean tongs and insert the thermometer from the side into the thickest meat, keeping the sensing area away from bone and clear of the rack. Follow the thermometer instructions for insertion depth and wait for the reading to settle. Check several of the largest pieces from different tray positions, including a flat by inserting into its thicker flesh alongside a bone rather than touching it.
Every piece you check must reach at least 165°F (74°C), the minimum internal temperature for poultry. If any reading is lower, return the tray to the oven and recheck after a few minutes. Clean the probe after it touches undercooked chicken and before the next check. A single small wing cannot stand in for every larger piece.
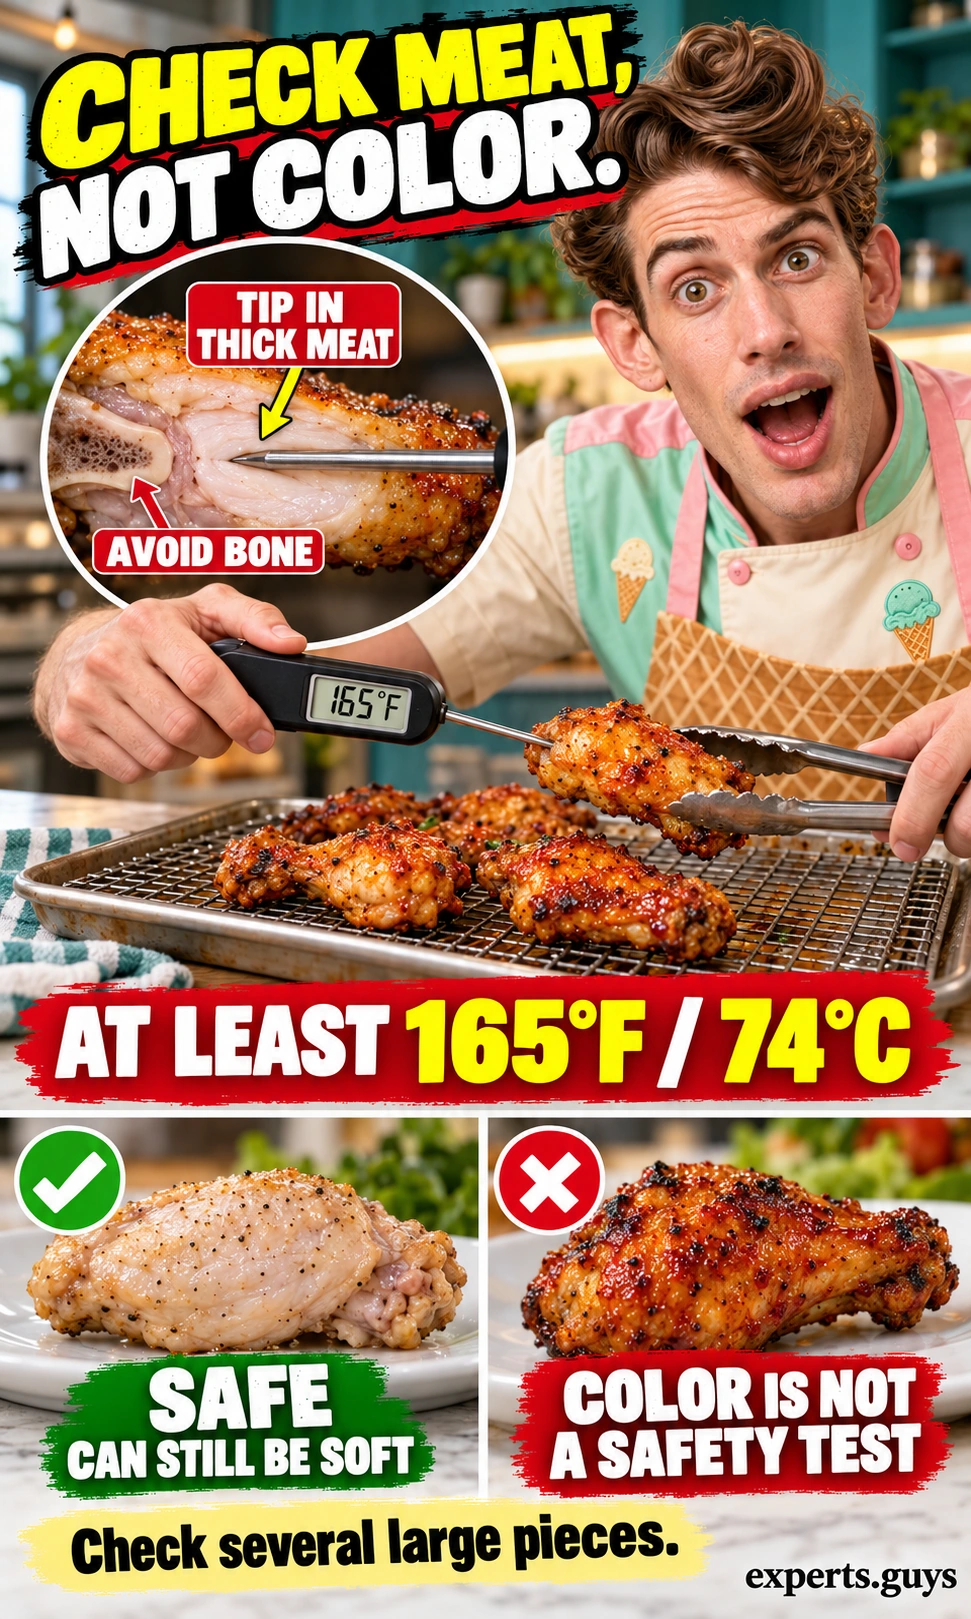
Once the meat has reached the safe minimum, look for skin that is dry-looking, browned and lightly blistered, rather than pale and rubbery. If it needs more texture, leave the wings unsauced and cook for a few more minutes, checking frequently. Wings often tolerate some additional cooking, but there is no need to chase a higher temperature if the texture already suits you.
The most useful correction depends on where the problem appears. Soft skin everywhere points toward moisture or crowding; a pale underside suggests contact conditions; one dark end of the tray suggests uneven heat. Change the condition responsible instead of automatically increasing the temperature. Switching to a fryer or grill is a different cooking method, not a correction you need to make to rescue every oven batch.
| What you notice | What to check | What to do now |
|---|---|---|
| Golden skin, meat below 165°F | Probe placement and thickest pieces | Keep cooking. If browning is becoming excessive, lower the heat slightly and check again; do not sauce or serve yet. |
| Safe temperature, pale or soft skin | Touching pieces, surface moisture, pooled liquid | Separate the wings and continue unsauced for a few minutes. More powder added now will not solve the problem. |
| One end much darker | Tray position and hot spots | Rotate the tray front to back. Check pieces individually as they finish. |
| Brown tops, soft undersides | Fat contact or a crowded rack | Turn the wings and keep the undersides exposed. Use a rack for the next batch if baking directly on a pan. |
| White patches or bitter flavor | Too much powder or a soda substitution | Do not mask a coating mistake with more sauce. Use level measures and the correct product for the next batch. |
Broiling is not required for this method. A fierce top element can darken seasoning before it improves the rest of the skin, and it adds another opportunity to burn a finished batch. A controlled short extension at the baking setting is easier to judge. Stop cooking if the pan begins to smoke excessively; do not keep raising the heat to chase a darker surface.
When should you add sauce, and how should you keep leftovers?
Add sauce only after the wings are cooked and their skin has reached the texture you want. Wet sauce softens a crisp surface, so the goal is a thin coat close to serving. Baking the entire batch under a thick layer of sauce from the start changes the result into sauced roasted chicken rather than crisp-skinned wings.
Make a warm coating and add it gradually
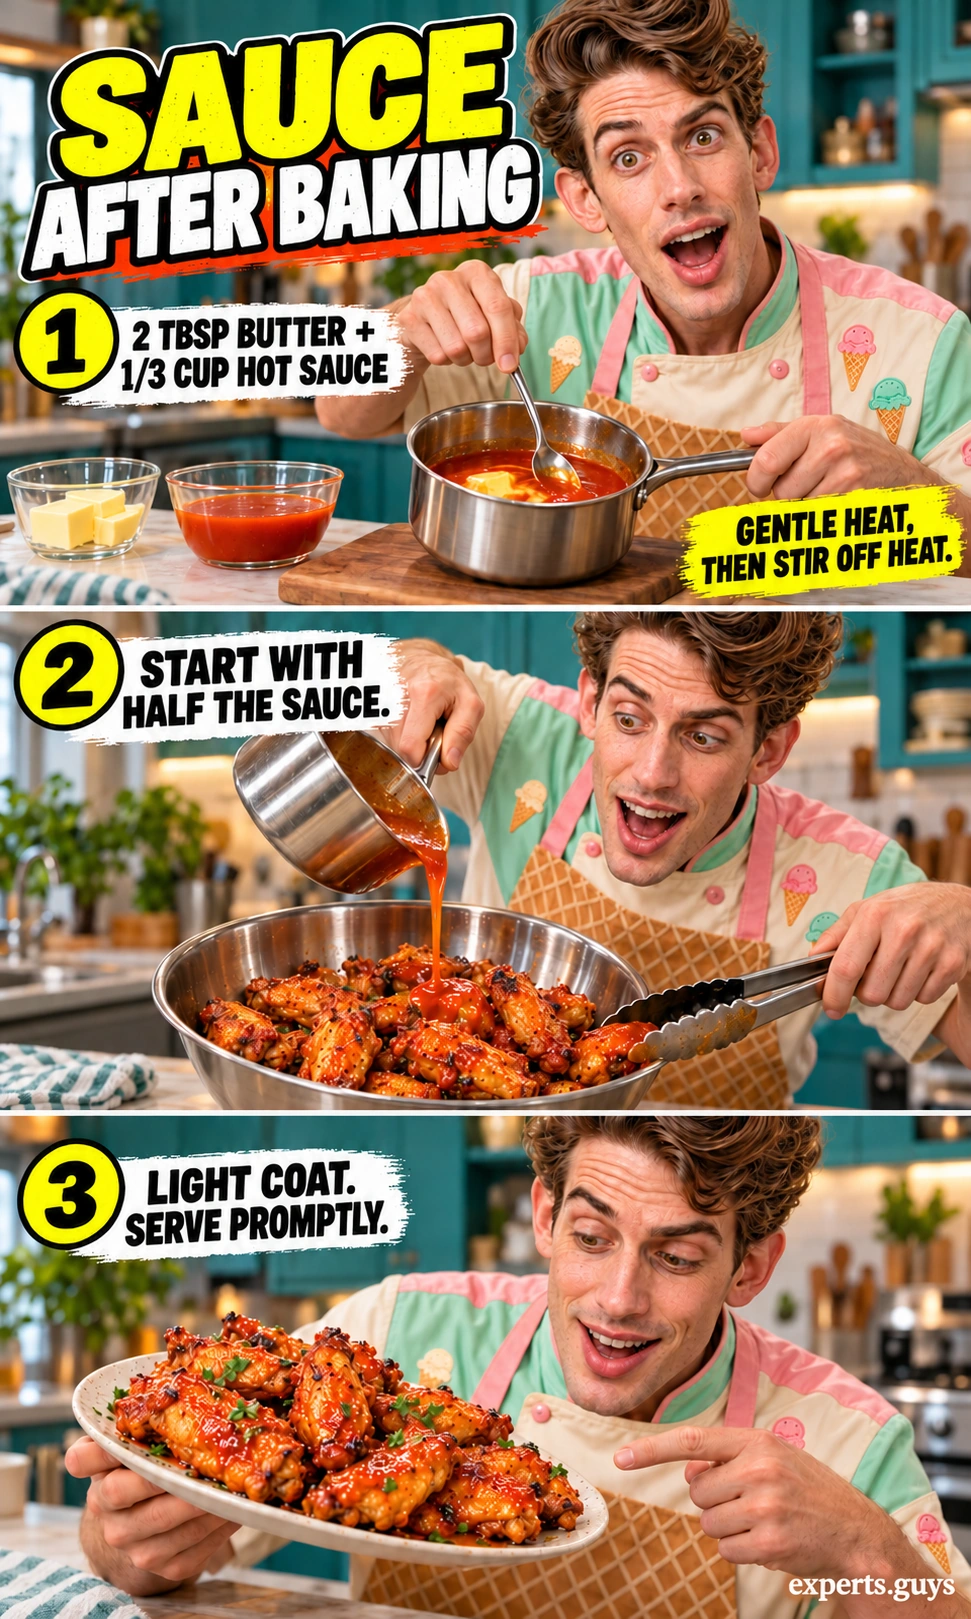
Melt 2 tablespoons of unsalted butter gently in a small saucepan over low heat, then remove it from the heat and stir in 1/3 cup of cayenne-style hot sauce. Keep it warm rather than boiling it hard. This combination supplies a tangy, buttery coating; its heat and salt level depend on the sauce you choose, so taste a little with a clean spoon before it touches the wings.
Transfer the cooked wings to a clean, roomy bowl with clean tongs. Add about half the warm sauce and turn the wings gently until a thin orange sheen covers them. Add more only if you want a heavier coating; serve the remainder separately rather than leaving the wings sitting in a puddle. Transfer promptly to a serving plate and do not cover the plate tightly while people are eating, because trapped steam softens the skin.
For a gentler result, use a hot sauce sold as mild or serve sauce on the side. Adding butter changes richness and dilutes the sauce but does not make an unknown hot sauce predictably mild. A prepared Buffalo wing sauce may already contain the ingredients for a finished coating; check the label before adding butter. Use a suitable dairy-free alternative if needed, and check all ingredient labels when cooking for an allergy.
Sweet glazes behave differently because their sugars can darken quickly. Keep this recipe centered on a late hot-sauce coating rather than adding a second full technique here. Do not assume that a timing written for a late hot-sauce coating will also work for a thick sugary glaze baked from the start.
Chill promptly and reheat with space around the pieces
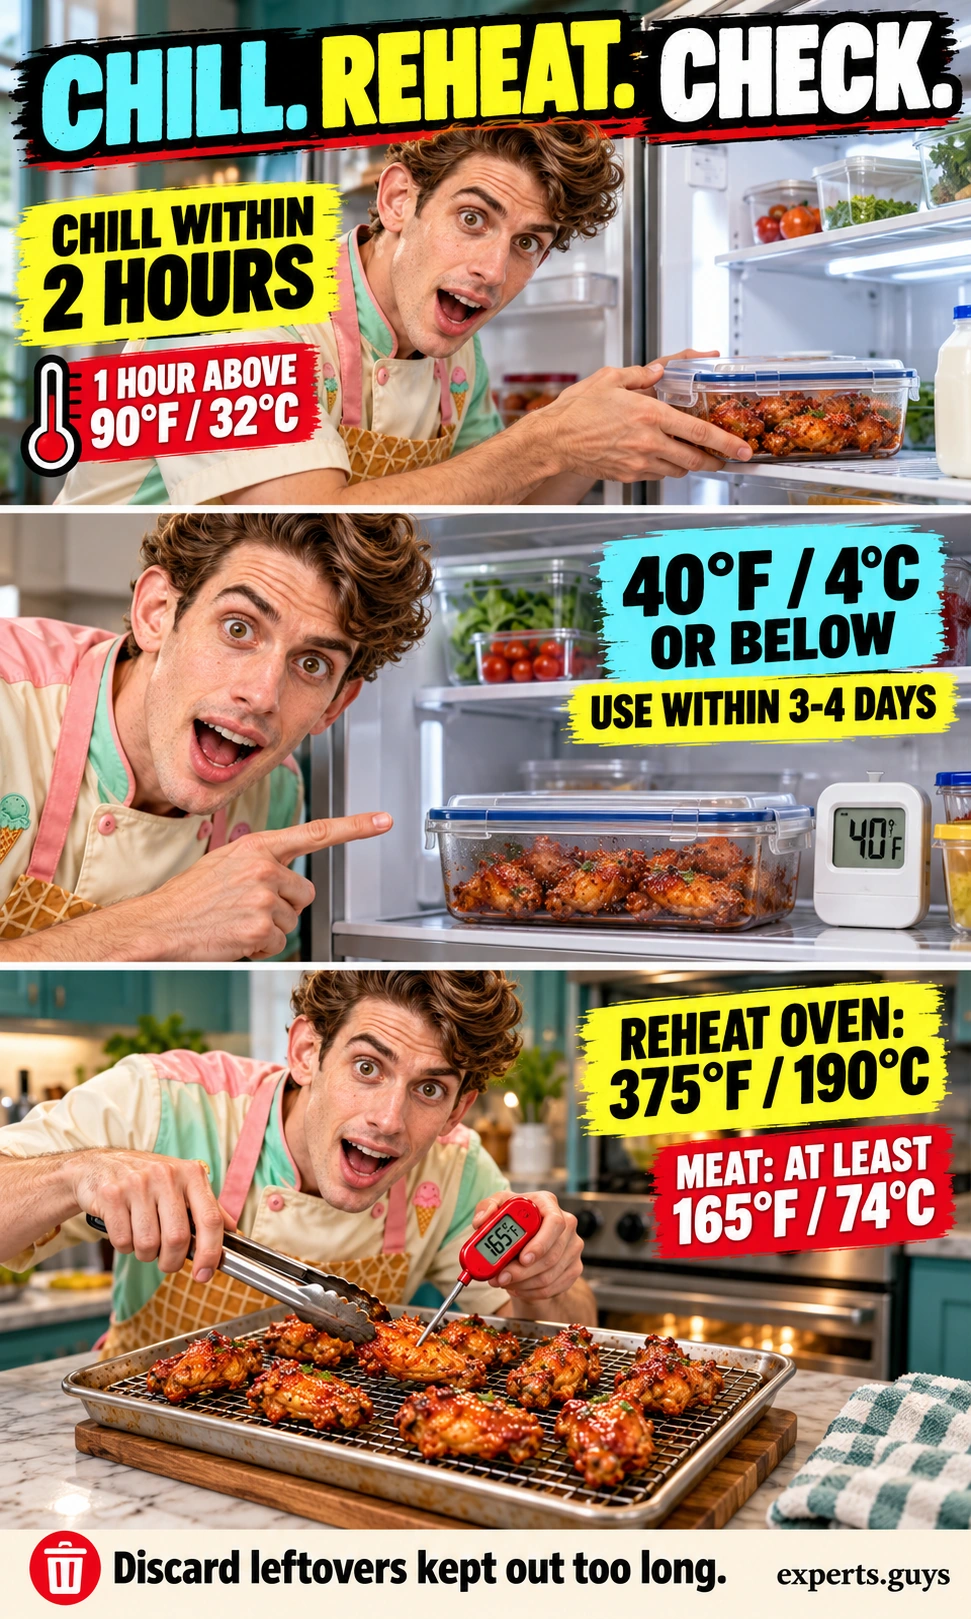
Put leftovers into shallow containers and refrigerate promptly at 40°F (4°C) or below, within two hours of cooking or one hour if the surroundings are above 90°F (32°C). Do not wait for a large bowl of wings to reach room temperature. Use refrigerated cooked wings within three to four days; discard wings left out beyond the safe time limit. Food storage and reheating guidance also explains why small containers cool more reliably.
For refrigerated leftovers, preheat a conventional oven to 375°F (190°C), arrange the wings in one layer on an oven-safe rack over a rimmed tray and reheat until several thick pieces reach at least 165°F (74°C). Begin checking around 10 minutes and continue as needed; cold size and loading determine the actual time. Already-sauced wings can darken sooner, so watch them closely. Reheating cannot make poorly stored chicken safe.
Unsauced leftovers usually give you more control over the final surface than heavily coated ones. Reheat only the portion you plan to eat and apply a fresh light coating afterward if desired. Do not expect the exact texture of a just-baked batch, particularly when the wings were stored with sauce; safe reheating and pleasant texture are related but separate checkpoints.
Frequently asked questions
Can I use flour instead of baking powder?
Flour makes a different coating rather than replacing baking powder directly. For this thin-skin method, leave out the powder if necessary and keep the drying, spacing and temperature checks. Use a dedicated breaded-wing recipe when you want a flour crust.
Can I bake wings straight from frozen?
This recipe is written for fully thawed separated wings, so its timing is not a frozen-wing instruction. Follow the package directions for products intended to cook from frozen, and verify 165°F (74°C) internally. Do not force frozen wings apart with a knife.
Do I need to marinate the wings first?
No marinade is needed for this version. A wet marinade adds surface liquid and changes how quickly the skin dries. Use the measured dry seasoning here and add the hot sauce after cooking.
What if I do not have a thermometer?
Color, smell, cooking time and clear juices cannot reliably confirm that chicken has reached a safe internal temperature. Use a food thermometer for the doneness check rather than guessing from the skin.
Are baked hot wings automatically low-fat?
No. Chicken skin and butter still contribute fat, and the sauce and portion size change the finished meal. Baking avoids a deep-frying step, but it does not make every wing recipe low-fat or low-sodium.
Keep the finish under your control
Make the first batch with fully thawed, well-dried wings, a measured coating and enough tray space to expose the skin. Use the thermometer to decide whether the meat is cooked, then use the surface texture to decide whether it needs a little longer. Finish with a thin coat of warm sauce just before serving.