


Hot wings are chicken wings served with a spicy coating, and four practical ways to cook them are baking, air frying, deep frying and grilling. Choose by the amount that fits your equipment and the finish you want: a larger tray batch, fast-moving hot air, an oil-fried crust or grilled char. These are four useful choices, not an exhaustive count of every possible technique.
| Your priority | Start with | Trade-off to accept |
|---|---|---|
| A larger batch without a fryer of oil | Oven baking | Longer cooking; tray space still limits the load. |
| A small meal with crisp skin | Air frying | Several small loads can take longer than one oven batch. |
| A pronounced fried finish | Deep frying | Hot oil needs continuous attention and safe cooling afterward. |
| Outdoor cooking with char | Grilling | Heat zones and turning need closer control. |
Which cooking method fits your batch and desired finish?
Separate the cooking method from the flavor
Buffalo, barbecue and garlic-chili describe flavor choices; they do not tell you how the meat was cooked. You can put the same ready-to-use hot wing sauce on baked, air-fried, fried or grilled wings. Keeping those decisions separate makes a comparison useful: first choose how to cook the chicken, then choose how to finish it.
This guide concerns fully thawed, separated, skin-on, bone-in flats and drumettes. Whole wings, boneless breast pieces and packaged frozen products can have different cooking requirements. Follow the package directions for prepared products rather than applying a raw-wing timing to anything called a wing.
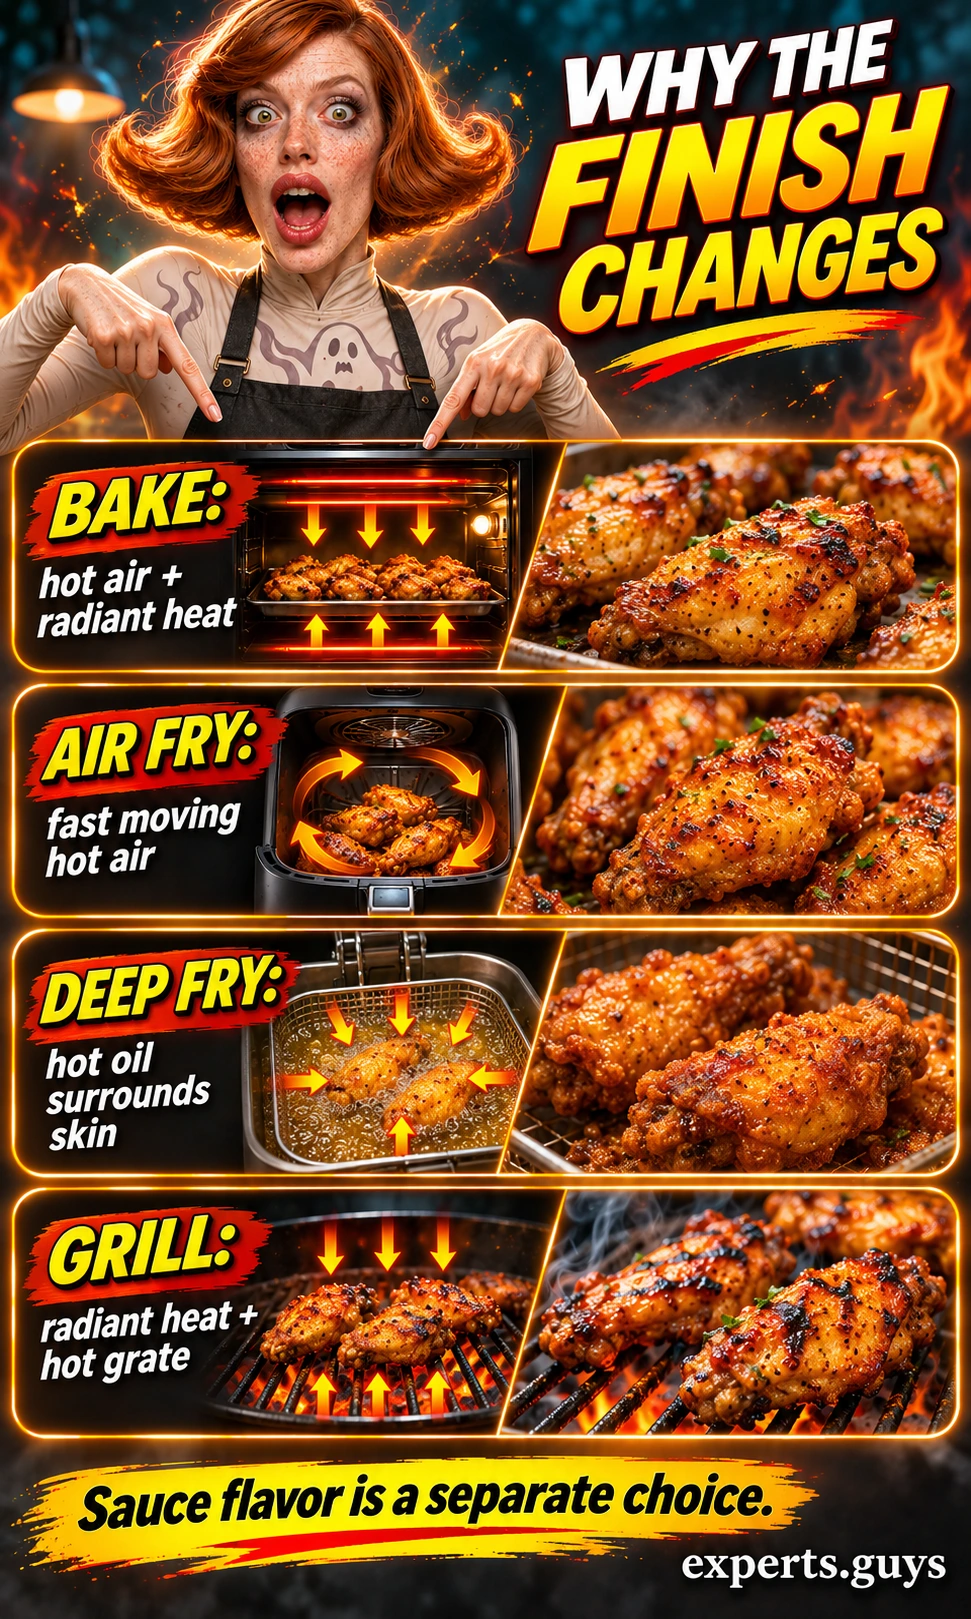
An oven heats through hot air and radiation; an air fryer moves hot air rapidly through a small chamber. Deep frying surrounds the surface with hot oil, while a grill combines radiant heat with contact at the grate. Surface water must escape before crispness develops, so crowding and wet coatings can change the result even when the temperature setting looks right.
Test usable capacity before choosing the appliance
The useful capacity is the space where wings can cook in a reasonably even layer, not the number of quarts printed on a box. Before preheating, use the actual removable basket or tray to see how many pieces fit without piling up. This quick fit check is especially valuable when a small air fryer is competing with a full oven tray.
- Use clean tongs to place a representative group of thawed wings in the cold basket or on the tray. Leave visible gaps; do not wedge pieces into corners or stack a second layer.
- Count the pieces in that comfortable load. Divide the total pieces by that number and round up: 24 pieces with an eight-piece fit means three loads.
- Keep the waiting raw wings refrigerated. If the measured fit creates too many loads for your meal, choose the larger cooking surface before starting.
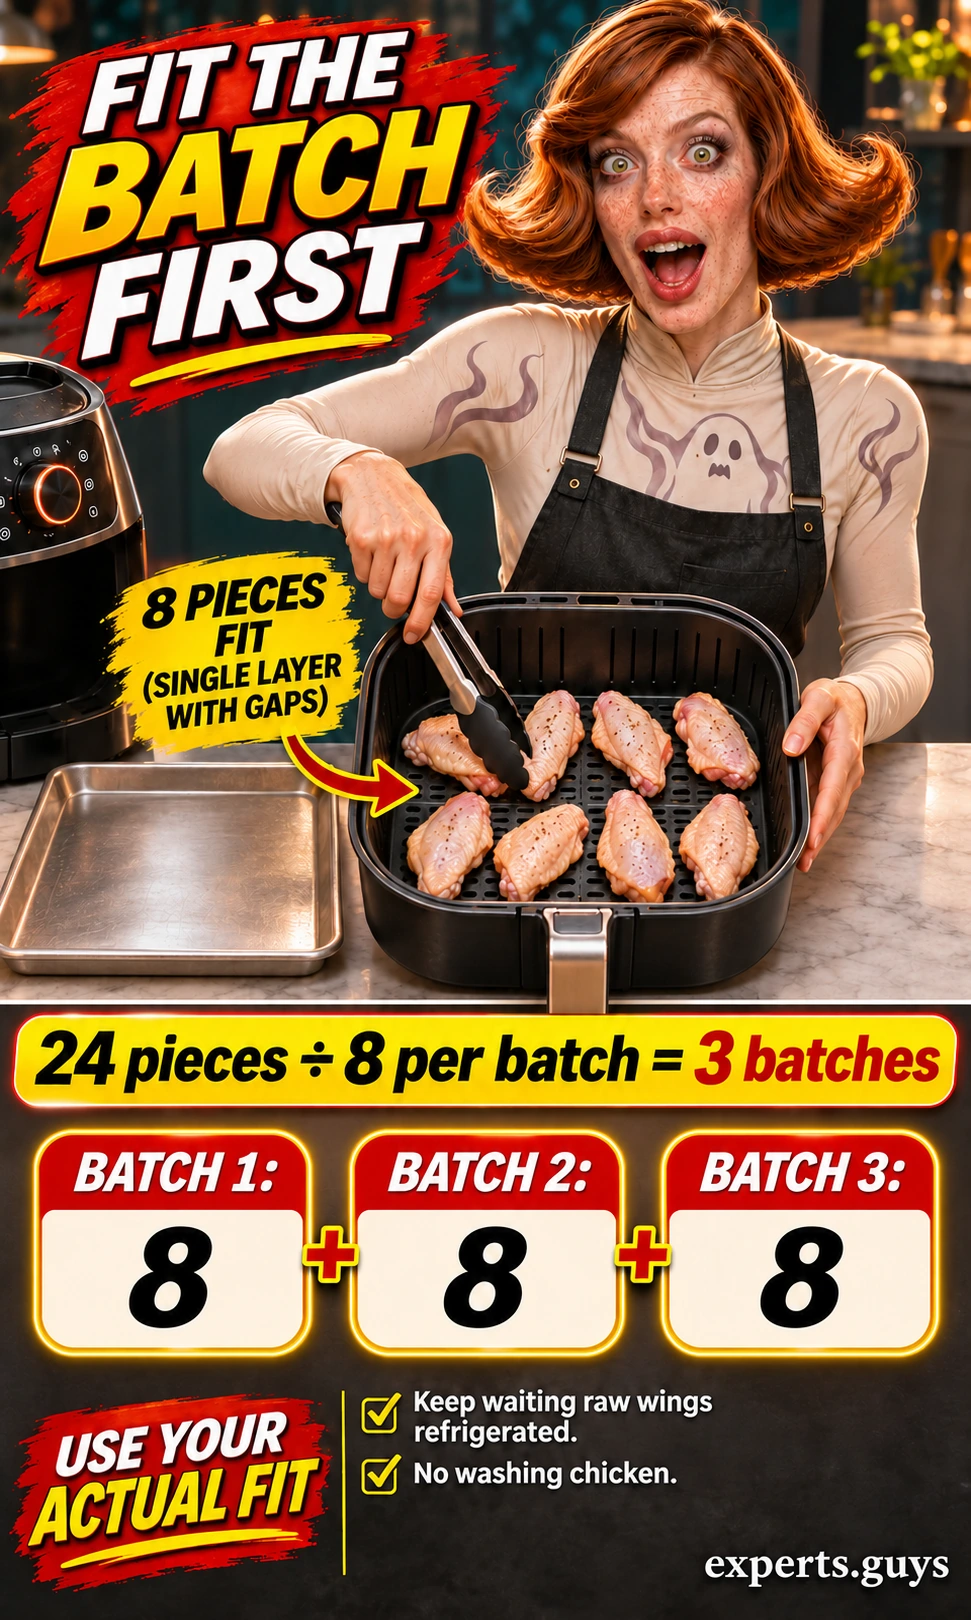
For example, three air-fryer loads taking roughly 25-30 minutes each occupy about 75-90 minutes of cooking time, before preheating and handling. That is arithmetic for a planning example, not a promise for your appliance. A method that is quick per load can still be the slower choice for the whole meal.
With unusually large drumettes, check the fit using those pieces rather than only small flats. The easiest adaptation is to cook a smaller meal, not force a second layer into the basket. For how much chicken to buy rather than how much fits at once, use the separate hot-wing party quantity guide.
How do you control heat with each cooking method?
Start with wings thawed in the refrigerator, kept cold until preparation and blotted free of surface liquid; do not rinse raw chicken. Use separate clean equipment for finished food and wash your hands after raw-poultry contact. A simple baseline is unbreaded wings with no wet marinade, followed by ready-to-use sauce after cooking; it makes the differences between methods easier to judge.
Bake when the tray solves the capacity problem
Baking is the practical choice when a roomy tray can hold the meal in one layer and the air fryer would require repeated loads. It avoids a pot of frying oil, although it does not automatically make every finished serving lower in calories: skin, portions and sauce still matter. For the complete measured coating, rack setup and turning sequence, follow the oven hot-wings method.
Use that recipe as the cooking instruction rather than adding an unrelated air-fryer time to an oven setting. The decision here is capacity: a usable oven tray can beat a small basket for the whole batch, even if an individual basket finishes sooner. A second crowded tray also changes airflow, so it is not a guaranteed shortcut.
Air fry when one or two small loads fit your meal
For a small batch, circulating hot air can dry and brown exposed skin without immersing the wings in oil. Use the basket and any light oiling permitted by your appliance manual; keep vents clear and leave out liners that obstruct the airflow. Start with unbreaded wings and put the hot sauce on after cooking.
- Preheat to 400°F (about 200°C), if your manual calls for preheating. Load one layer with the gaps established in the fit check.
- Turn the wings with tongs about every five minutes. Pull out and support the basket as directed by the manufacturer; keep fingers clear of its hot metal.
- Begin checking the meat around 20 minutes. Many thawed separated-wing batches take about 25-30 minutes, but continue until the meat reaches at least 165°F (74°C).
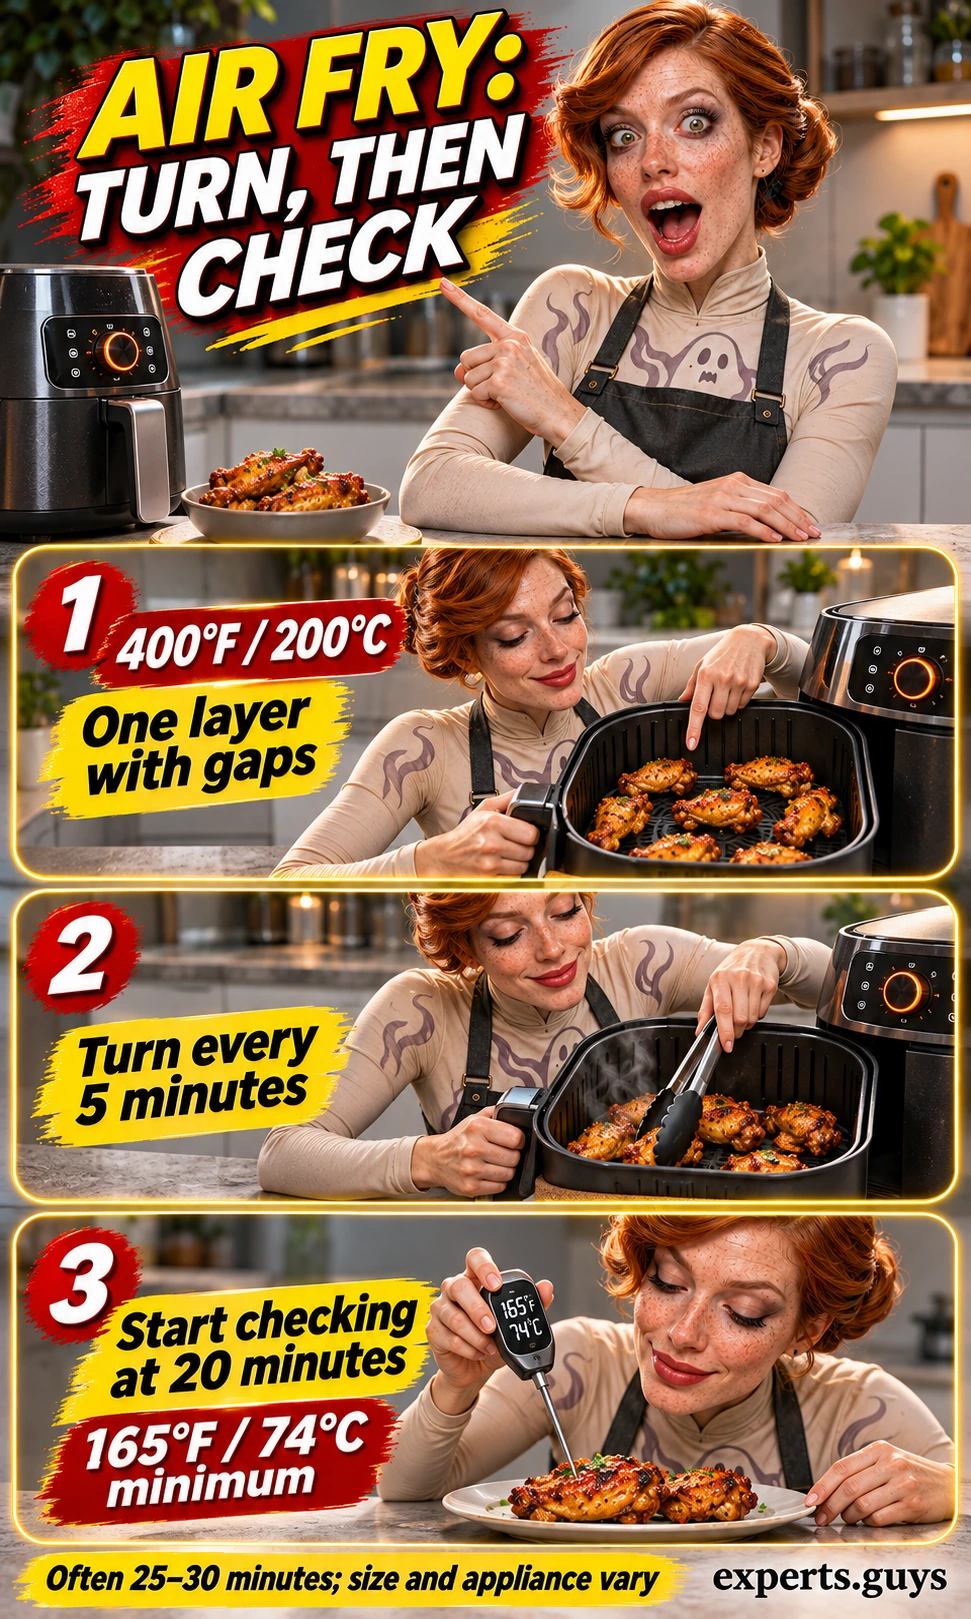
The air-fryer timing reference uses this general temperature and turning approach. Treat the clock as a reminder to inspect, not a substitute for the thermometer. If some pieces finish earlier, remove them with clean utensils and continue cooking the rest; do not wait for every small flat to look like the largest drumette.
Deep fry when you can supervise the oil
Deep frying gives the wing surface direct contact with hot oil, but its speed depends on load size and temperature recovery. A thermostat-controlled electric fryer is a manageable option if you already know its controls. Use a refined oil approved by the fryer instructions, and never fill above the stated limit; the wings displace oil when the basket is lowered.
- Use fully thawed wings with no ice or visible surface water. Set up the dry fryer away from water and follow its filling and basket-loading instructions.
- Heat the oil to 375°F (190°C). Lower a small load slowly using the basket handle; stay with the fryer throughout cooking.
- Use about 10 minutes as an initial inspection point, not guaranteed doneness. Lift and drain the basket, then check thick meat for at least 165°F (74°C). Continue cooking underdone pieces.
- Drain finished wings on a rack over a tray. Let the oil recover to the target setting before the next load, and reduce the load if recovery is slow.
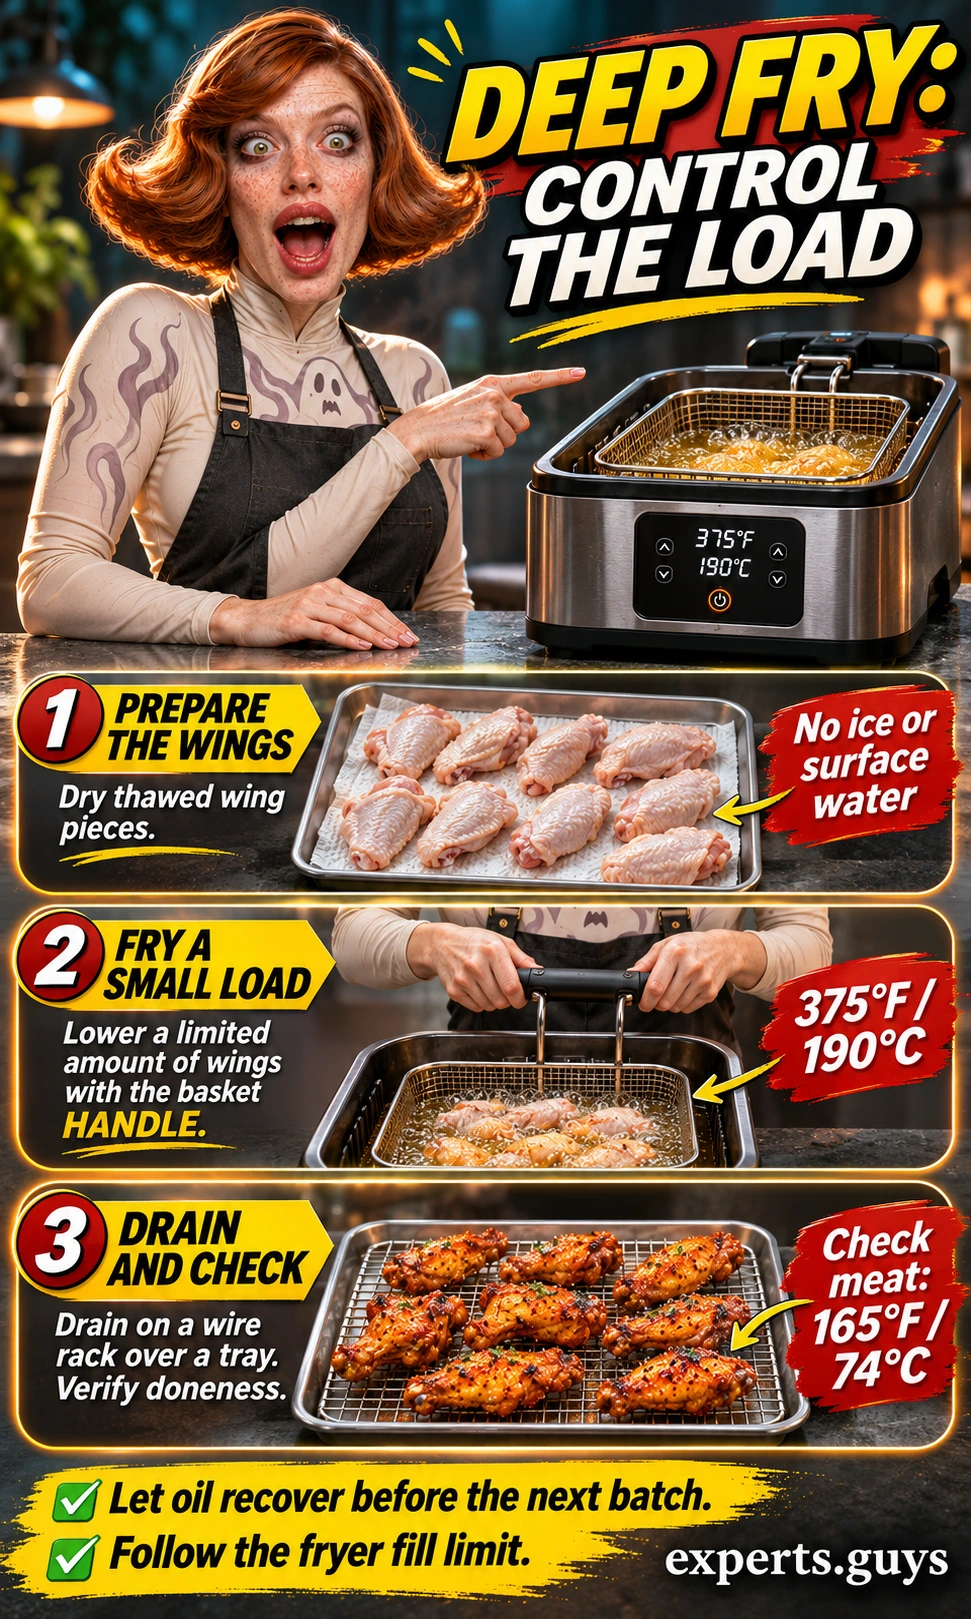
A low reading after loading is a reason to wait for recovery and make the next batch smaller, not to turn the control to its maximum. Never put water into hot oil, leave the fryer unattended or move it while hot. If oil smokes, stop heating safely; if a fire starts, never use water, and leave and call emergency services if it cannot be safely contained. Follow the appliance instructions for cooling and disposal.
The fried-wing starting reference gives 375°F and about 10 minutes, but wing size and fryer performance can change the time. If you cannot supervise hot oil or lack suitable equipment, choose the oven or air fryer rather than improvising a shallow, overfilled pan.
Grill when char matters more than uniform crunch
A two-zone grill separates the job of cooking the center from browning the outside. On a suitable gas grill, create a heated side and a side without a burner directly underneath, following the manual. Use a covered-grill temperature around 375-425°F (190-220°C) as a starting range, with room on the indirect side for the whole load; use outdoor grills outdoors only.
- Place the unbreaded wings over indirect heat and close the lid. Turn periodically with long tongs so one surface does not take all the heat.
- Begin checking thick meat at about 20 minutes; many batches need roughly 25-35 minutes or longer. Continue indirect cooking until the pieces reach at least 165°F (74°C).
- If the safe-to-eat wings need more surface color, move them briefly over direct heat. Turn frequently and watch continuously, stopping as soon as the surface is browned to your liking.
- Move wings back to the indirect side if fat causes flare-ups. Coat with ready-to-use wing sauce after removing them from the grill.
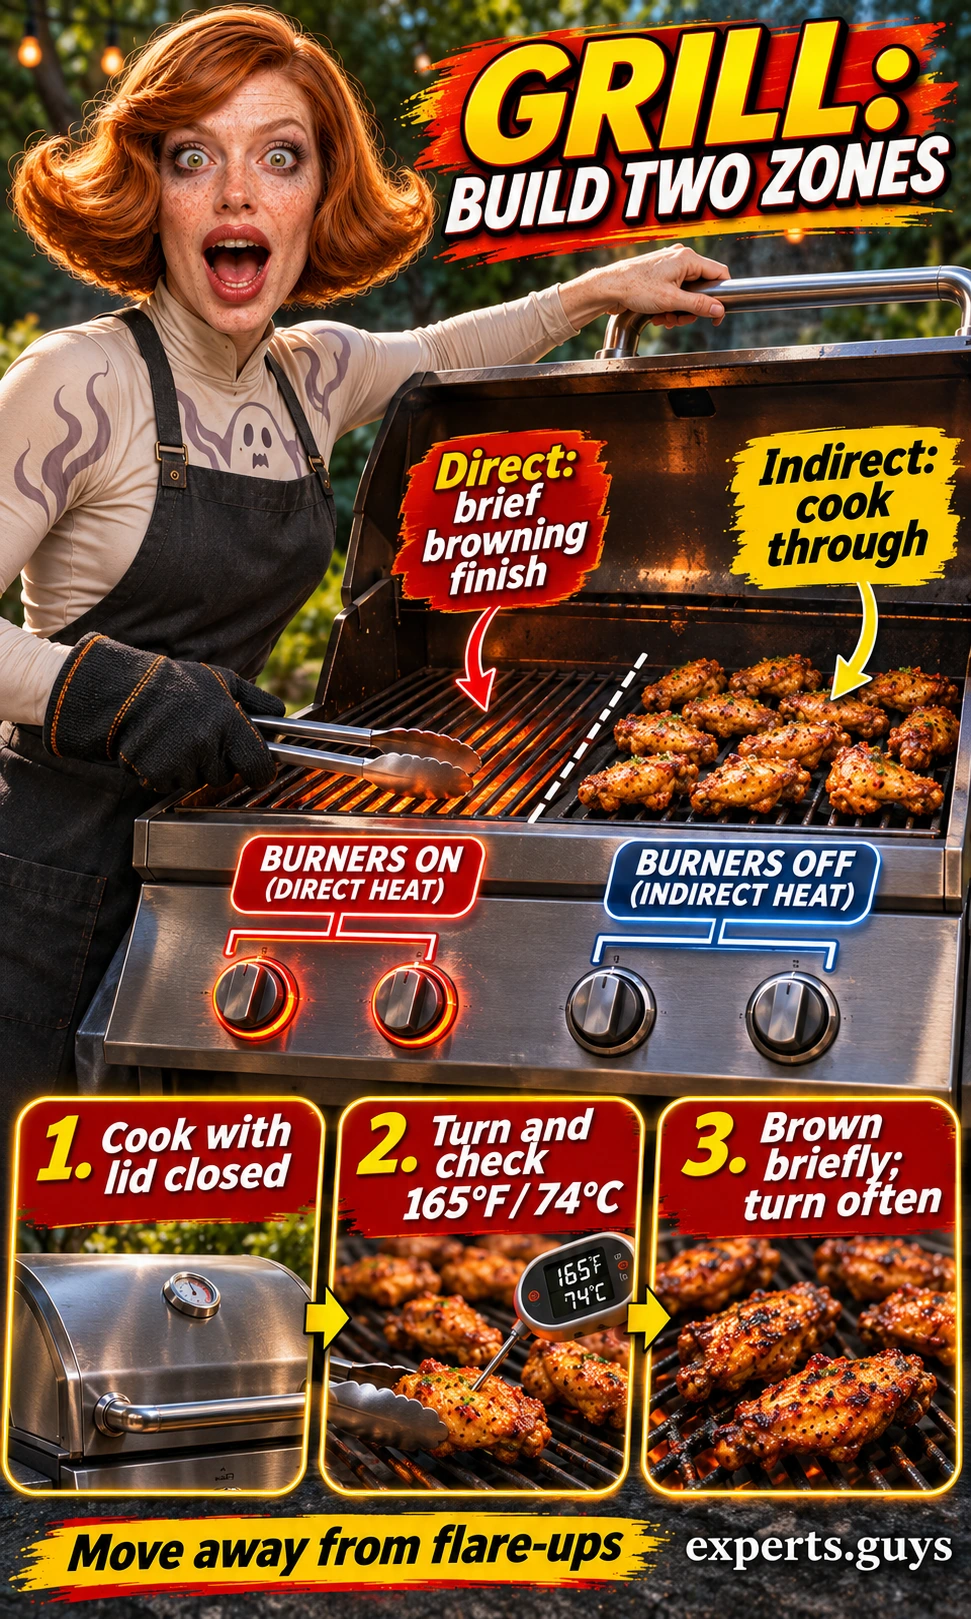
For example, a drumette with a dark patch and an underdone center needs gentler indirect cooking, not another spell directly over the burner. A sweet sauce also darkens quickly, which is why adding it after the grill is the simpler approach here. If your grill cannot provide a dependable indirect area, use the oven route instead of trying to manage the whole cook over an intense hot spot.
How do you add heat without soaking the crust?
Try one cooked wing before coating the batch
The sauce amount that suits a large drumette may overwhelm a small flat. Use a ready-to-use wing sauce for this check; concentrated hot sauce, chili paste and bottled wing sauce are not interchangeable in strength or thickness. The aim is a coating that clings rather than liquid pooling underneath every piece.
- Put one fully cooked wing in a clean small bowl and add one teaspoon of ready-to-use wing sauce.
- Turn it with clean tongs until the sauce spreads. Check the sheen and the amount left in the bowl, then taste only once the cooked wing is cool enough to eat.
- If that coating suits you, use it as a starting proportion for similarly sized pieces. Add sauce to the remaining cooked batch gradually and stop when it is lightly coated.
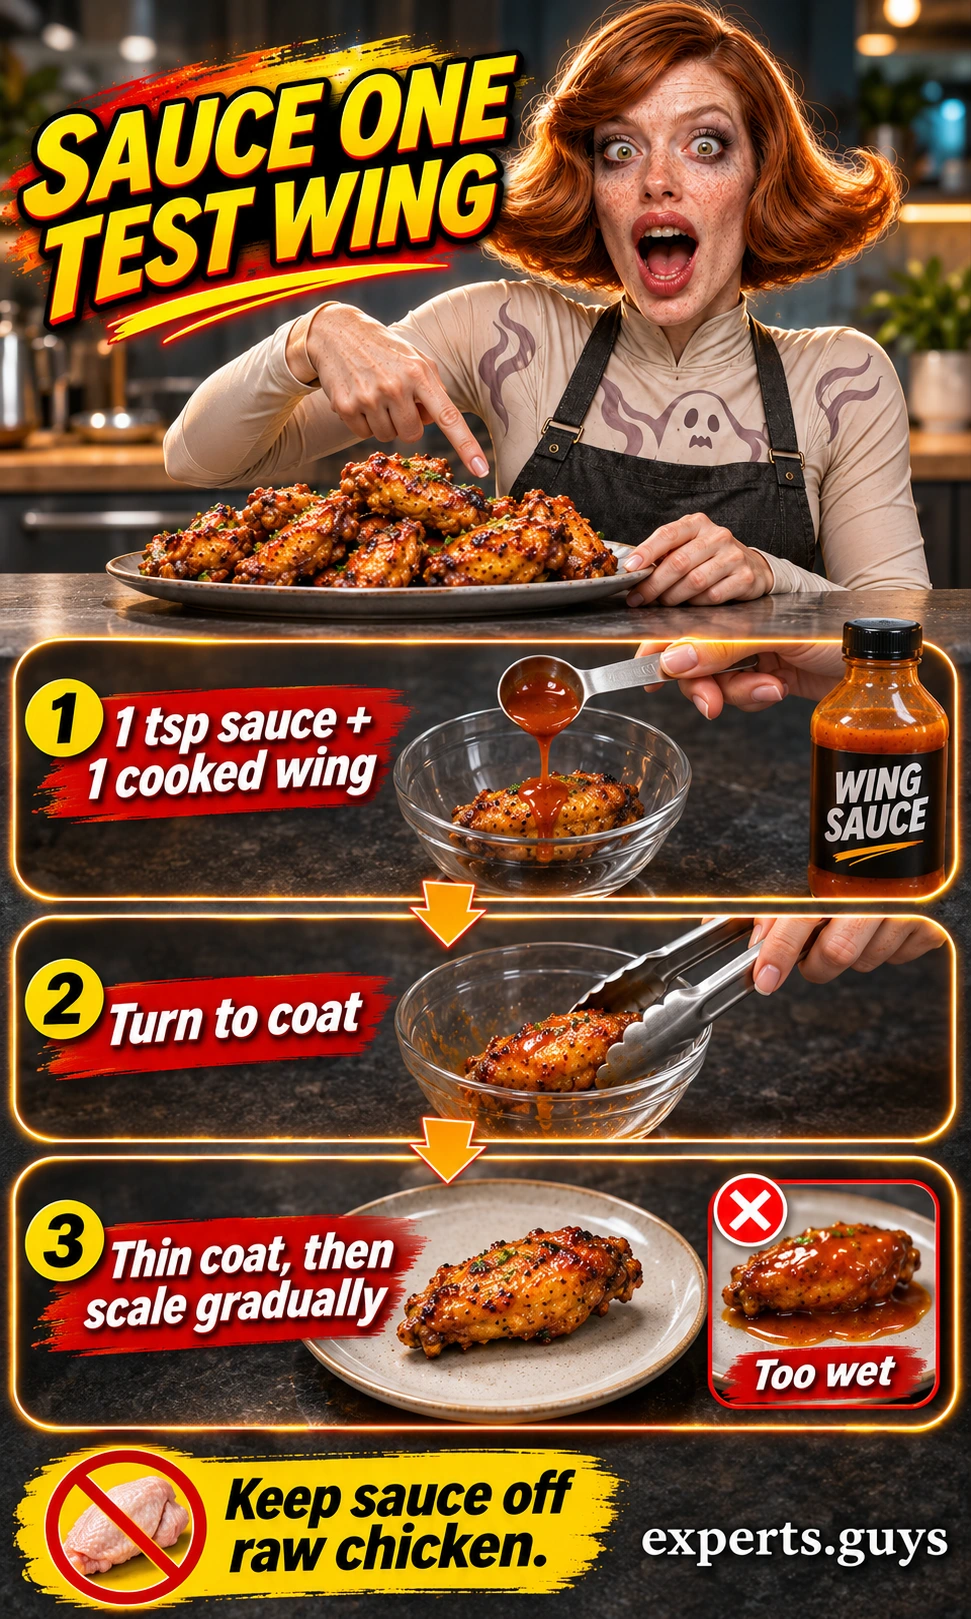
If a teaspoon leaves a puddle, use less on the next piece or choose a thicker ready-to-use sauce. If the flavor is too hot, select a milder sauce for the remaining plain wings; adding sugar does not remove the chili already on the food. Keeping part of the cooked batch plain is easier than trying to undo an entire bowl of overly hot wings.
This test changes sauce coverage, not cooking safety. Keep the sauce and clean bowl separate from raw poultry throughout preparation.
What should you change when the result disappoints?
Confirm doneness before judging the finish
Use a slim-tip instant-read thermometer in the thickest meat, entering from the side when that helps keep the sensing area inside a small wing. Avoid touching bone, and check several pieces, including large drumettes and wings from different parts of the cooking surface. The minimum internal temperature for poultry is 165°F (74°C); brown skin, clear juices and hot oil cannot establish that temperature. Return any underdone pieces to the heat and recheck before serving.
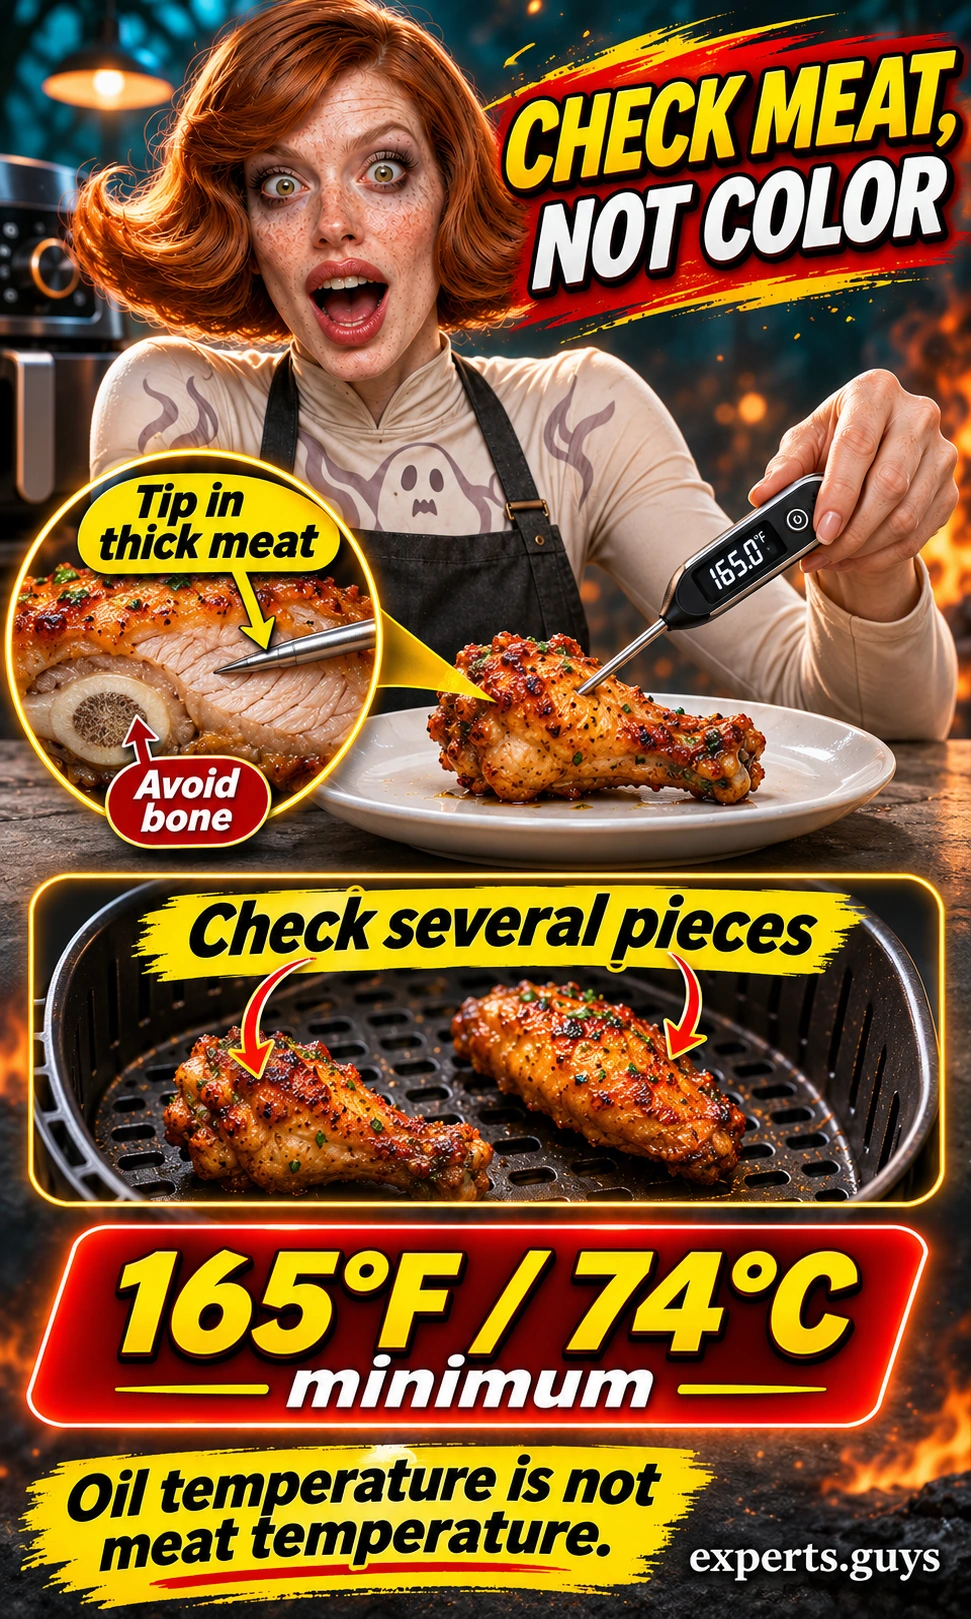
Only compare texture after safety is established. A wing can be safe but have soft skin, or look beautifully browned while the center still needs cooking. Those are different problems, so they need different corrections rather than one universal instruction to turn the heat up.
| What you observe | Likely issue | Useful correction |
|---|---|---|
| Grilled skin darkens before meat reaches 165°F | Direct heat is outpacing the center | Move to indirect heat, close the lid and recheck the meat. |
| Air-fried pieces have pale contact patches | Touching pieces block exposure to moving air | Turn the current pieces; use a smaller, separated load next time. |
| Fryer temperature recovers slowly after loading | Too much cold food for the oil and heater | Keep supervising; let oil recover and make the next load smaller. |
| Wings soften immediately after coating | Too much liquid coats the skin | Use the one-wing sauce test and coat only what will be served now. |
| Small flats dry while large drumettes finish | Different sizes reach the endpoint at different times | Check separately and remove finished pieces using clean utensils. |
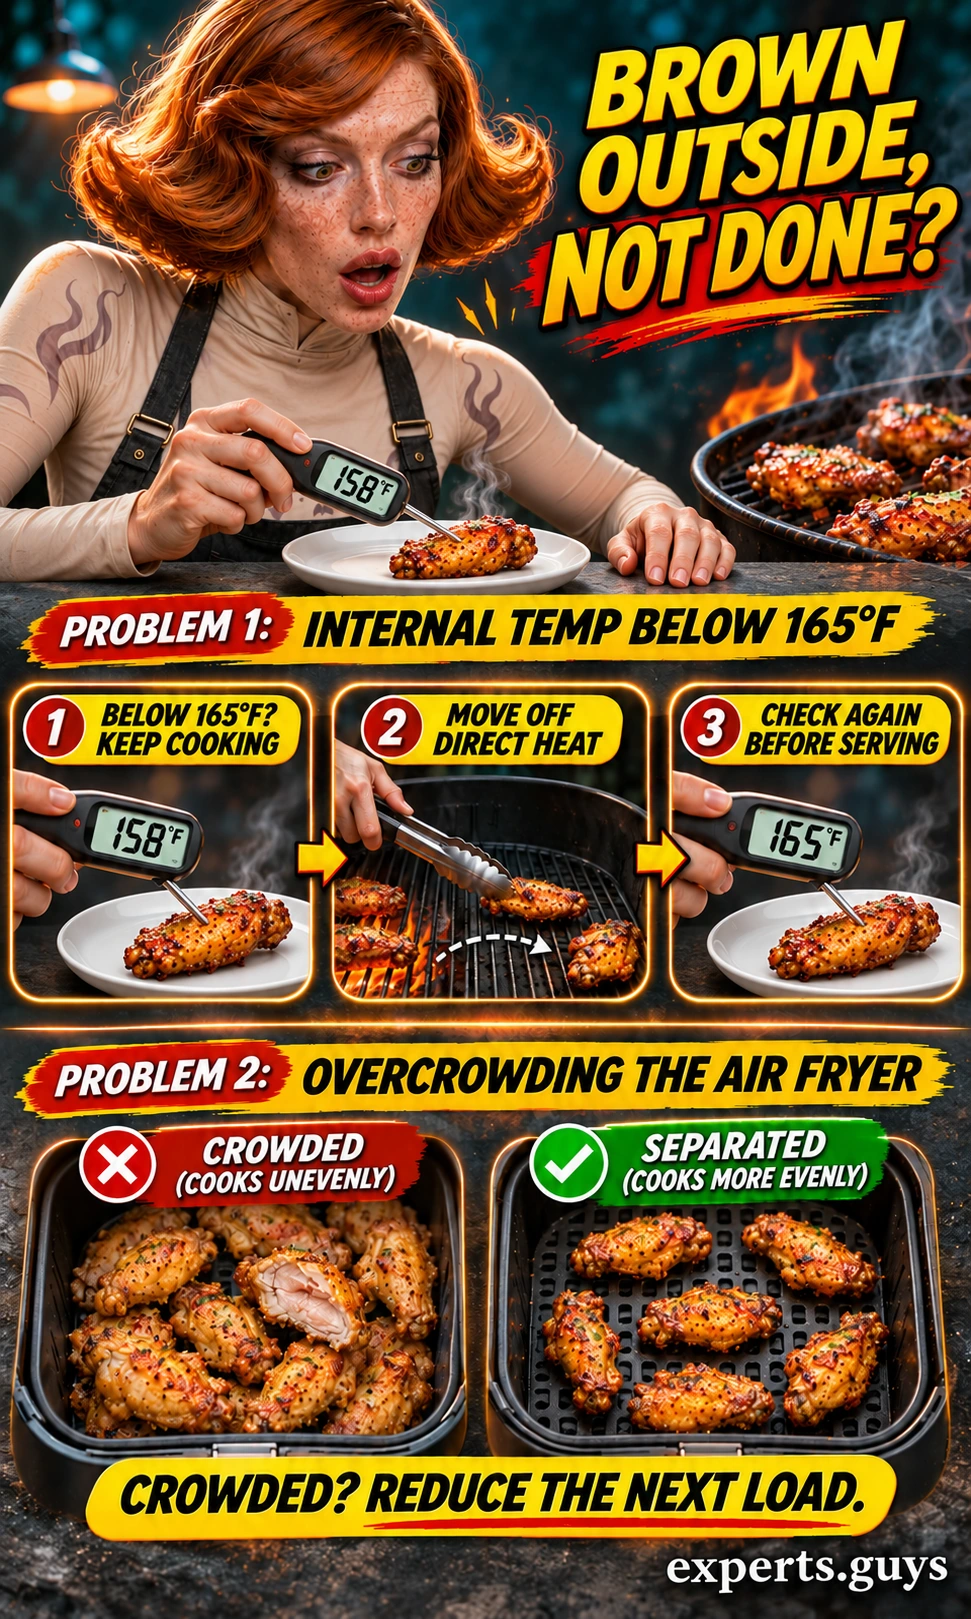
For a fair comparison on a later meal, keep the wing size and sauce similar and change the cooking method. Otherwise a heavier sauce or larger piece can disguise what the appliance actually changed. You do not need a score sheet: decide whether the batch fit, whether the meat reached temperature and whether you liked the skin before and after sauce.
Frequently asked questions
Are there only four ways to make hot wings?
No. Smoking, broiling and combination methods also exist. Four is a useful comparison of common home-cooking choices, not a scientific limit on the number of techniques.
Is an air fryer the same as deep frying?
No. An air fryer cooks with moving hot air; a deep fryer immerses food in hot oil. They can both produce browned wings, but the cooking environment, loading limits and handling requirements differ.
Can I use these times for frozen or boneless wings?
Not interchangeably. This guide uses thawed, separated bone-in wings. Follow the package or a recipe written for your frozen or boneless product, and check the appropriate internal temperature rather than borrowing a time from a different cut.
Should I remove the bones before grilling?
No. Bone-in flats and drumettes can be grilled as they are. Deboning changes the preparation and is not necessary for the two-zone method.
Does the lowest-oil method always make the healthiest meal?
No single cooking label decides that. The amount eaten, skin, added oil, sauce and accompaniments all affect the meal. Baking or air frying avoids immersion in frying oil, but that alone is not a complete nutritional comparison.
Choose the method your batch can actually use
Check the usable cooking space first. Choose the oven for a roomy tray batch, the air fryer for manageable small loads, deep frying when you can supervise the oil, or a two-zone grill for char. Then verify doneness and test the sauce on one cooked wing before committing the whole batch.