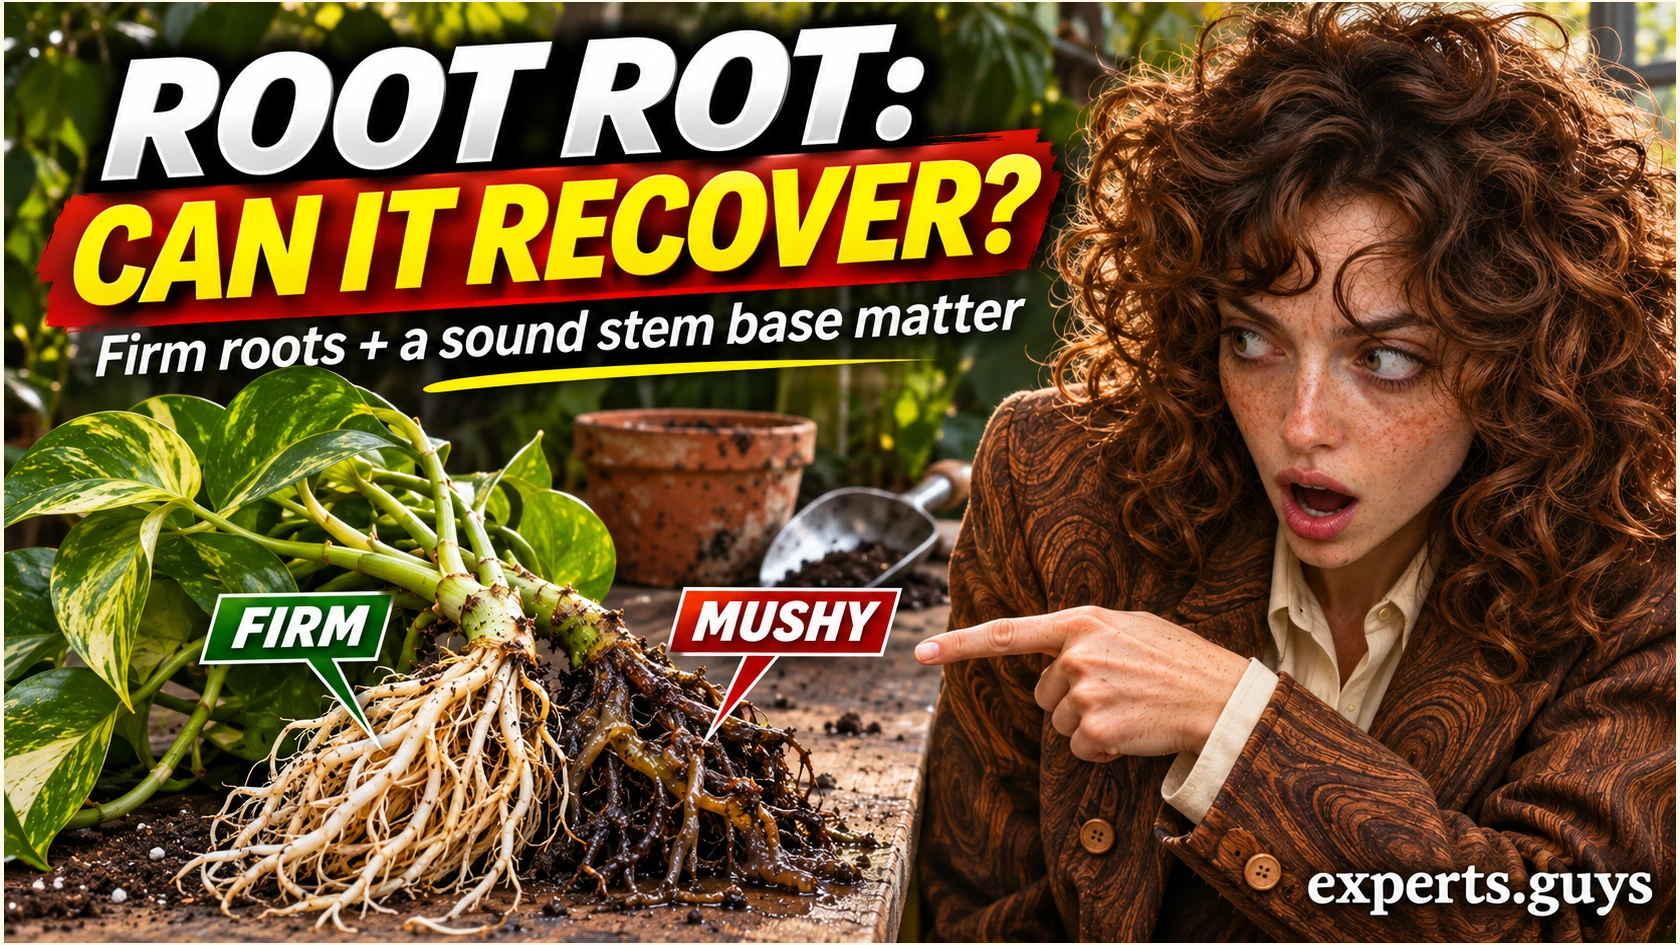
A plant with root rot can recover if enough living root and stem tissue remains, but decayed roots do not turn healthy again. The useful decision is whether to rebuild the original plant, preserve a healthy cutting, or stop because no viable growing tissue remains.
For a potted houseplant, start with the connection between surviving roots and a sound stem base. A green canopy is encouraging, but it cannot tell you whether that connection is intact; equally, losing several leaves does not prove the plant is beyond saving.
This guide focuses on that rescue decision and the adjustments needed after substantial root loss. The worked example uses pothos, a vine that can grow from a suitable stem cutting. Do not apply its cutting method to palms, orchids, bulbs or mature landscape trees without checking the plant’s biology.
What determines whether the original plant can recover?
Look for living roots attached to firm central tissue and at least one viable growing point. These features make a rescue attempt reasonable; they do not provide a survival percentage. A soft, collapsing stem base changes the decision more than an untidy root ball does.
Root rot describes tissue deterioration associated with several possible organisms and growing conditions. A home inspection can identify obviously failed tissue, but it cannot reliably name the pathogen or reveal every internal infection. Treat the following routes as practical choices under uncertainty, not a laboratory diagnosis.
Swipe horizontally to compare if needed.
| What remains | Reasonable route | What changes the decision |
|---|---|---|
| Firm roots, firm base, living growth point | Attempt whole-plant recovery | New softness or collapse means reassess rather than keep watering. |
| Few firm roots, firm base, healthy vine available | Consider rescue plus one backup cutting | Only take material the species can propagate; avoid stripping the parent. |
| Failed roots or lower stem, separate healthy stem section | Consider propagation instead of relying on the old base | The cutting must contain appropriate growing tissue and no visible decay. |
| Collapsed essential base and no healthy propagatable section | Discard the failed plant material | Do not retain rotting tissue simply because a leaf is still green. |
1. Inspect the living connection without pulling the plant apart
Use this check when persistent wetness and decline justify examining the roots, or when the plant is already out of its pot. If your only concern is one yellow leaf, first use the less disruptive checks in the guide to early root-rot signs. Unpotting is a decision with a cost: it can damage roots you are trying to preserve.
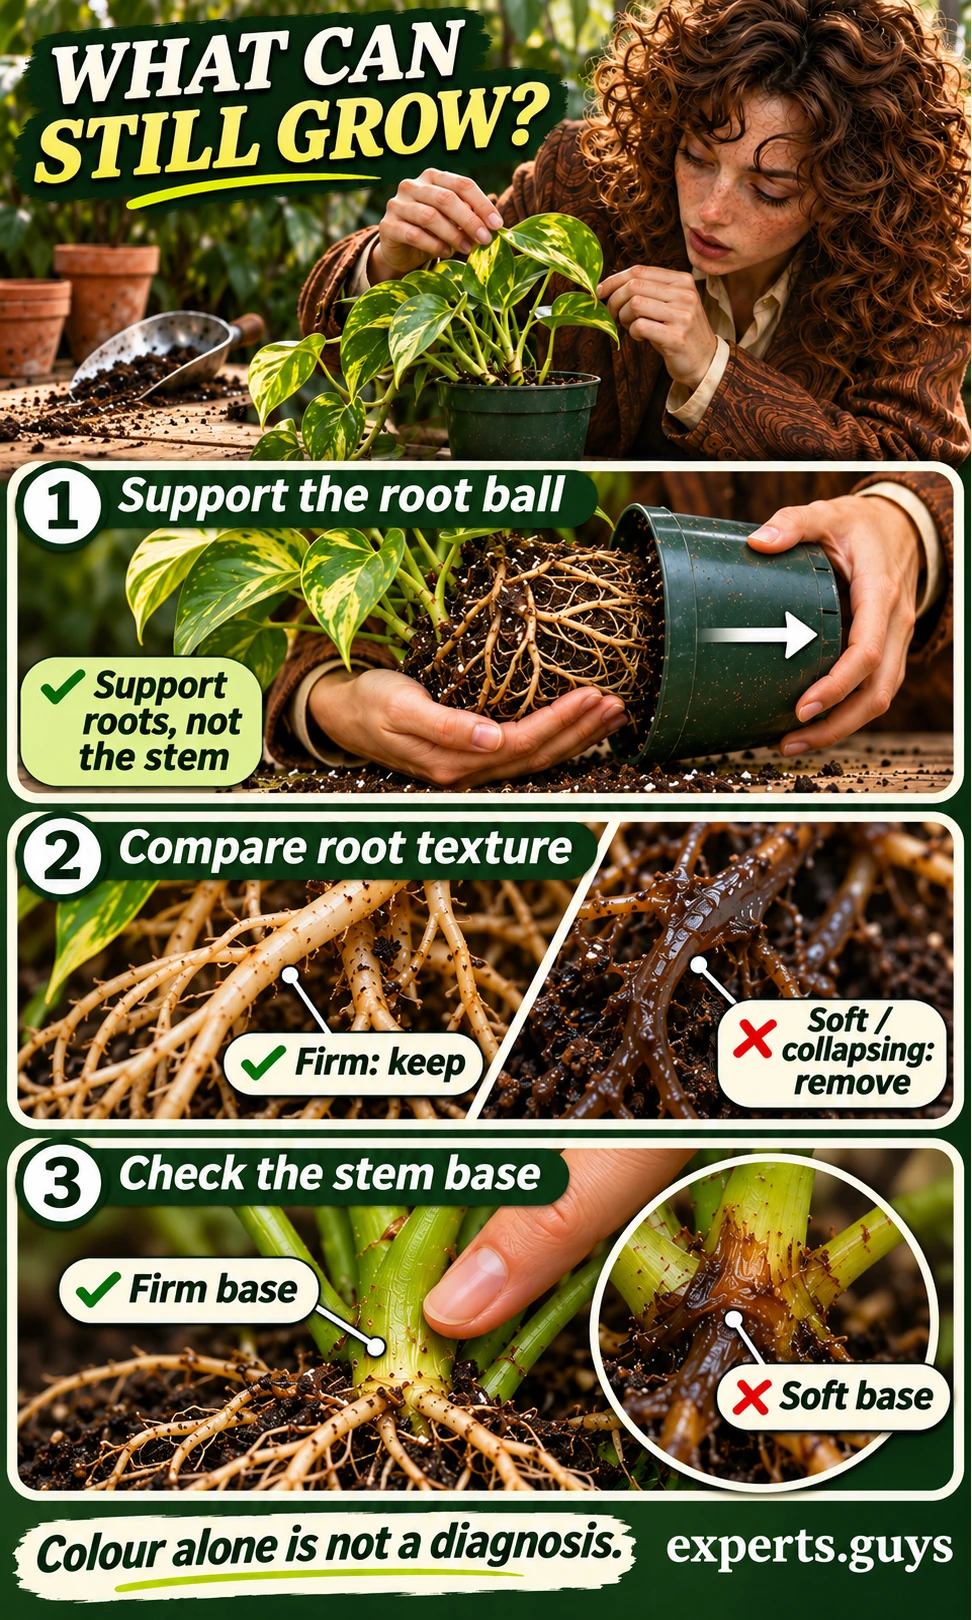
- Set the pot on a tray. Support the root ball with one hand and ease the container away with the other; never lift a heavy root ball by its stems.
- Loosen only material that releases readily. Look for roots that retain their structure, then compare a suspicious root with a firm one on the same plant.
- Inspect where the roots join the crown or lower stem. Gently check for firmness, collapse or water-soaked tissue without repeatedly squeezing it.
- Identify the growing tissue that would remain after removing failed roots: a sound crown, living stem node, bud or other species-appropriate structure. Choose the rescue route before making extensive cuts.
Texture matters more than a demand for white roots. Age and potting materials can darken viable roots. Conversely, a root whose outer tissue slides away or whose body collapses is not useful merely because part of it is pale. The indoor root-rot guidance from University of Maryland Extension describes soft roots and sloughing tissue, while also distinguishing damage that reaches lower stems.
For example, an illustrative pothos may have a small but coherent set of firm roots connected to a firm vine base. Keeping that connection is a different task from trying to save a plant whose base disintegrates when supported. Do not give both plants the same treatment simply because both have drooping leaves.
If roots are so fine that handling them causes breakage, stop trying to classify every strand. Inspect the accessible areas and preserve the intact network. A seated bench setup or help holding the pot can make this easier without turning the inspection into repeated handling.
Why wet soil can coexist with wilting
Water in a pot is not the same as water delivered through functioning roots. Prolonged saturation restricts oxygen around ordinary terrestrial roots; damaged roots may then fail to supply the leaves despite abundant moisture nearby. Adding water to answer the wilt can therefore reinforce the problem. The RHS explanation of water uptake connects waterlogging, root function and misleading thirst-like symptoms.
The recovery task has two parts: retain a living structure capable of rebuilding, and give that structure a workable root environment. Neither a prettier pot nor a chemical drench can replace missing growing tissue. The immediate takeaway is to decide what can still function before choosing what to remove.
How should you protect the roots that survive?
Remove clearly failed material while preserving sound tissue, then size the new root zone around what remains. This is rehabilitation after damage, so a larger pot and more aggressive pruning are not automatic improvements. The general step-by-step root-rot rescue guide covers the broader treatment process; the checks below concentrate on avoiding additional losses when the surviving root system is small.
2. Prepare a clean side before you cut
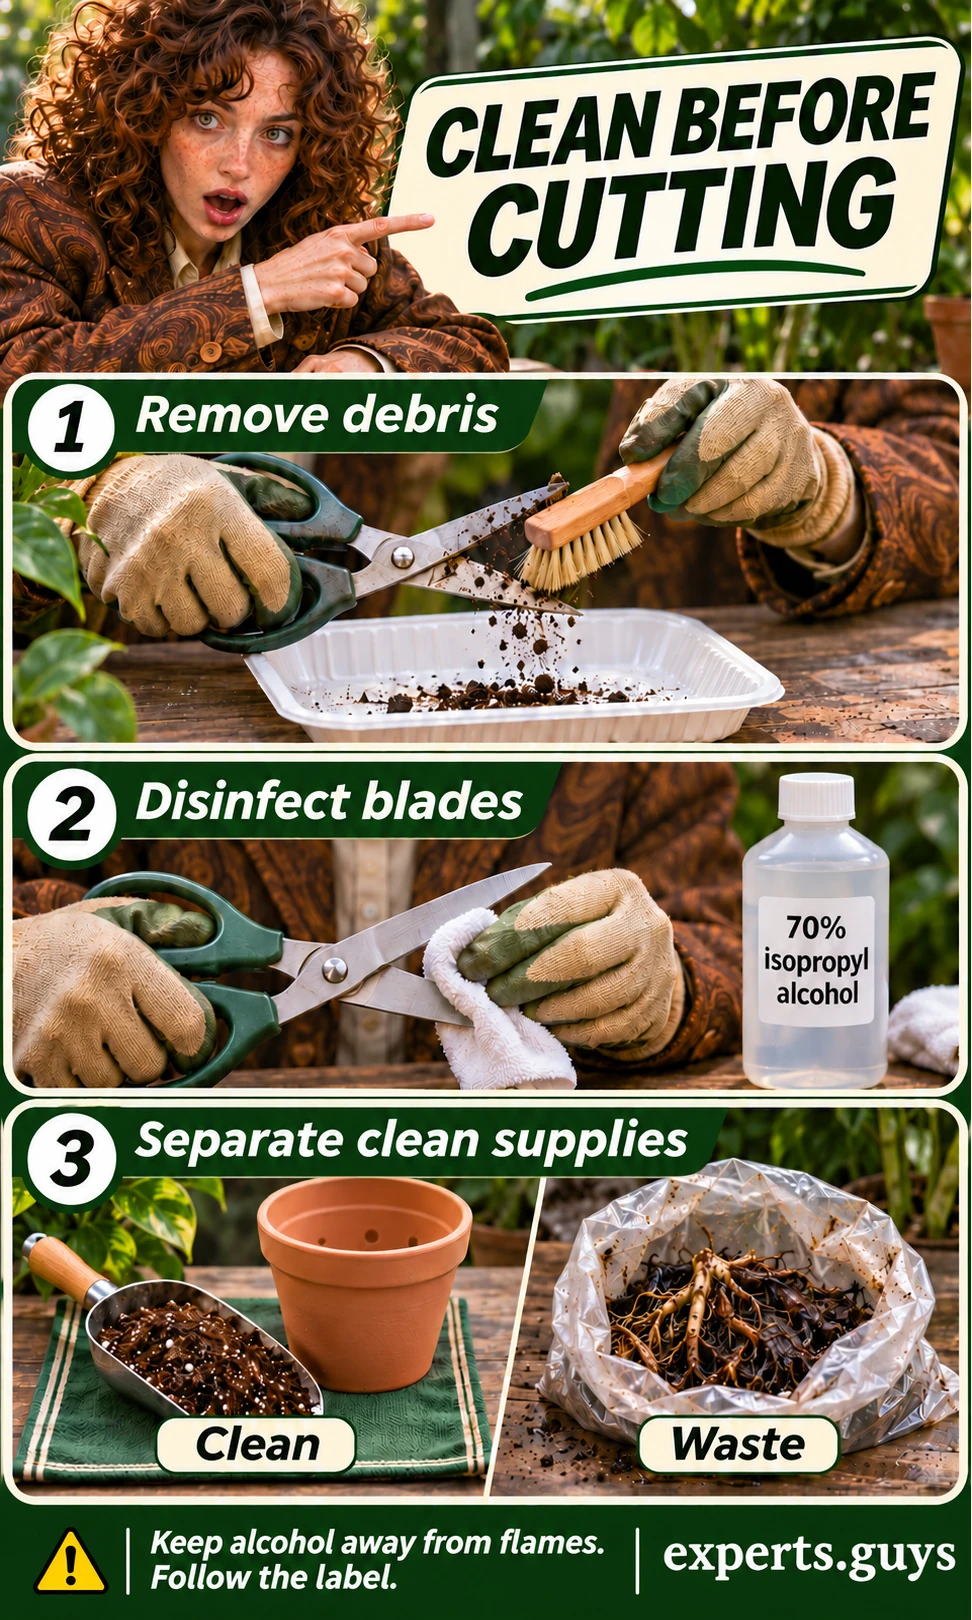
Have sharp snips, a tray, a waste bag, fresh species-appropriate potting mix and a clean container ready before exposing roots for long. Keep unused supplies away from the old wet mix. This simple separation prevents you from placing cleaned equipment back into the same contaminated debris.
- Brush or wash visible dirt and plant fragments from the cutting tool. Disinfectant works poorly through a layer of debris.
- Disinfect the cleaned blades using a suitable product according to its label. For small pruners, 70% isopropyl alcohol is one option; keep it away from flames, use ventilation and let treated blades dry before cutting.
- Put decayed roots and used mix directly into the waste area. Keep the replacement pot and fresh mix on the clean side; clean and disinfect reused containers with a product suitable for that material.
- Clean tools again after working on the diseased plant and before using them on another plant. Keep runoff and dirty trays away from other containers.
The distinction between cleaning and disinfecting is explained in University of Minnesota Extension’s tool and container guidance. Alcohol is for the tool in this method, not for roots or foliage. Never mix disinfectants or transfer them into unlabelled drink containers.
A clean spare nursery pot is the easier option if the old container is difficult to clean. In the pothos example, the goal is a prepared workspace and an appropriate replacement pot, not an elaborate sterilisation ritual. Household cleaning reduces a route of spread; it does not establish that the plant is pathogen-free.
3. Trim failed tissue and stop at a sensible boundary
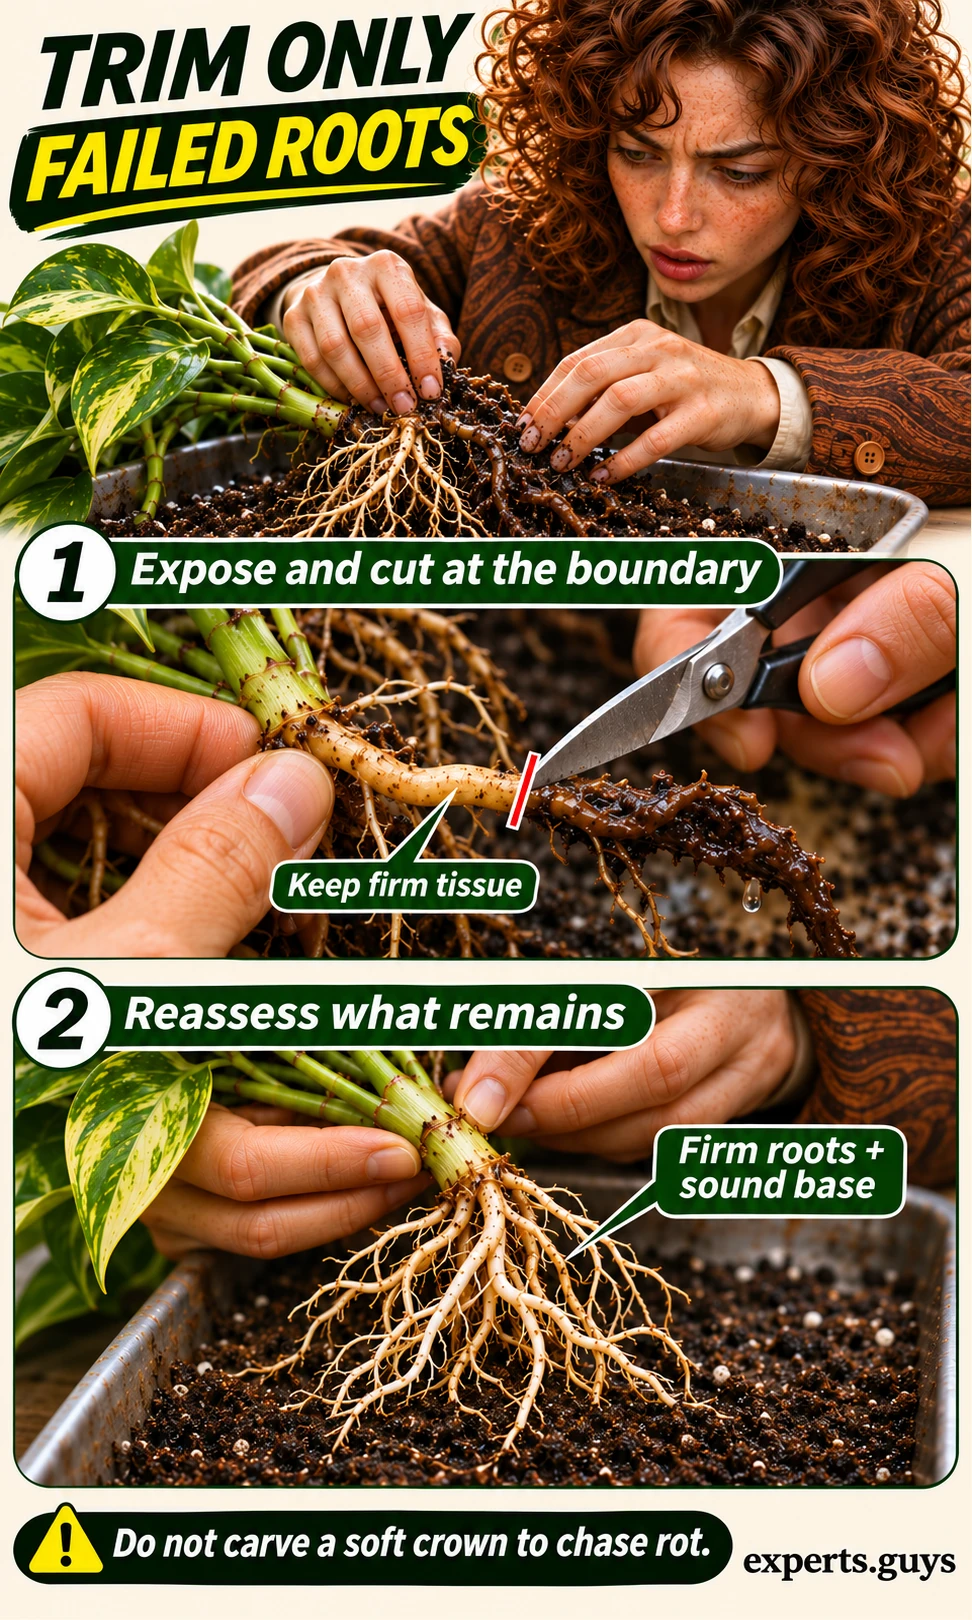
Cut only roots that are clearly mushy, hollow, sloughing or disintegrating. Make a clean cut back to sound tissue rather than crushing or pulling the root away. If loose mix obscures a questionable area, remove enough to inspect it; do not scour every healthy fine root to make the plant look freshly washed.
- Locate the boundary between intact tissue and the part that has broken down. Support the plant so the root is not under tension.
- Cut away the failed portion with prepared sharp blades, retaining firm roots even when naturally tan or dark.
- Remove loose decayed fragments from the tray and reassess the roots still attached to the base. Re-clean the tool if it becomes coated with debris.
- Stop if the essential crown or stem base is collapsing. Repeatedly carving into a soft centre is not a general rescue technique; move to the species-appropriate propagation decision instead.
The useful endpoint is a sound structure with as much viable root tissue as practicable. It is not a neat white bundle. Maryland’s indoor plant problem guide supports removing rotten portions and retaining healthy sections, but a home inspection still cannot guarantee that every affected area has been eliminated.
An illustrative correction shows why restraint matters: if several roots are stained brown but firm, cutting all of them removes capacity the plant still has. If the roots collapse and their outer layers detach, leaving them because the plant already has few roots preserves debris rather than function. Do not compensate for uncertainty by cutting indiscriminately.
If you cannot find a clear tissue boundary without destroying the base, stop the trimming attempt. For a valuable plant or a spreading collection problem, a plant diagnostic service can help identify the cause before further cuts or disease-specific treatment. The concrete trigger is continuing tissue loss, not the mere presence of an unattractive leaf.
4. Fit the container to the remaining roots
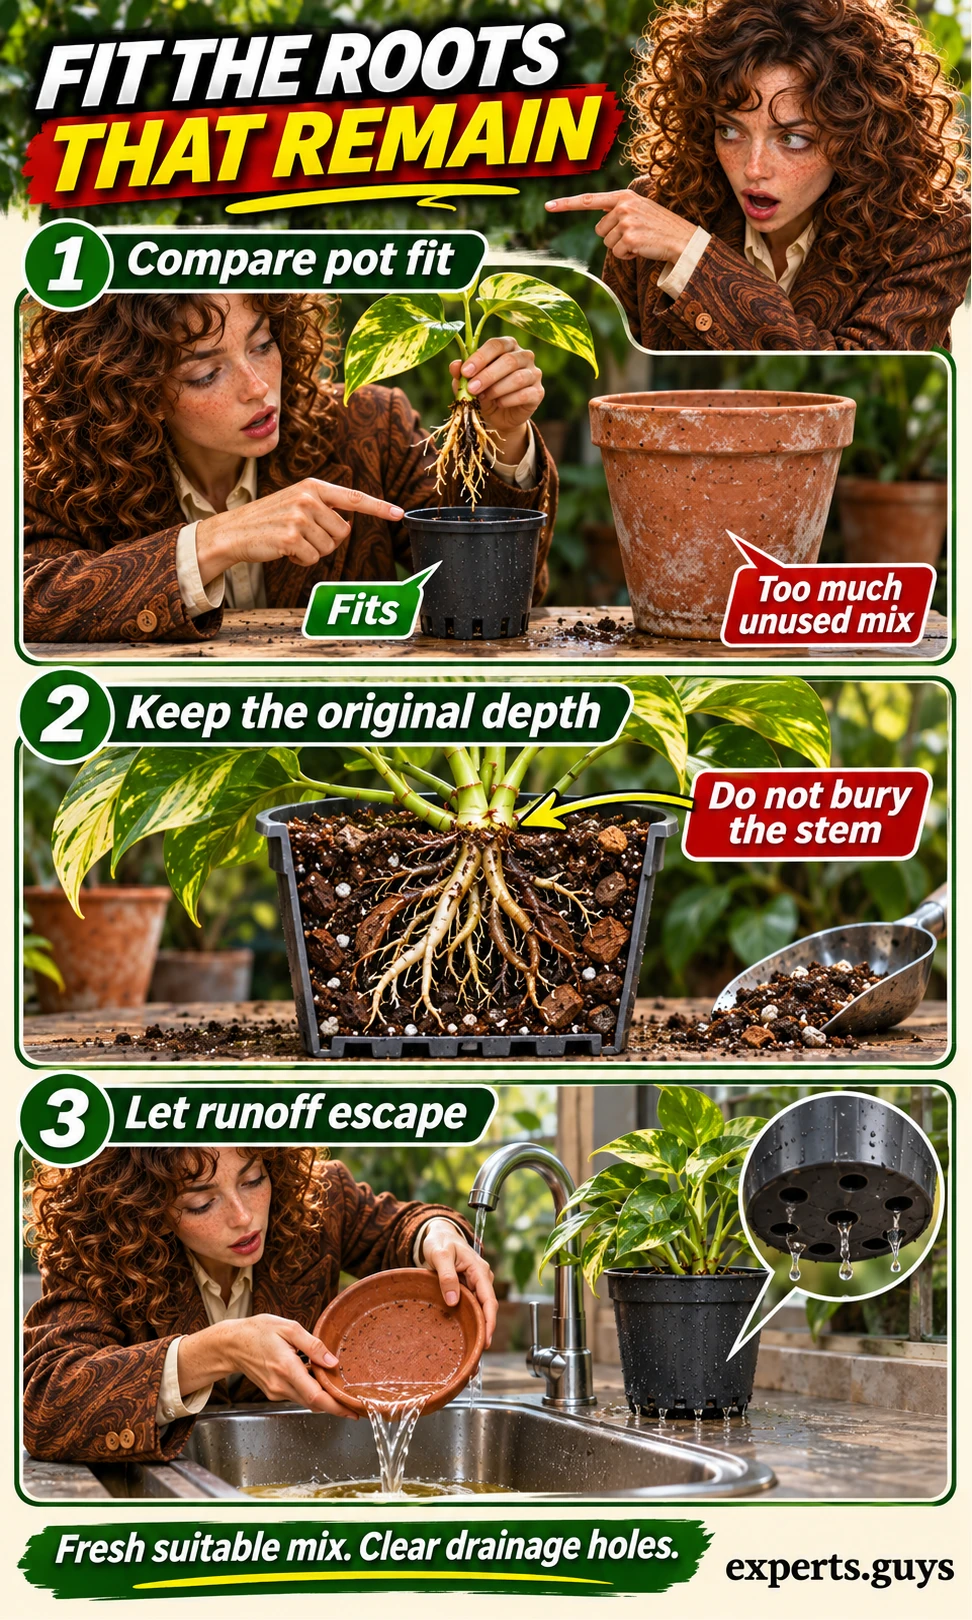
After significant pruning, the old pot may contain much more wet mix than the surviving roots can occupy. Choose a container that accommodates the roots naturally with room for suitable fresh mix, rather than sizing it to the former canopy. A smaller drained nursery pot can be a better fit than the large decorative pot the plant used before.
- Test the remaining roots loosely in the empty clean pot. They should fit without tight folding, while avoiding a broad excess volume of mix around them.
- Use fresh potting medium suited to the species. Place the root system so the original appropriate stem-base depth is maintained.
- Work mix around the roots gently. Do not press it into a dense plug or bury the crown more deeply to hold the plant upright.
- Leave drainage openings clear and set the pot where runoff can escape. Empty the saucer or outer pot after drainage instead of leaving the nursery pot standing in water.
An oversized container is a recognised root-rot risk in RHS container-growing guidance. The practical adjustment is to recheck pot fit after root loss, rather than apply the usual growth-driven repotting habit of moving upward in size. There is no universal rescue diameter that fits every species or root architecture.
For the pothos example, compare the smaller surviving root bundle with two empty pots before adding mix. Choose the one that supports natural placement without a large unused surround. If the plant is too top-heavy for a suitable root container, support the container safely rather than burying the stem. A heavy outer holder can stabilise it only if drainage water is removed.
Changing pot size cannot fix every slow-drying system. If a sensibly sized pot still traps moisture, the detailed explanation of why pots can drain poorly despite having holes helps you investigate the medium and drainage arrangement without repeatedly adding more holes.
How do watering and light change during recovery?
Treat the repotted plant as a changed root system, not as the old plant on its old schedule. The container, root mass and medium may all be different. The first aim is suitable moisture and a stable environment, not forcing immediate growth or making the surface dry as quickly as possible.
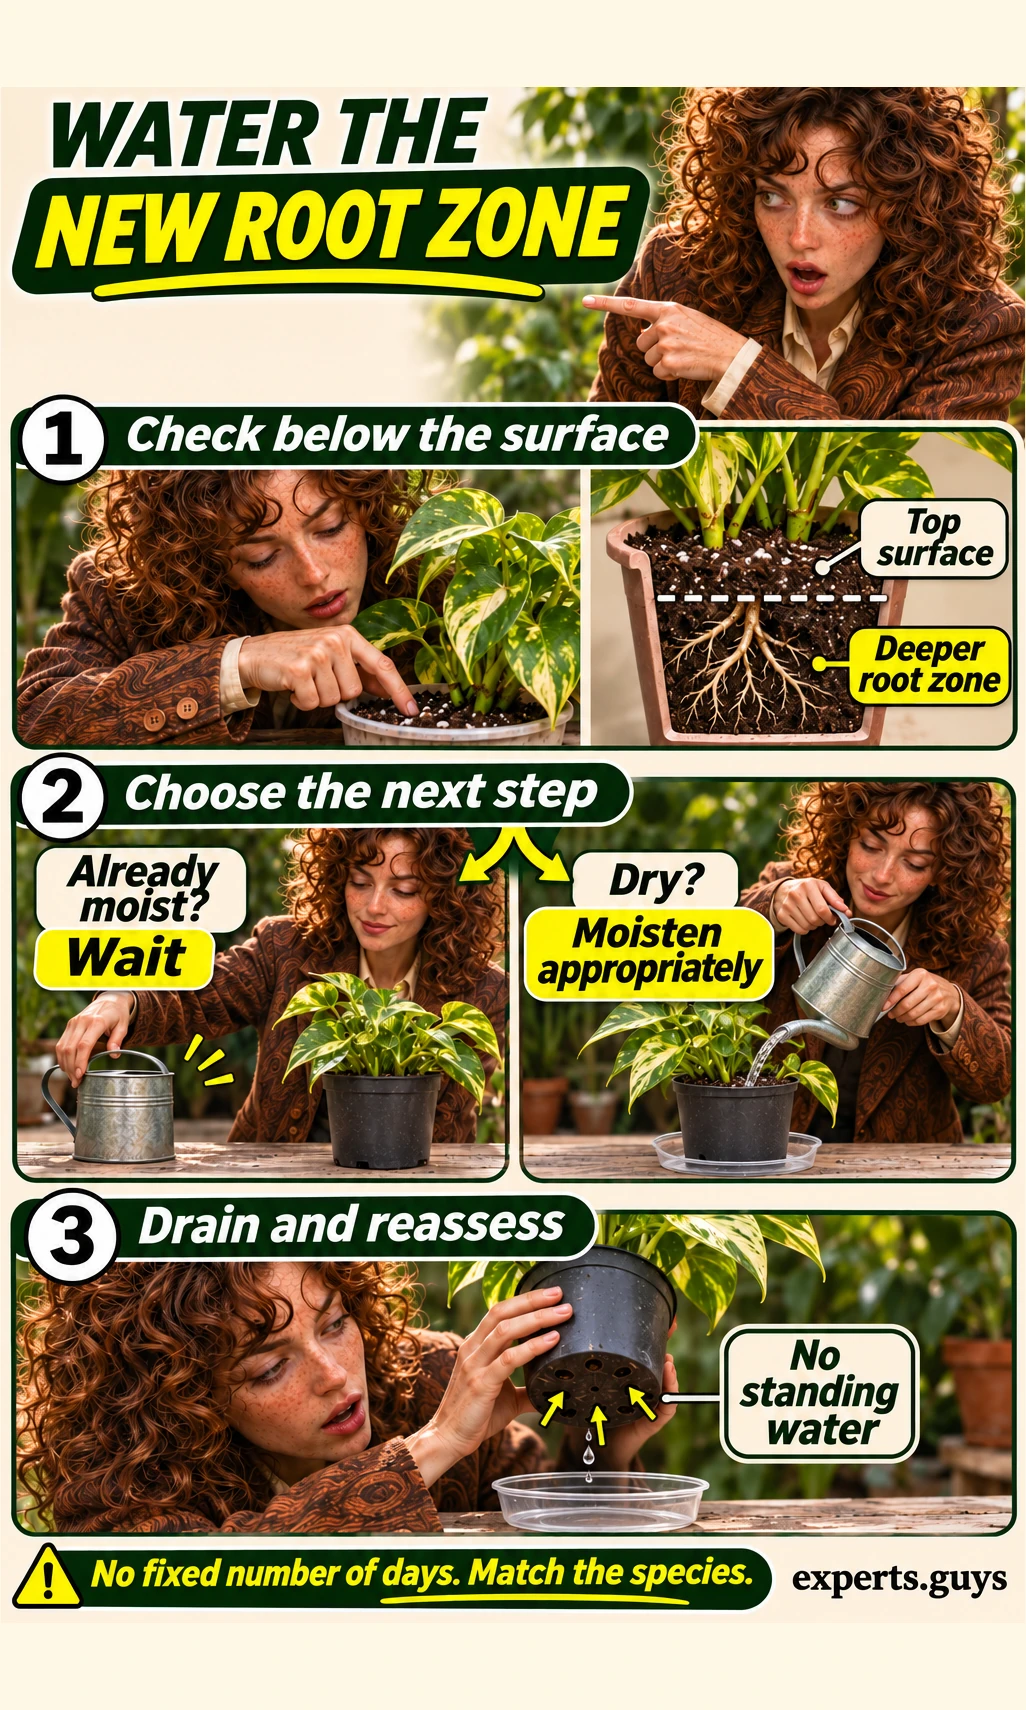
5. Make the first-watering decision from the new root zone
There is no reliable all-species rule to soak every rescue immediately or withhold water for a fixed number of days. A leafy tropical plant placed in genuinely dry mix faces a different problem from a succulent with fresh cuts placed in already damp medium. Use the plant’s normal needs and the actual moisture present to decide.
- Check the moisture of the replacement mix where the roots now sit, not only its exposed surface. Consider whether the roots were already wet from the old pot or handling.
- If suitable moisture is already present, do not add another watering simply because repotting is finished. Recheck as the root zone changes.
- If a leafy plant that needs available moisture is in genuinely dry mix, moisten the root zone appropriately and allow free drainage. Avoid both a prolonged soak and an arbitrary drought.
- At later waterings, compare deeper moisture and the pot’s changing weight with the species’ needs. Remove collected runoff each time; do not resume the old weekday routine automatically.
For a small container, lift it gently to feel the difference between freshly moistened and lighter mix. For a pot too heavy to lift safely, use an accessible edge check and inspect drainage without moving the whole plant. If the surface misleads you, the guide to dry tops over wet root zones explains that mismatch in more detail.
In the illustrative pothos rescue, fresh mix that is already lightly moist does not need a ceremonial second soaking. Later, a pot that becomes lighter while its base stays firm is useful information about the new cycle. A heavy wet pot and worsening wilt call for reassessment, not another drink. These observations guide a decision without pretending to measure a recovery percentage.
6. Choose one suitable recovery position
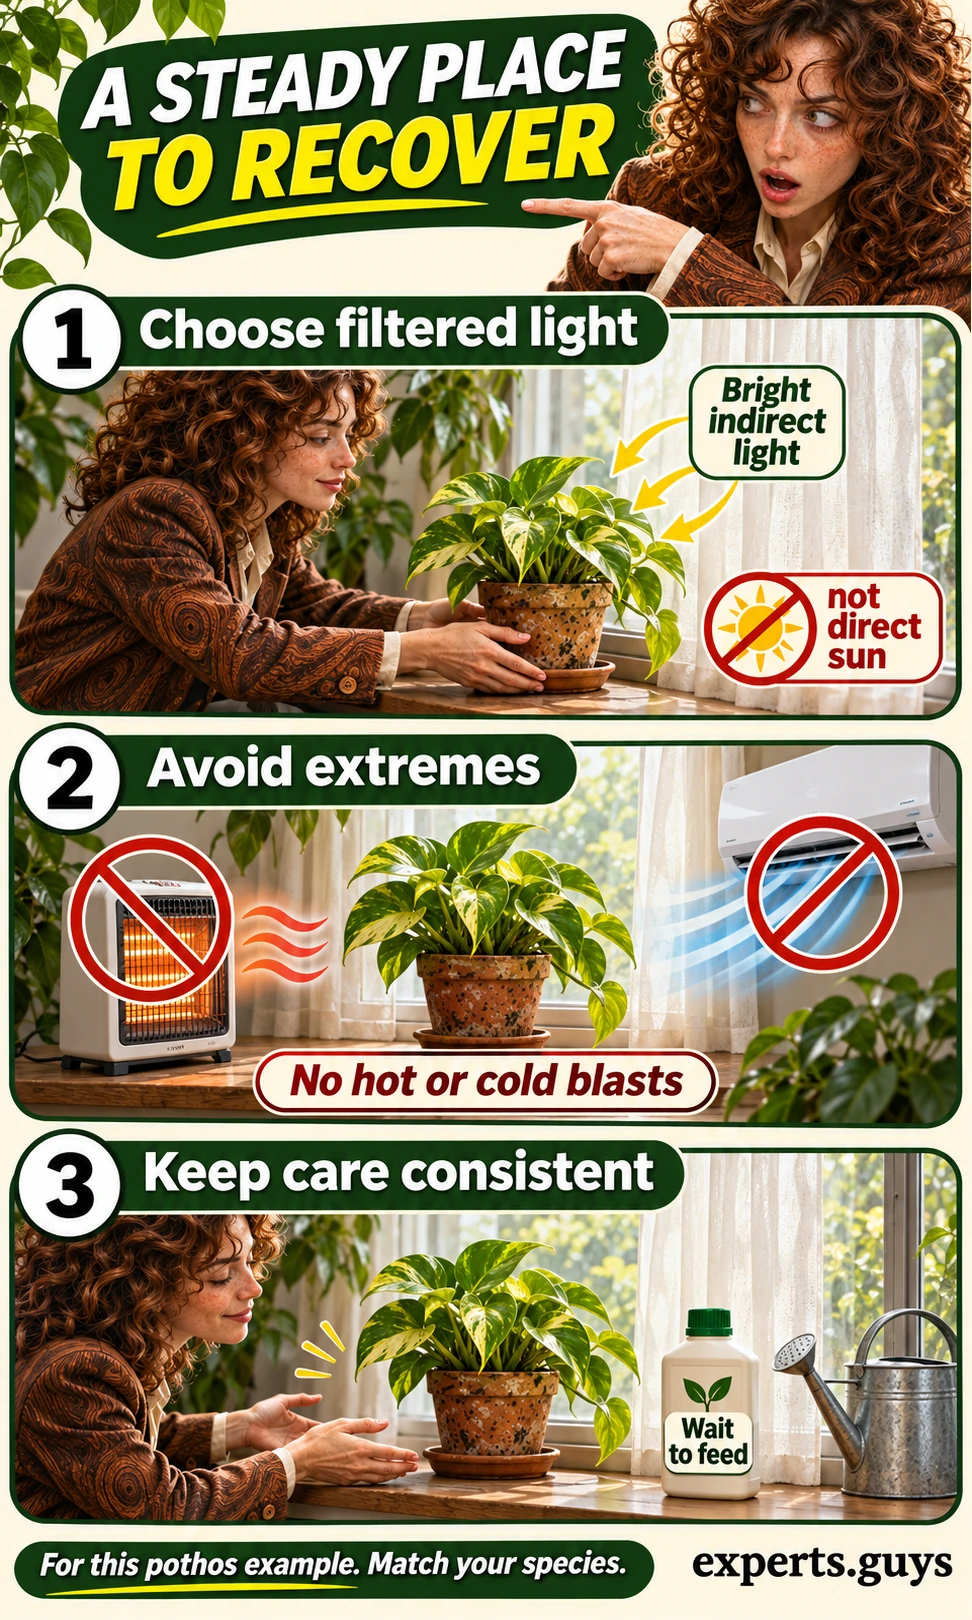
For the pothos example and many common leafy houseplants, use a stable place with bright indirect light, away from hot direct sun and strong temperature changes. This balances light for plant function with avoiding a sudden increase in leaf water loss. It is not a universal instruction to keep every recovering species in shade.
- Choose a position that already meets the species’ light requirements. For the illustrated pothos, filtered window light is appropriate.
- Keep the pot away from hot glass, heaters and direct air-conditioning blasts. Leave space around it and keep the affected plant separate from other pots and their runoff.
- Keep the suitable position consistent rather than moving the plant repeatedly to chase a faster response. Do not put it into a dark cupboard to slow water use.
- Hold off on feeding as a rescue treatment. Resume normal species-appropriate feeding when the plant is stable and active growth supports it, accounting for any nutrients already in the new mix.
The practical correction is restraint with a purpose. Moving a previously shaded pothos into harsh sun to dry its pot can stress foliage while roots are impaired. Hiding it in darkness removes useful light. Likewise, fertiliser cannot replace missing roots. There is no need to add a feed, tonic and disinfectant simply because recovery is not immediately visible.
Use the RHS houseplant health guidance to check environmental needs rather than assume all decline needs a treatment product. A stable location does not mean ignoring worsening symptoms; it means avoiding unrelated changes while you assess the specific signs described below.
When should you switch to a cutting or reconsider the rescue?
Prioritise a healthy propagatable section when the original base is failing but suitable tissue remains elsewhere. Continue a whole-plant attempt when sound connected tissue remains and deterioration is not advancing. These routes can coexist in a branching vine, but taking many cuttings from an already weakened parent creates its own cost.
7. Preserve a healthy pothos cutting when the species allows it
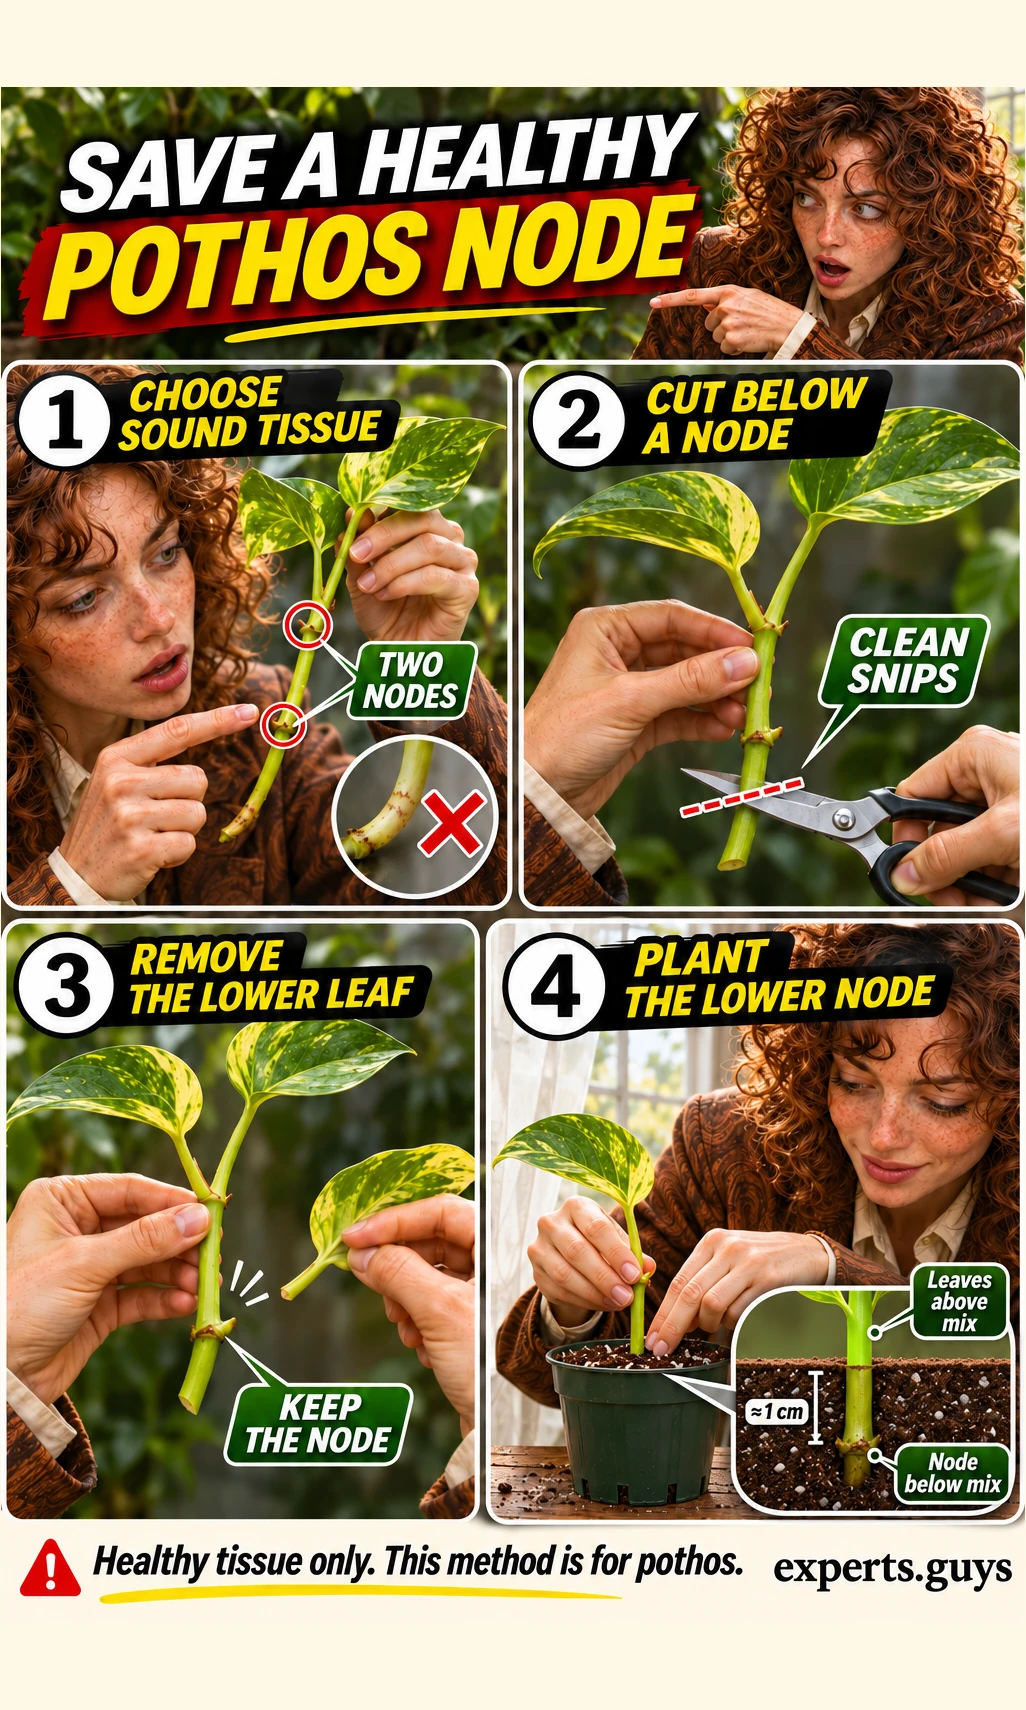
This method is for a healthy pothos vine section with suitable nodes; it does not make every detached leaf a new plant. A node is the stem junction from which a leaf and potential roots arise. A green leaf blade alone, without the needed stem tissue, cannot substitute for a proper pothos cutting.
- Choose a firm, unaffected vine section away from the deteriorating base, with at least two healthy nodes and a small amount of sound foliage. Prepare a small clean drained pot and suitable fresh rooting medium.
- With cleaned and disinfected snips, make a clean cut below a node in healthy tissue. Inspect the section; discard it if it is soft, water-soaked or visibly decayed rather than putting it into a propagation pot.
- Remove the leaf that would be below the medium. Make a small planting hole, place the lower node into lightly pre-moistened rooting medium, and gently settle the mix around it; keep the remaining leaves above the surface.
- Keep the cutting in bright indirect light with appropriate moisture and separate runoff. Watch for continued firmness and developing growth; softness at the cutting base means the attempt needs reassessment.
The Illinois Extension guide to cuttings explains node-based stem propagation and important species exceptions. Some succulent cut surfaces need to dry and heal before planting; that exception is one reason this pothos sequence must not become a universal root-rot recipe. Propagation can also fail when damage is not visibly obvious.
The conservative backup in the worked example is one suitable section, not harvesting every green vine. If the original plant has no spare healthy growing tissue, do not force a backup just to complete a checklist. For a single-crowned plant or an unfamiliar species, the easier and more useful action is to identify its legitimate propagation structure before cutting anything off.
8. Check progress without scheduled re-unpotting
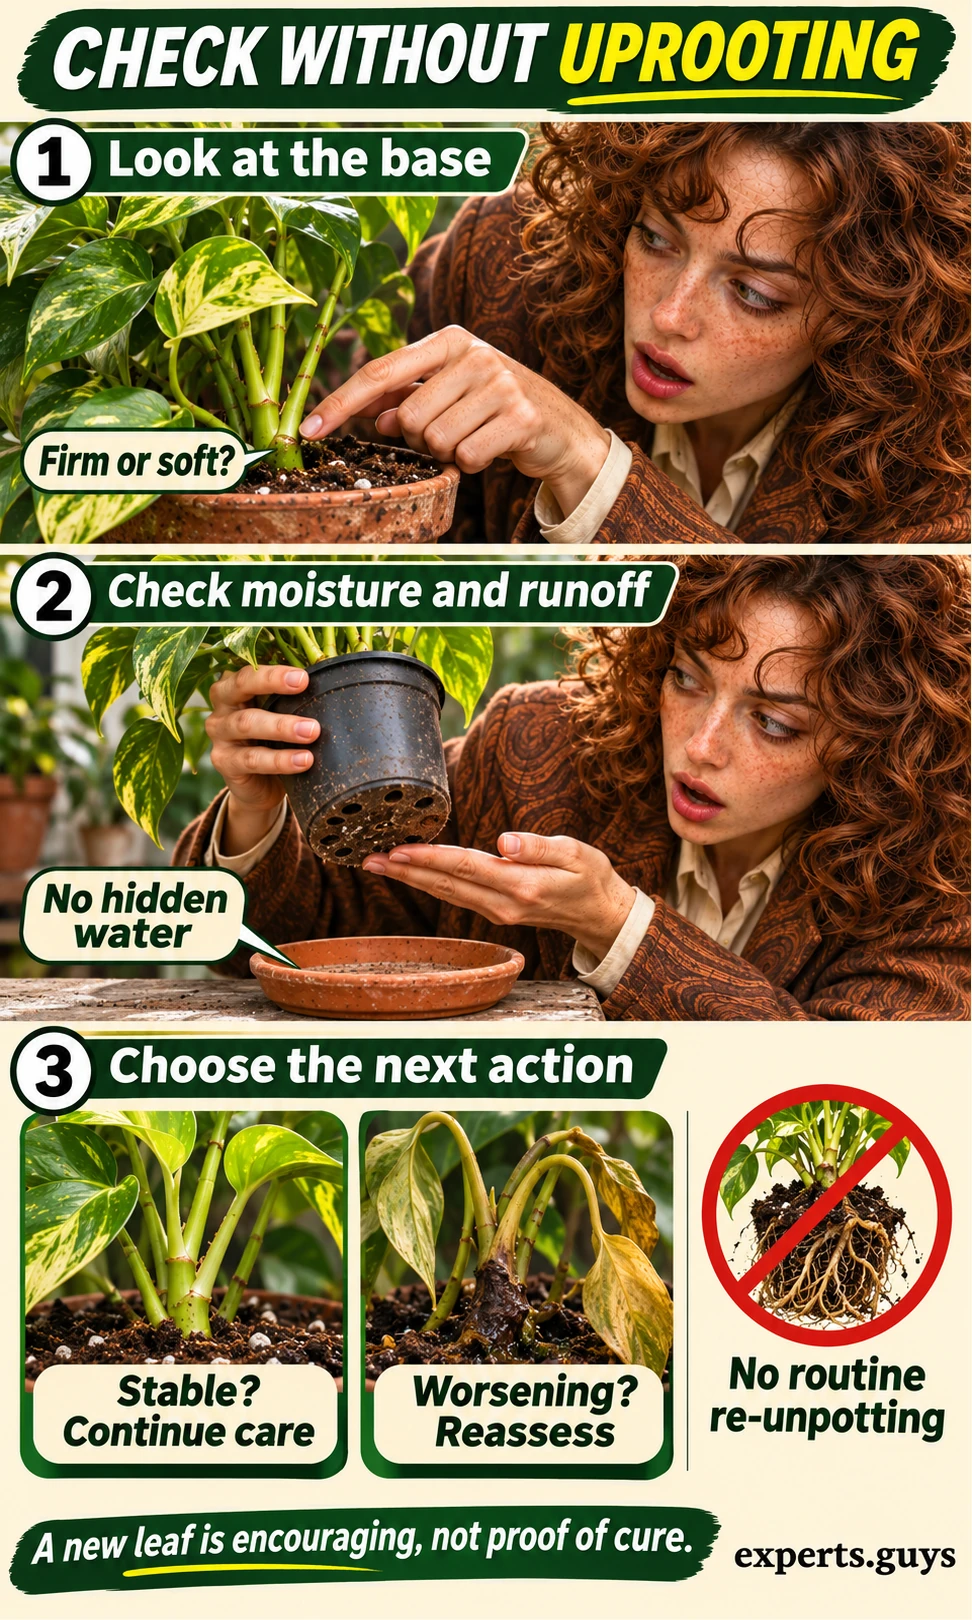
Look for a stable stem base, slowing decline and a workable moisture cycle before expecting a restored canopy. New growth can support a positive interpretation, but one new leaf is not proof that disease has ended. Likewise, an old damaged leaf remaining yellow does not mean the intervention failed.
- Leave the root ball in place during routine checks. Look at the exposed stem base, existing leaves and any obvious new collapse.
- Check moisture before deciding to water and make sure the saucer or cachepot is not holding runoff.
- Continue suitable care when the base stays firm and the plant is no longer progressively deteriorating. Allow time for the species and growing conditions rather than imposing a recovery deadline.
- Reassess promptly if softness spreads, the base collapses or decline accelerates while the medium remains wet. Review the diagnosis and rescue route; do not simply repeat trimming and repotting indefinitely.
A repeated root inspection has a real trade-off: it may reveal change, but it also disturbs a structure trying to establish in fresh medium. Use new adverse evidence as the reason to investigate again, rather than a calendar reminder. If roots happen to become visible at a drainage opening, observe them without tugging them out for reassurance.
The hypothetical pothos demonstrates three distinct outcomes. Firm tissue and no continuing decline support patience. A persistently wet pot with increasing wilt suggests the root environment or diagnosis needs another look. A softening base with an available healthy vine changes the priority toward preserving that vine before its usable tissue is lost. None of these outcomes depends on a made-up percentage of roots remaining.
Swipe horizontally to compare if needed.
| Next observation | What it does and does not tell you | Useful response |
|---|---|---|
| One previously damaged leaf yellows | Old injury may remain visible; it does not diagnose fresh rot. | Look for new progression elsewhere before intervening again. |
| Firm base, stable foliage, slowly changing moisture | Compatible with stabilisation; not proof that every pathogen is absent. | Maintain suitable conditions and use moisture to guide watering. |
| Wet medium, increasing collapse or spreading softness | A stronger reason to question the rescue than a lack of new leaves. | Reassess living tissue and whether propagation is still possible. |
| New leaf appears | Encouraging growth; stored resources and remaining tissue can still support a leaf. | Continue careful care rather than up-potting or feeding aggressively. |
If the original structure has failed and no healthy growing section remains, discard the decayed plant and used mix rather than moving them into another indoor pot. Keep dirty runoff away from the collection and clean the equipment. For recurring losses across multiple plants, identifying the disease and shared watering or contamination route becomes more useful than repeating the same rescue on each pot.
The same amount of root loss can lead to different choices
Consider three illustrative plants with roughly similar visible root loss. The first is a branching pothos with several sound nodes above a firm base. It has both an existing root connection and a possible backup route. The second is an unfamiliar single-crowned plant whose crown has softened. A cutting chosen merely because it is green may contain none of the structures needed to regenerate. The third has healthy-looking roots but a collapsing lower stem. Counting roots makes the third case look reassuring, while ignoring the failing connection above them.
These examples explain why a percentage-based recovery score is misleading. Counting visible roots is already difficult: large old roots, fine absorbing roots and damaged root fragments do not contribute equally. The species, growth point and location of damage can change the practical choice before any percentage is estimated. A simple tissue-based route keeps those decisive conditions visible instead of averaging them into a number.
There is also a difference between preserving the same plant and preserving a descendant. A rooted backup may retain the original variety, but it starts again as a smaller plant; it does not restore the size or structure of the old specimen. Keeping the original may preserve more established growth, but depends on its surviving connection remaining functional. Where a suitable backup is available, choosing both routes accepts those trade-offs without promising that either will succeed.
Finally, separate an unfinished recovery from an unsuitable environment. A plant that has stopped declining may need time. A plant returned to standing water still has an unresolved obstacle. Patience is useful in the first situation and insufficient in the second. Make that distinction from the actual root-zone conditions and tissue changes, rather than from how long you have owned the plant or how much effort the rescue has already taken.
Questions that change the next decision
Can a plant recover if every root is gone?
Sometimes suitable living stems or other structures can form new roots, depending on the species. That is a re-rooting or propagation problem, not recovery of dead roots. A rootless pothos stem containing healthy nodes is different from a detached leaf or a plant whose essential crown has collapsed.
How long does root-rot recovery take?
There is no reliable deadline for all plants. Root loss, species, temperature, light and season influence progress, and visible growth may take weeks or longer. Judge whether tissue remains sound and deterioration has slowed; do not keep repotting just because a new leaf has not appeared.
Should I use hydrogen peroxide or cinnamon?
Neither is a required step in this rescue. Household treatments are not interchangeable with disease-specific management, and unsuitable concentrations can harm living tissue. Start with the tissue decision and corrected growing conditions; use any plant-treatment product only for an appropriate plant and purpose according to its label.
Should I remove healthy leaves to match the smaller roots?
Do not use an arbitrary rule such as removing half the leaves after losing half the roots. Suitable pruning depends on species and condition; healthy foliage also contributes to the plant's resources. The illustrated backup cutting is a specific pothos option, not a direction to defoliate every rescued houseplant.
Can I use the same method for a tree in the garden?
No. Digging up and trimming the roots of an established tree is not the equivalent of a small houseplant rescue. Root disease, waterlogging and structural stability need assessment in their landscape context; do not cut major roots or excavate around a potentially unstable tree using this guide.
Make the next decision from living tissue
If firm roots remain connected to a sound base, a controlled recovery attempt is reasonable. If that base is failing but a healthy pothos vine remains, preserve the suitable growing section while it is still usable. If neither route has viable tissue, stop investing in repeated interventions and correct the growing setup before another plant uses it.
The worthwhile result today is a defensible rescue route and a root environment that fits what survives. A dramatic overnight transformation is not the test. Protect the remaining living structure, make the specific adjustment it needs, and let new evidence decide the next intervention.