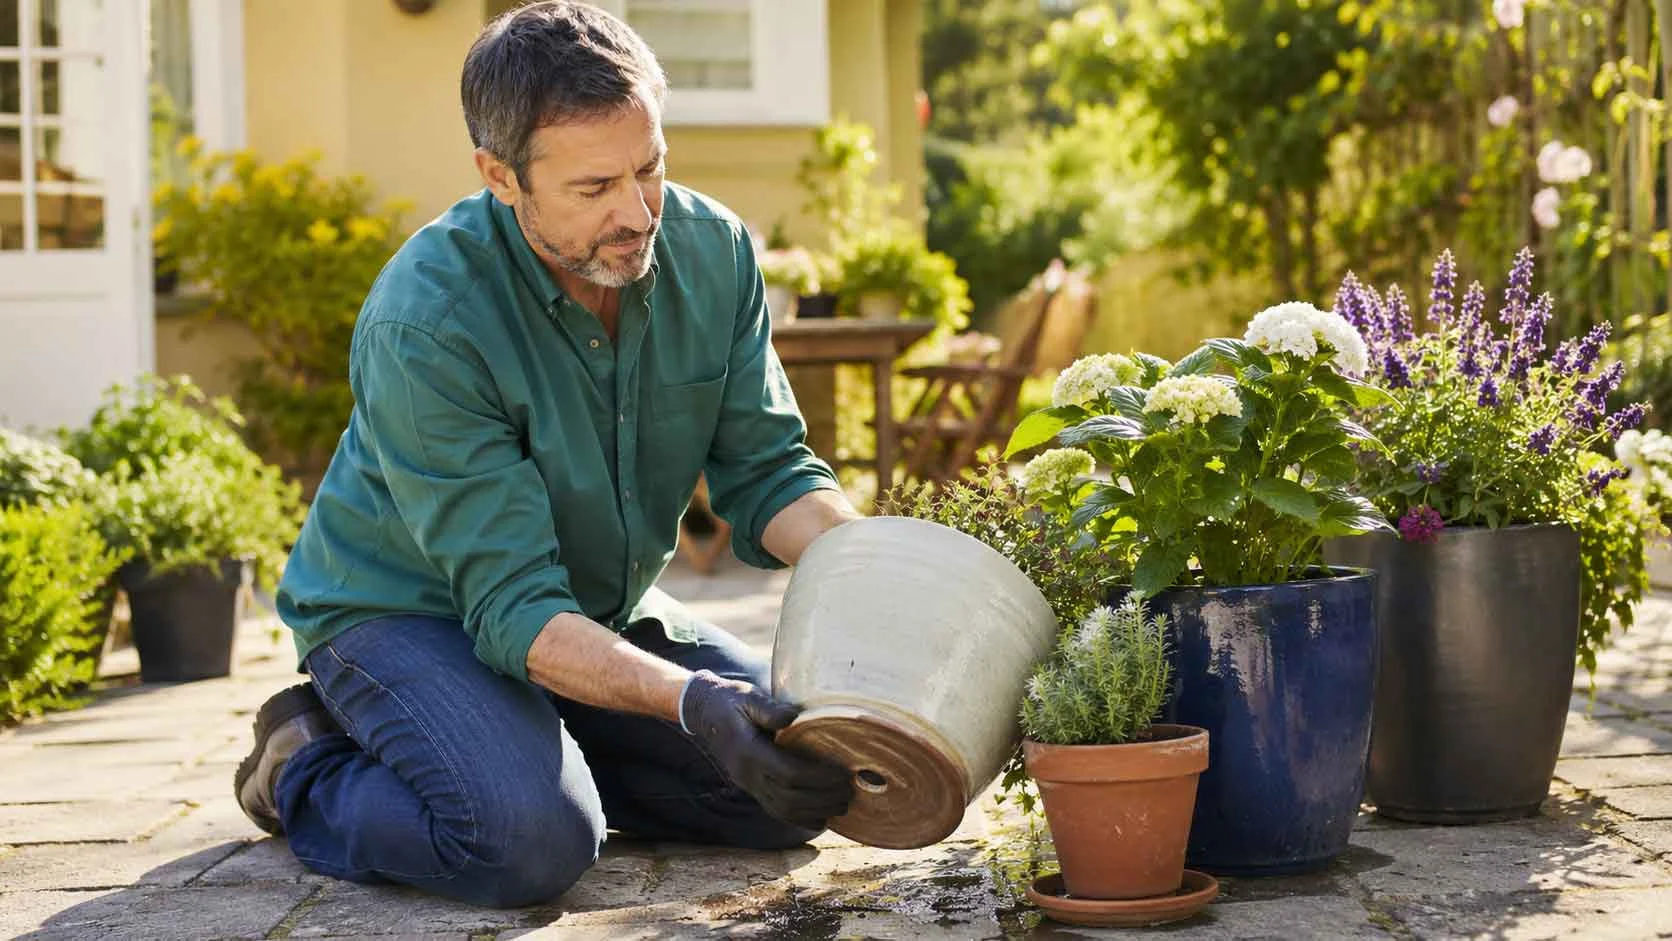
Have you ever watered a plant, stepped away for a few minutes, and then returned expecting to see water dripping from the bottom of the pot—only to find nothing at all? It feels like one of gardening’s little mysteries. After all, the pot has drainage holes, so surely the excess water should have somewhere to go.
Many gardeners immediately blame the pot. Others assume the drainage holes are blocked, while some decide the plant simply needs less water. Surprisingly, none of those explanations are always correct. A pot can have perfectly good drainage holes and still trap enough moisture to leave plant roots sitting in wet soil for days.
If your plant still looks green but refuses to produce new growth, the issue may connect closely with why plants stop growing even when they look healthy.
Here’s the interesting part: drainage isn’t controlled by the holes alone. Think of them as the exit doors rather than the entire building. If people can’t reach the exit because the hallway is blocked, opening another door won’t solve the problem. Water behaves in a remarkably similar way inside a flowerpot. The soil structure, root system, container material, watering habits, and even the saucer underneath all influence whether water moves freely or stays trapped where your plant doesn’t want it.
I’ve spoken with plenty of gardeners who proudly showed me pots with four or five drainage holes drilled into the bottom, convinced they had solved every watering problem imaginable. Yet when we tipped the pot over together, the soil was heavy, the roots smelled musty, and the bottom few centimetres were still soaked. The extra holes hadn’t fixed the real issue because the problem was happening higher up inside the pot.
The good news is that poor drainage is usually much easier to solve than people expect. Once you understand why water sometimes refuses to leave a container, you’ll begin spotting the warning signs long before your plants stop growing or develop yellow leaves. In this guide, we’ll look beyond the drainage holes themselves and uncover the hidden reasons some pots never seem to dry properly—even when everything appears correct from the outside.
Garden Decision Support Tool
Pot Drainage Intelligence Studio
Diagnose hidden drainage problems, identify root-zone risks, and receive a personalised plant recovery plan.
The generated report is formatted for A4 portrait paper. In the print window, choose A4, portrait orientation and 100% scale.
Drainage Holes Are Only One Part of the Story
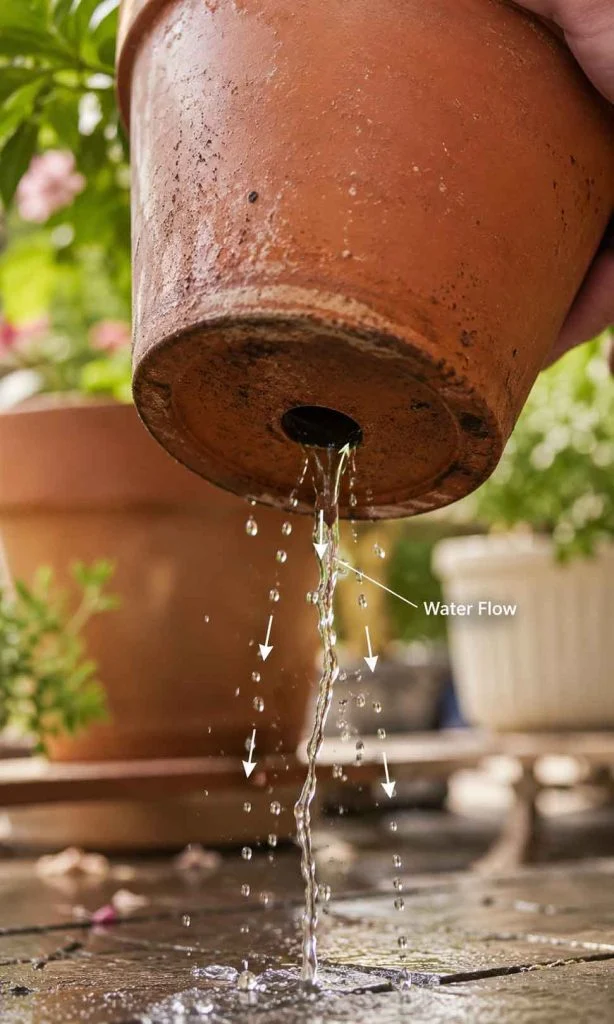
One of the biggest misconceptions in gardening is that drainage holes automatically guarantee healthy drainage. It’s an understandable assumption because the holes are the only part of the system we can actually see. If water has somewhere to escape, surely the pot should never stay waterlogged. In reality, the drainage holes are simply the final stop in a much larger journey that water has to complete before it ever reaches the bottom of the container.
Imagine pouring rainwater into a city full of narrow streets. The drains at the edge of town might be completely open, but if traffic is blocked throughout the city, very little reaches those exits. Water behaves much the same way inside a flowerpot. Before it can leave through the drainage holes, it has to travel between tiny spaces in the potting mix, move around roots, and overcome natural forces that encourage moisture to cling to soil particles. If any part of that journey slows down, the holes underneath cannot solve the problem on their own.
This explains why two identical pots sitting next to each other can behave completely differently. Both may have the same number of drainage holes, receive the same amount of water, and even contain the same species of plant. Yet one dries beautifully while the other remains damp for nearly a week. The difference often lies inside the pot rather than underneath it.
Another reason this misunderstanding persists is that many gardening tips focus almost entirely on container design. People are encouraged to buy pots with more holes, drill additional openings, or place stones in the bottom of containers. While those ideas sound logical, they rarely address what is actually preventing water from moving through the soil profile. In some cases, they make almost no difference at all.
Professional growers usually approach drainage from a completely different perspective. Instead of asking, “Does this pot have holes?” they ask, “Can water travel freely from the surface all the way to those holes?” That small change in thinking often reveals the real problem much faster than replacing containers or reducing watering frequency.
The Drainage Triangle™
Over time, I’ve found it helpful to think of drainage as three connected parts rather than one simple feature. I call this the Drainage Triangle™ because every healthy container relies on these three factors working together.
1. Soil Structure
The potting mix needs enough air spaces for water to move downward naturally. Soil that becomes compacted or breaks down into fine particles behaves more like a sponge than a filter, slowing the movement of water throughout the container.
2. Root Environment
Healthy roots absorb moisture while still allowing oxygen to circulate. As roots become densely packed or begin circling the inside of the pot, they can create physical barriers that interfere with normal water movement. The drainage holes may still be open, but water has a much harder time reaching them.
3. Drainage Exit
Only after water has travelled successfully through the soil and around the roots does it finally reach the drainage holes. If this final exit is blocked by a saucer full of standing water, compacted debris, or a decorative cachepot without clearance underneath, drainage slows even further.
When all three parts remain balanced, watering becomes predictable and plants recover quickly after each drink. If even one side of the triangle begins to fail, the entire drainage system becomes less effective.
| Drainage Factor | What It Does | Common Problem |
|---|---|---|
| Soil Structure | Allows water and air to move through the pot. | Compacted or broken-down potting mix traps moisture. |
| Root Environment | Absorbs water while maintaining healthy airflow. | Root-bound plants restrict water movement. |
| Drainage Exit | Provides the final path for excess water to leave. | Blocked holes or standing water beneath the pot. |
By thinking about drainage as a complete system instead of a single feature, diagnosing plant problems becomes much easier. Rather than immediately blaming your watering routine or buying another container, you can inspect each part of the Drainage Triangle™ and quickly identify where water is actually getting delayed. Quite often, the drainage holes are doing exactly what they’re supposed to do—the real bottleneck is happening long before the water ever reaches them.
Why Water Sometimes Refuses to Leave the Pot
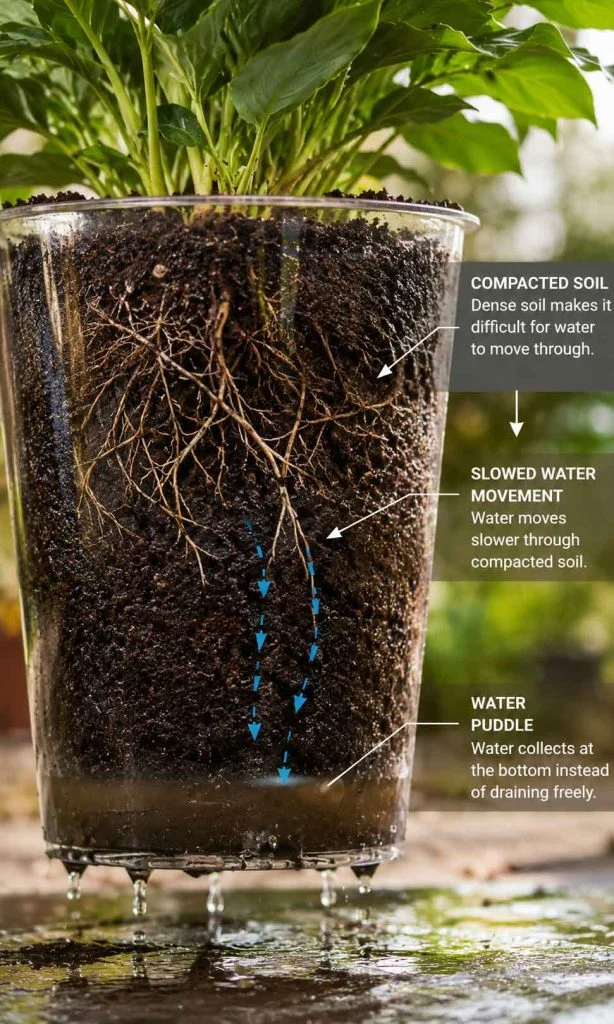
At first glance, water seems wonderfully predictable. Pour it into a pot, and gravity should pull it straight to the bottom before it escapes through the drainage holes. That’s certainly what most of us expect to happen. Yet if you’ve ever lifted a pot several days after watering and found it surprisingly heavy, you’ve already discovered that water doesn’t always follow such a simple path.
The reason lies in the way water interacts with soil. Moisture doesn’t merely fall downward like rain through an empty pipe. Instead, every tiny particle of potting mix attracts water and holds onto it. The finer the material, the stronger that attraction becomes. Rather than rushing immediately toward the drainage holes, water spreads sideways, clings to organic matter, fills microscopic air pockets, and gradually works its way lower through the container.
This behaviour creates one of the least understood concepts in container gardening: not all of the water inside a pot is supposed to drain away. A small amount always remains behind because soil naturally retains moisture for the roots to use later. Problems begin when that retained layer becomes much larger than it should be.
Professional growers often refer to this as a perched water layer—a zone near the bottom of the pot where excess moisture lingers even after visible dripping has stopped. It doesn’t mean the drainage holes have failed. Instead, it means the soil is holding onto more water than the roots can comfortably tolerate.
Here’s something that often surprises new gardeners. Drilling extra holes into the base of the pot rarely removes this trapped layer. Water is being held inside the soil itself, not simply waiting for another exit. Improving the soil structure, refreshing old potting mix, or reducing compaction is usually far more effective than adding more drainage holes.
Once you understand how water naturally moves through a container, many mysterious plant problems suddenly begin to make sense. Yellow leaves, slow growth, fungus gnats, and sour-smelling soil are often symptoms of moisture that never truly left the root zone—even though the pot appeared to drain normally after watering.
In the next section, we’ll explore the seven most common reasons this happens and, more importantly, how to recognise each one before your plants begin showing obvious signs of stress.
Seven Reasons Your Pot Never Seems to Drain Properly
Now that we’ve looked at how water actually behaves inside a container, let’s investigate the problems that interrupt that journey. The encouraging news is that poor drainage is rarely caused by a single dramatic mistake. More often, it’s several small issues quietly working together. Once you know what to look for, you’ll begin spotting these problems long before your plants show signs of stress.
Think of yourself as a garden detective rather than a plant doctor. Instead of immediately reaching for fertilizer or buying a new pot, start asking simple questions. Is the soil still fluffy? Are the roots filling every corner of the container? Does water have anywhere to go after it leaves the drainage holes? These observations usually reveal the answer much faster than guessing.
1. The Potting Mix Has Become Too Dense
Fresh potting mix is designed with thousands of tiny air pockets between its particles. Those spaces allow both oxygen and water to move comfortably through the container. Over time, however, every watering slowly changes that structure. Organic materials decompose, fine particles settle into empty spaces, and what was once a light, airy mixture gradually becomes heavier and more compact.
Have you ever noticed how an old bag of potting mix feels fluffy when you first open it, but a two-year-old houseplant seems to contain soil that feels almost solid? That’s exactly what’s happening. The drainage holes haven’t changed at all, but the path leading to them has become much narrower.
Compacted soil also creates another hidden problem. Plant roots need oxygen just as much as they need water. When those valuable air pockets disappear, roots spend longer sitting in saturated conditions after every watering. Growth slows, nutrient uptake becomes less efficient, and leaves often begin losing their healthy colour even though the soil appears permanently moist.
Fortunately, this is one of the easiest problems to correct. Refreshing the potting mix during repotting often restores drainage almost immediately because you’re rebuilding the soil’s internal structure rather than trying to force more water out through the bottom.
2. The Plant Has Become Root-Bound
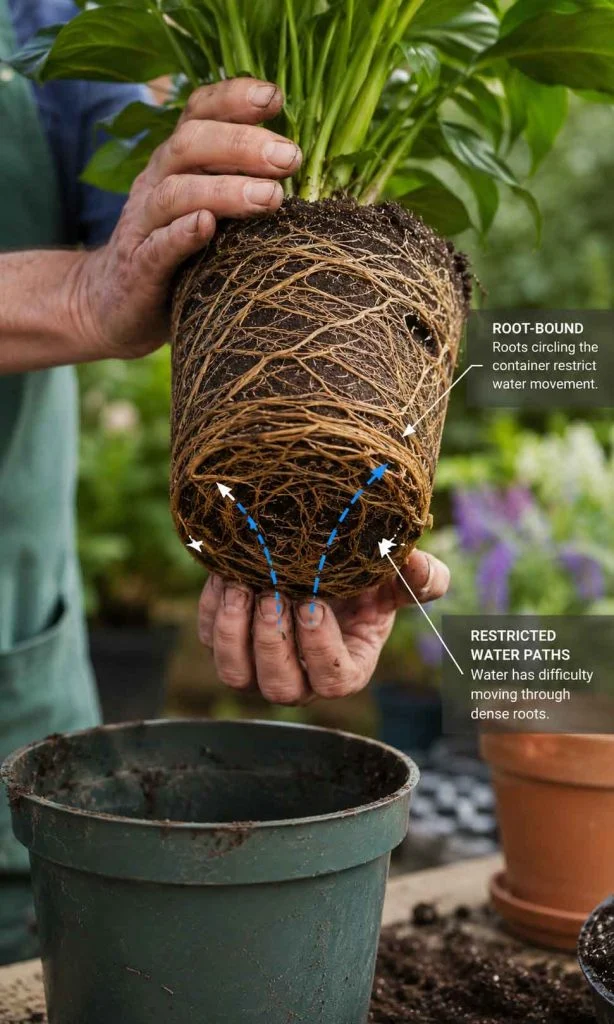
Here’s something that surprises many gardeners: healthy roots can eventually become part of the drainage problem.
When a plant spends years in the same container, its roots naturally explore every available space. Eventually they begin circling around the inside of the pot, weaving together into an increasingly dense network. From above, the plant may still look perfectly healthy, but below the surface the roots have almost filled the entire container.
Imagine trying to pour water through a basket packed tightly with ropes. The water still gets through, but much more slowly because there are fewer open spaces remaining. A heavily root-bound plant behaves in much the same way.
Some gardeners assume that a root-bound plant always dries out faster because there is less soil remaining. While that can happen during warm weather, the opposite is also surprisingly common. Dense roots can slow the even movement of water, creating isolated pockets where moisture lingers much longer than expected. Some sections of the root ball may become almost dry while others stay constantly wet.
One of my favourite little inspection tricks is simply lifting the plant out of its pot. If the root ball comes out in one solid piece with thick roots wrapped around the outside like spaghetti, you’ve probably found a major contributor to the drainage problem.
3. Decorative Cachepots Quietly Trap Water
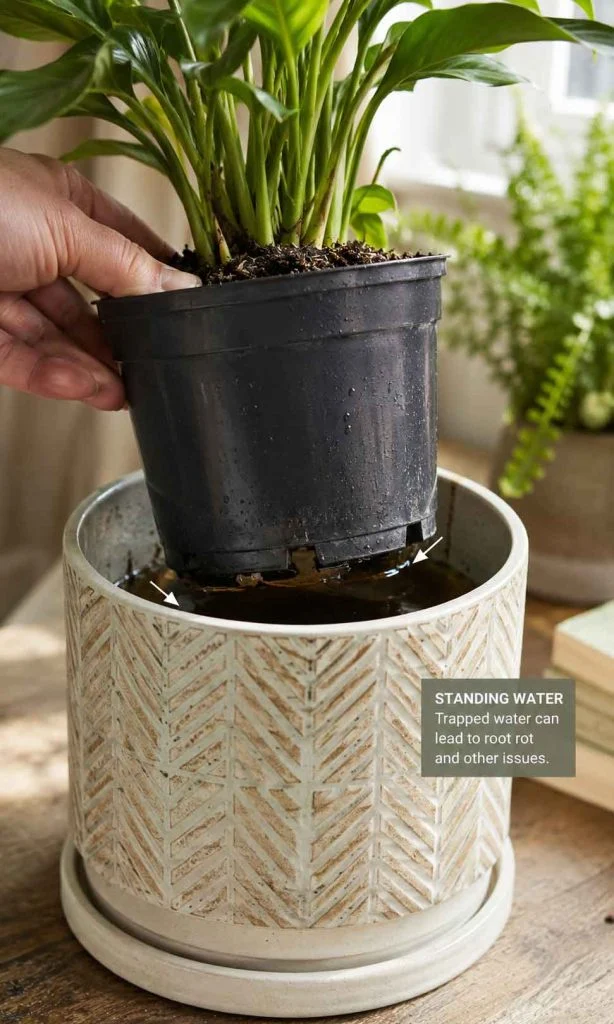
This catches far more gardeners than you’d imagine.
Decorative cachepots are beautiful. They hide plain nursery containers, match interior décor beautifully, and instantly make houseplants look more elegant. Unfortunately, they’re also one of the most common reasons drainage appears to fail.
The growing pot may drain exactly as intended, but where does that water go afterwards?
Straight into the decorative container.
If that standing water isn’t emptied, the bottom of the nursery pot simply sits in it. The drainage holes are technically still open, yet they now lead directly into another pool of water. Instead of encouraging excess moisture to leave the root zone, the cachepot keeps the soil damp for much longer than intended.
It’s a little like wearing waterproof boots while standing ankle-deep in a puddle. Your feet might stay dry for a while, but eventually the surrounding moisture begins affecting everything.
Whenever someone tells me, “My pot has drainage holes but the soil never dries,” one of the very first questions I ask is whether the plant sits inside another decorative container. More often than not, the answer is yes.
4. The Drainage Holes Are Smaller Than You Think
Most gardeners check whether drainage holes exist.
Fewer people check whether they’re actually working.
Tiny drainage holes can become partially blocked by old roots, compacted compost, mineral deposits from hard water, algae, or even fallen leaves that wash down during watering. The blockage doesn’t have to seal the opening completely. Even reducing the size of the exit slows water movement considerably.
Another surprisingly common issue occurs when the pot sits perfectly flat on a solid surface. If the drainage holes press tightly against a patio, windowsill, or decorative tray, water has very little space to escape underneath. Raising the container just a few millimetres with pot feet or small supports often improves drainage immediately.
This is why professional nurseries rarely place growing pots directly onto completely flat surfaces. They allow a small air gap underneath so water can leave freely after every watering.
5. The Pot Is Simply Too Large for the Plant
It sounds strange, but giving a plant “more room to grow” sometimes creates the very problem we’re trying to avoid.
When a small plant sits inside an oversized container, its roots occupy only a tiny portion of the available soil. Every watering moistens the entire pot, yet only a small section is actively absorbing that water. The remaining soil stays damp for much longer because there simply aren’t enough roots using the available moisture.
The result is a container that always feels heavy, even though the plant itself isn’t drinking very much.
Professional growers usually increase pot sizes gradually rather than jumping several container sizes at once. This keeps the balance between root growth and soil volume much more stable, making drainage naturally more predictable.
6. Old Potting Mix Has Lost Its Structure
Potting mix doesn’t last forever.
This surprises many beginners because the plant itself may still appear alive after several years. Underneath the surface, however, the growing medium has been slowly changing with every watering, every fertilizer application, and every growing season.
Materials such as bark, compost, and peat gradually decompose into much finer particles. Those particles settle into the spaces that once allowed water and oxygen to move freely, leaving the entire container denser than when it was first planted.
Think of it like a kitchen sponge. A brand-new sponge feels light and springy, but after months of use it becomes flatter, denser, and noticeably slower to release water. Potting mix experiences a remarkably similar transformation.
Replacing tired growing media every few years doesn’t simply provide fresh nutrients. More importantly, it restores the physical structure that healthy drainage depends upon.
7. Watering Habits Are Working Against You
Sometimes the container isn’t the problem at all.
Our watering routine is.
Frequent light watering often keeps only the upper portion of the soil consistently damp while encouraging deeper layers to remain saturated. Conversely, watering heavily every day can prevent the lower part of the pot from ever having a chance to dry naturally.
Plants generally appreciate a healthy cycle of watering, drainage, oxygen exchange, and gradual drying before the next irrigation. Interrupting that cycle means the roots spend far more time surrounded by moisture than fresh air.
One of the easiest habits to develop is simply lifting the pot before watering. After a week or two, you’ll become surprisingly good at recognising the difference between a container that still holds plenty of moisture and one that’s genuinely ready for another drink. Your hands often become a more reliable moisture meter than your eyes.
| Problem | What Happens | Best Solution |
|---|---|---|
| Compacted soil | Water moves slowly through the container. | Replace old potting mix. |
| Root-bound plant | Roots restrict water movement. | Repot into the next suitable container size. |
| Decorative cachepot | Water collects beneath the growing pot. | Empty excess water after watering. |
| Blocked drainage holes | Water exits more slowly. | Clear holes and raise the pot slightly. |
| Oversized pot | Too much wet soil surrounds the roots. | Choose a container that matches root size. |
| Old potting mix | Air spaces collapse over time. | Refresh the growing medium every few years. |
| Poor watering routine | Soil stays constantly saturated. | Water thoroughly, then allow gradual drying before watering again. |
As you can see, most drainage problems have surprisingly practical solutions. Before replacing every pot in your collection, it’s worth spending a few minutes investigating the entire drainage system. Quite often, one small adjustment restores healthy airflow, healthier roots, and much happier plants.
Different Pot Materials Change the Way Water Behaves
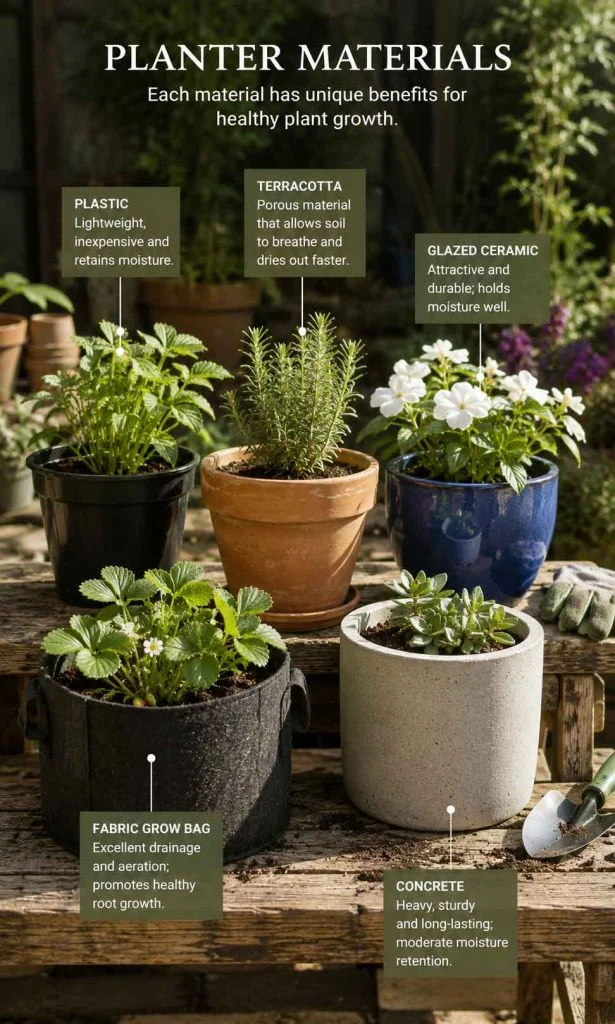
If you’ve ever moved the same plant from a plastic nursery pot into a beautiful ceramic container and noticed it suddenly stayed wetter for much longer, you weren’t imagining things. The plant didn’t suddenly change its watering needs overnight. The container itself became part of the watering system.
This is one of those little gardening details that people often discover by accident. Two pots can be identical in size, hold exactly the same potting mix, and have identical drainage holes, yet they dry at completely different speeds. That’s because every material interacts with heat, moisture, and airflow differently.
Instead of asking, “Which pot is the best?” I prefer asking a different question.
“Which pot is the best for this particular plant and this particular environment?”
A fern sitting inside an air-conditioned apartment has very different watering needs from a rosemary plant growing on a sunny balcony. Choosing the right container helps nature do part of the work for you instead of constantly adjusting your watering schedule.
Plastic Pots Hold Moisture the Longest
Plastic pots are everywhere for good reason. They’re lightweight, inexpensive, durable, and excellent at keeping moisture inside the container. Because plastic doesn’t absorb water, almost every drop stays within the potting mix until the plant uses it or it eventually drains away.
That makes plastic an excellent choice for moisture-loving plants or gardeners who occasionally forget to water. On the other hand, if your watering routine is already a little generous, plastic containers can keep roots damp much longer than expected.
Here’s something I’ve noticed while visiting home gardens. Many people blame themselves for overwatering when the real issue is that they’re using a plastic container in a cool indoor room where very little moisture evaporates. The watering routine isn’t necessarily wrong—the environment simply doesn’t remove water very quickly.
Terracotta Pots Help Soil Dry Naturally
Terracotta has been popular for centuries, and there’s a very good reason why.
Unlike plastic, terracotta is naturally porous. Tiny amounts of moisture gradually pass through the walls of the pot and evaporate into the surrounding air. This creates another pathway for water to leave the container besides the drainage holes.
If you’ve ever seen a white chalky coating appear on the outside of a clay pot, you’ve already witnessed this process. Water moves through the clay, evaporates, and leaves behind dissolved minerals.
Many Mediterranean herbs such as rosemary, thyme, lavender, and oregano appreciate this extra drying because their roots naturally prefer plenty of oxygen. Indoor tropical plants, however, may dry much faster than expected in warm weather, so they usually need slightly more frequent watering.
Terracotta isn’t automatically better—it simply behaves differently.
Glazed Ceramic Pots Can Be Surprisingly Different
Ceramic pots often confuse new gardeners because they don’t all perform the same way.
A fully glazed ceramic pot behaves much more like plastic. The glazed surface prevents moisture from escaping through the sides, meaning most water remains inside until it reaches the drainage holes.
Unglazed ceramic, meanwhile, allows some moisture movement, although usually not as much as traditional terracotta.
This is why two attractive ceramic pots sitting beside each other may require completely different watering schedules despite looking almost identical.
Fabric Pots Encourage Excellent Airflow
Fabric pots have become increasingly popular among vegetable growers and indoor plant enthusiasts, and it’s easy to understand why.
Instead of relying only on drainage holes underneath, the breathable fabric allows air to circulate around almost the entire root zone. Excess moisture escapes more evenly, while fresh oxygen continually reaches developing roots.
Another interesting benefit is something called air pruning. When roots reach the edge of the fabric, they’re naturally exposed to air and stop circling endlessly around the container. Instead, they produce new branching roots inside the pot, creating a healthier and more efficient root system.
The only trade-off is that fabric containers dry considerably faster, particularly during hot summer weather or in windy outdoor locations.
Concrete and Stone Containers Store Moisture Differently
Large concrete and stone planters are beautiful statement pieces, but they’re also heavy thermal masses. They absorb heat slowly, cool down slowly, and often keep the root environment more stable than lightweight containers.
That stability can benefit larger shrubs and ornamental plants. However, because these containers are usually much larger, they also contain a significant volume of potting mix. More soil naturally means more water is stored after every watering.
This doesn’t automatically create poor drainage, but it does mean the drying process usually takes longer than people expect.
Which Pot Material Is Right for You?
Rather than choosing whichever pot looks nicest at the garden centre, try matching the container to your growing conditions.
| Pot Material | Moisture Retention | Best For | Watch Out For |
|---|---|---|---|
| Plastic | High | Indoor plants, tropical species, busy gardeners. | Can remain wet for extended periods. |
| Terracotta | Medium | Herbs, succulents, Mediterranean plants. | Needs more frequent watering. |
| Glazed Ceramic | Medium to High | Decorative indoor plants. | Often behaves similarly to plastic. |
| Fabric Pot | Low | Vegetables, vigorous growers, root health. | Dries quickly during warm weather. |
| Concrete / Stone | Medium | Large outdoor containers and shrubs. | Large soil volume remains moist longer. |
One little gardening secret is that professional growers rarely expect every container to behave the same. They adjust watering according to the pot, not just the plant. Once you begin thinking this way, you’ll find yourself watering more confidently instead of following a fixed schedule that ignores the container’s role.
Selecting the correct container is only half the job. The other half is making sure water can move through it efficiently, which is why it’s worth understanding why some pots never drain even with holes before choosing your next planter.
How to Tell If Poor Drainage Is Already Damaging Your Plant
Plants are wonderfully patient.
In fact, they’re often too patient.
One of the reasons drainage problems become so frustrating is that plants don’t complain immediately. A container can stay overly wet for days or even weeks before obvious symptoms appear above the soil. By the time leaves begin turning yellow or growth slows dramatically, the roots have usually been dealing with poor conditions for quite some time.
That’s why experienced gardeners spend just as much time observing subtle clues as they do looking for dramatic ones.
A healthy root system lives in a balance between moisture and oxygen. When water remains trapped inside the container for too long, oxygen gradually disappears from the spaces between soil particles. The roots don’t suddenly rot overnight. Instead, they slowly lose efficiency. Water uptake becomes inconsistent, nutrient absorption declines, and new growth begins slowing long before older leaves show visible damage.
Root rot rarely begins because a plant suddenly receives too much water once. More often, the real problem is a container that quietly holds moisture for too long, which is why understanding why some pots never drain even with holes is one of the best ways to prevent root damage before it starts.
One of the earliest clues is surprisingly easy to miss.
The pot simply feels heavy for much longer than usual.
If you normally water every five or six days but suddenly notice the container still feels heavy after eight or nine days, that’s your plant quietly telling you that something inside the pot has changed.
Another clue is slow, uneven growth. New leaves may still appear, but they’re smaller than usual, stems elongate less, and the overall plant seems to have pressed the pause button. Many gardeners respond by adding fertilizer, but healthy roots are needed before extra nutrients can make much difference.
Then there are the little visitors nobody enjoys seeing—fungus gnats. These tiny flying insects absolutely love consistently damp potting mix. Seeing a few doesn’t necessarily mean your plant is in danger, but seeing them repeatedly is often a helpful reminder that the soil is remaining moist for longer than ideal.
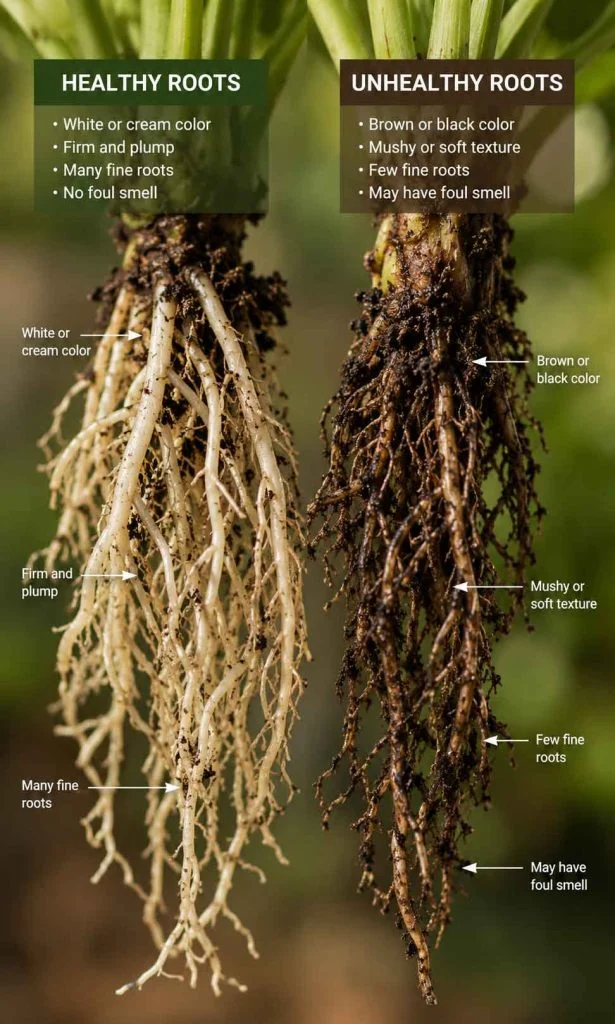
If you gently remove the plant from its pot, healthy roots should usually appear firm, pale cream or white, and smell fresh like damp earth. Roots that look dark brown, feel soft, or produce a sour, swampy smell are signalling that excess moisture has been present for too long.
If you’re unsure whether those darker roots are simply stained or beginning to decay, learning the early signs of root rot can help you decide whether the plant needs immediate attention or simply improved drainage.
The encouraging part is that these warning signs don’t always mean the plant is beyond saving. Quite the opposite. Catching drainage issues at this stage often allows the root system to recover remarkably well once airflow and moisture balance are restored. Sometimes the biggest improvement doesn’t come from buying new products at all—it comes from understanding what your pot has been trying to tell you all along.
A Five-Minute Drainage Inspection You Can Do Today
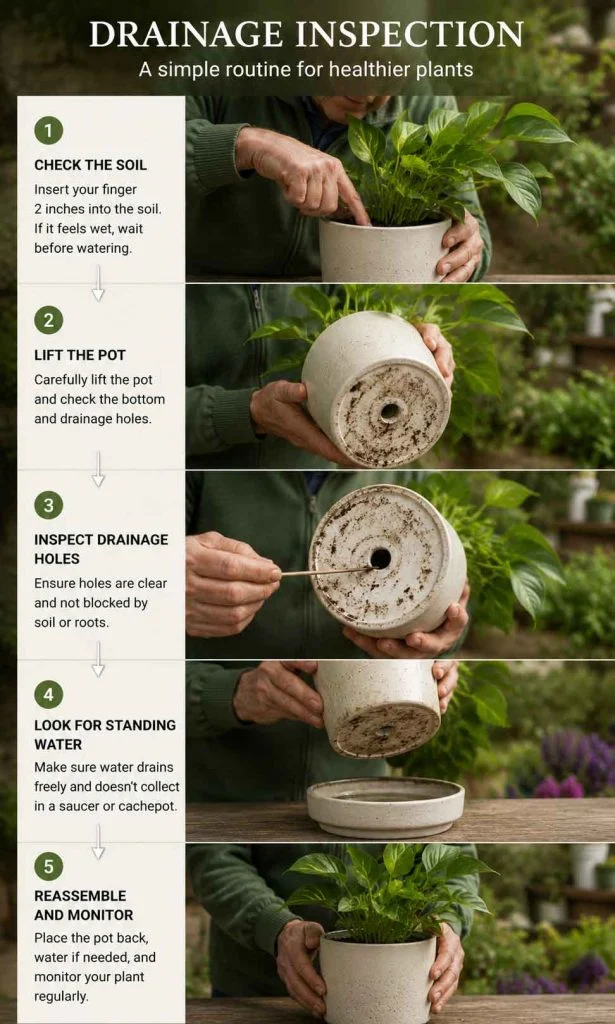
One of my favourite things about gardening is that you don’t always need expensive tools to solve a problem. Sometimes five careful minutes tell you more than buying another bag of potting mix or another bottle of plant food ever could.
Whenever someone asks me, “Do you think my pot has a drainage problem?” I rarely answer immediately. Instead, I suggest a quick inspection. By the time we’ve finished, the cause is usually much clearer, and we’ve avoided making changes that weren’t actually necessary.
Let’s work through the same inspection together.
Step 1: Lift the Pot Before You Water
This sounds almost too simple to matter, but it’s one of the best habits you can develop.
Pick up the container before reaching for the watering can. Don’t worry about guessing the exact weight. You’re simply teaching your hands to recognise whether the pot still contains plenty of moisture or has genuinely begun drying.
After a couple of weeks, you’ll notice something interesting. Healthy pots become lighter in a fairly predictable rhythm. Pots with drainage problems often stay surprisingly heavy for much longer than expected.
Many experienced gardeners hardly use moisture meters anymore because they trust what the weight of the container tells them.
Step 2: Look at the Drainage Holes
Now turn your attention underneath the pot.
You aren’t just checking whether holes exist. You’re looking for signs that they’re still working properly.
Ask yourself a few simple questions.
- Can you actually see daylight through the drainage hole?
- Are thick roots growing tightly across the opening?
- Is old compost packed firmly against the exit?
- Does algae or mineral build-up appear around the hole?
- Is the pot sitting completely flat against the ground?
Here’s something that often makes people smile.
I’ve seen gardeners proudly drill six extra drainage holes into a pot while leaving it sitting directly on a solid concrete patio. The new holes couldn’t help because they were still pressed tightly against the surface underneath.
Sometimes raising the pot by only a few millimetres with pot feet makes a noticeable difference.
Step 3: Feel Below the Surface
This is also why soil looks dry on top but wet underneath, especially when the upper layer dries faster than the root zone below.
The surface of potting mix can be surprisingly convincing.
It may look dusty.
It may even feel dry.
Yet only a few centimetres below, the soil can still contain plenty of moisture.
Instead of judging the top alone, gently insert your finger a little deeper into the potting mix.
You don’t need to dig all the way to the bottom. Simply compare what you feel near the surface with what you discover further down.
Quite often you’ll find something like this:
- Top layer — dry
- Middle layer — slightly moist
- Lower root zone — still very wet
This difference explains why so many people accidentally overwater healthy plants. The surface asks for another drink while the roots are still finishing the previous one.
This uneven drying pattern is why soil can look dry on top but remain wet underneath, especially when evaporation dries the surface faster than moisture leaves the lower root zone.
Step 4: Watch What Happens During Watering
The next inspection only takes a minute.
Water the plant thoroughly and simply observe.
Does the water disappear smoothly into the soil?
Does it pool on the surface?
Does it immediately run down the sides of the pot?
How long does it take before water begins leaving through the drainage holes?
Healthy potting mix usually absorbs water evenly before allowing excess moisture to drain away. If water races straight down one side without soaking the root ball, parts of the soil may have become hydrophobic. If water sits on top for an unusually long time, compaction could be slowing movement through the container.
Both situations point toward problems inside the pot rather than underneath it.
Step 5: Check the Saucer or Decorative Pot
Now comes the step that solves countless drainage mysteries.
After watering, wait about fifteen minutes.
Then look underneath.
Is the saucer full?
Is the decorative cachepot holding several centimetres of water?
Has the nursery pot been sitting in that water since the previous watering?
Many gardeners are genuinely surprised by what they discover here. The drainage holes performed exactly as they should, but the water never actually left the growing environment because it simply collected underneath the container.
Emptying that excess water may be the easiest improvement you make all season.
Step 6: Inspect the Root Ball (If Necessary)
If your plant has been struggling for several weeks, it may be worth gently sliding it from the container for a closer look.
Don’t worry—healthy plants usually tolerate this brief inspection perfectly well.
Here’s what you’re hoping to see:
| Healthy Signs | Warning Signs |
|---|---|
| White or cream-coloured roots | Brown or black roots |
| Firm, springy texture | Soft or mushy texture |
| Fresh earthy smell | Sour or swampy odour |
| Roots spread naturally | Roots tightly circling the pot |
Don’t panic if you notice one or two warning signs. Plants are remarkably resilient, and many recover beautifully once the underlying drainage issue is corrected. The goal isn’t to achieve perfect roots every time—it’s to catch small problems before they become major ones.
Should You Drill More Drainage Holes?
If you’ve searched online for solutions to poor drainage, you’ve almost certainly seen one recommendation repeated over and over again:
“Just drill more holes.”
It sounds sensible.
More holes should mean better drainage.
Sometimes it even appears to work.
But here’s the surprising truth: drilling extra holes fixes far fewer drainage problems than most gardeners expect.
Remember the Drainage Triangle™ we discussed earlier. The holes are only the final exit point. If water struggles to travel through compacted soil, around a dense root ball, or out of a decorative cachepot filled with standing water, adding another exit doesn’t remove the obstacles that came before it.
Think about a busy motorway during rush hour. Building another exit ramp doesn’t magically remove the traffic jam several kilometres earlier. Cars still have to reach that exit before it becomes useful.
Water behaves in much the same way.
That doesn’t mean drilling additional holes is always a bad idea. There are situations where it genuinely helps.
For example:
- A decorative ceramic pot was manufactured with only one tiny drainage hole.
- The existing hole has become damaged or partially blocked.
- You’re converting a decorative container into a permanent planting pot.
- The original design clearly doesn’t allow water to leave efficiently.
In those situations, increasing drainage capacity can certainly improve performance.
However, if your pot already has several well-sized drainage holes and still remains wet for days, it’s usually more productive to investigate the soil, the roots, or the watering routine before reaching for the drill.
One little rule I’ve followed for years is this:
If water reaches the drainage holes quickly but the pot still stays wet, the problem is probably inside the container. If water struggles to reach the holes at all, that’s when the drainage system deserves a closer inspection.
That simple observation has saved me from drilling perfectly good pots more times than I can count.
In the next section, we’ll look at the situations where repotting becomes the better long-term solution—and how to tell whether your plant is genuinely asking for a new home rather than another drainage hole.
When Repotting Is the Better Solution
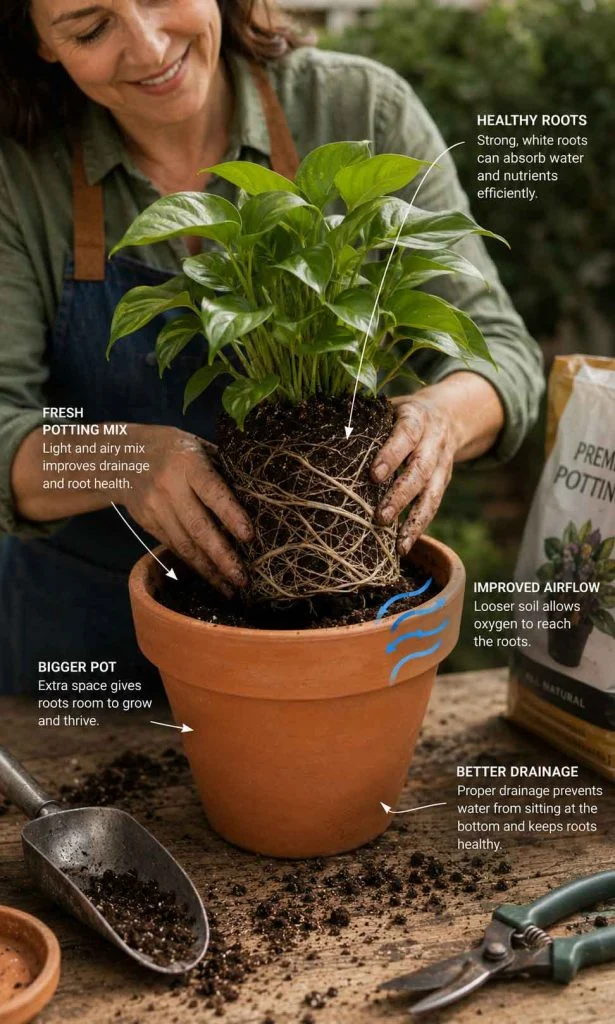
One question seems to appear in every gardening group sooner or later.
“Can I fix this without repotting?”
I completely understand why people ask. Repotting sounds like hard work, it can be a little messy, and nobody enjoys disturbing a healthy-looking plant unless it’s truly necessary.
The good news is that not every drainage problem requires a new pot. Sometimes refreshing your watering routine or emptying the decorative cachepot solves everything. Other times, however, the container has simply reached the end of what it can comfortably do for the plant. Knowing the difference saves both your plant and your weekend.
One way I like to think about it is this. Imagine wearing the same pair of shoes every single day for several years. Eventually, it doesn’t matter how well you clean them or replace the shoelaces—they simply no longer fit the job they’re supposed to do. Plant containers reach a similar point. They’re not broken, but the growing conditions inside them have slowly changed over time.
So how do you know when it’s time?
Repotting Usually Helps When Multiple Problems Appear Together
One warning sign by itself doesn’t necessarily mean you need a larger container.
Two or three appearing together, however, usually tell a much clearer story.
For example, imagine your plant has started growing more slowly, the pot feels unusually heavy several days after watering, roots are beginning to emerge from the drainage holes, and the soil has become hard enough that water pools briefly on the surface before soaking in.
Could each of those issues be solved individually?
Perhaps.
But together they suggest that the entire growing environment has become less suitable than it once was. In situations like this, repotting often improves several problems at the same time because you’re refreshing the soil, giving the roots more breathing room, and restoring proper water movement throughout the container.
Bigger Isn’t Always Better
Here’s another gardening myth that’s worth leaving behind.
Many people believe that if a plant needs repotting, they should choose the largest container possible so they won’t have to repeat the process for years.
It sounds sensible.
Unfortunately, it often creates a new drainage problem.
A much larger pot contains much more soil than the existing roots can use. Every watering leaves a large volume of damp compost surrounding a relatively small root system, meaning the lower part of the container stays wet for much longer than necessary.
Professional growers usually move plants one pot size larger, not three or four.
If you’re wondering whether your plant genuinely needs a new container or could happily stay where it is for another season, our guide on how often you should repot houseplants walks through the most reliable signs to look for.
That small increase allows the roots to expand naturally while still drying the surrounding soil at a healthy pace.
Think of it as giving your plant room to stretch rather than asking it to fill an empty apartment overnight.
Fresh Potting Mix Is Often the Real Upgrade
Something else worth remembering is that many successful repotting jobs have very little to do with the new pot itself.
The fresh potting mix often makes the biggest difference.
Over months and years, even excellent growing media slowly lose their structure. Tiny particles settle together, organic matter decomposes, and the spaces that once carried air and water gradually disappear.
Replacing that tired mix restores the tiny pathways roots rely on every day.
It’s a little like replacing the filter in an air purifier. The machine hasn’t changed, but everything suddenly works much more efficiently.
Don’t Rush to Repot During Every Season
Timing also matters.
Most actively growing plants recover much more quickly from repotting during their natural growing season because they’re already producing fresh roots and new leaves.
Repotting during winter dormancy isn’t always harmful, but recovery is usually slower because the plant isn’t actively building new growth.
Of course, there are exceptions. If the roots are rotting, the soil smells unpleasant, or the container has become completely waterlogged, waiting several months simply because it’s winter usually does more harm than good. In those situations, restoring healthy root conditions should take priority.
The ExpertsGuys Repot or Repair Decision™
Whenever I’m uncertain whether a plant genuinely needs repotting, I run through a simple checklist. It only takes a minute, but it prevents unnecessary work remarkably often.
The nice thing about this approach is that it avoids turning repotting into the automatic solution for every plant problem. Sometimes your plant really does need a new home. Other times, it’s simply asking for better drainage habits.
Key Takeaways
If there’s one lesson I’d love every gardener to remember after reading this guide, it’s this:
Drainage holes don’t create healthy drainage by themselves. They simply finish the journey that water has already travelled.
Once you begin looking at the entire system instead of the holes alone, many frustrating plant problems suddenly become much easier to understand.
Before buying a new container or drilling extra holes, take a few minutes to inspect the complete growing environment.
Ask yourself:
- Is the potting mix still light and airy?
- Have the roots filled the container?
- Is excess water collecting underneath the pot?
- Does the pot stay unusually heavy for several days?
- Has the container become much larger than the plant actually needs?
Those simple observations often reveal far more than adding another bottle of fertilizer or following a rigid watering schedule.
Gardening has a wonderful way of teaching patience. Plants rarely ask for perfection—they simply appreciate consistency. Once their roots receive the right balance of moisture, oxygen, and space, they’ll often reward you with stronger growth than you expected.
Once drainage is working properly, the next step is improving the wider growing environment with a plant compatibility guide that helps match plants with the right conditions.
And if your plant still seems healthy but stubbornly refuses to produce new growth, don’t stop here. Poor drainage is only one piece of the puzzle. Our complete guide to Why Plants Stop Growing Even When They Look Healthy explores several other hidden causes that quietly slow plant development, while our companion article Why Soil Looks Dry on Top but Wet Underneath explains one of the most misleading watering situations gardeners encounter.
Sometimes the biggest improvement doesn’t come from watering more or watering less.
It comes from understanding what has been happening beneath the surface all along.
Professional Perspective
One thing I’ve learned after years of helping gardeners solve plant problems is that we often spend far too much time looking above the soil and not nearly enough time thinking about what’s happening below it.
When a plant begins looking unhappy, it’s natural to focus on the leaves. We notice yellow edges, brown tips, or slower growth because that’s what we can see every day. The roots, meanwhile, quietly adapt to changing conditions long before the foliage tells us anything is wrong. By the time those first visible symptoms appear, the root environment has usually been changing for quite a while.
That’s why experienced growers rarely diagnose drainage by looking at the drainage holes alone. Instead, they observe how the entire growing system behaves over time.
For example, imagine two gardeners watering identical peace lilies on the same Saturday morning. Both plants receive the same amount of water, both containers have drainage holes, and both sit in similar-sized pots.
Five days later, one container feels comfortably light while the other still feels surprisingly heavy.
The difference isn’t luck.
Somewhere inside that second container, water is moving more slowly than the roots would prefer.
Perhaps the potting mix has gradually broken down after several years. Perhaps the decorative cachepot has been quietly holding excess water after every watering. Maybe the plant has become root-bound and the roots themselves are restricting healthy movement through the soil.
Whatever the reason, the plant is responding to the entire environment—not simply counting how many drainage holes exist underneath the pot.
One habit I encourage every gardener to develop is becoming a careful observer instead of a fast fixer.
It’s surprisingly tempting to react immediately when a plant looks unhappy. We add fertilizer, change watering schedules, move the pot closer to a window, buy moisture meters, or even purchase a completely new container. Sometimes those changes help. Sometimes they simply introduce more variables without addressing the original problem.
Instead, spend a few days gathering clues.
Lift the pot every morning.
Notice how quickly its weight changes.
Watch how long water continues dripping after watering.
Look underneath the container instead of only at the leaves.
Smell the potting mix when you gently loosen the surface.
Those simple observations build a much clearer picture than guessing ever will.
I’ve also found that many gardeners become much more confident once they stop chasing perfect watering schedules.
People often ask questions like:
“Should I water every four days?”
or
“Is once a week the correct routine?”
The honest answer is that healthy plants don’t own calendars.
They respond to conditions.
A terracotta pot on a warm balcony may dry in three days.
The same plant growing indoors in winter could remain comfortably moist for more than a week.
Rather than following fixed dates, successful gardeners learn to follow the plant itself.
Perhaps that’s one of the reasons gardening remains so enjoyable. Every container teaches you something slightly different. No two balconies receive exactly the same sunshine. No two homes have identical humidity. Even two pots filled with the same compost will gradually develop their own personalities as roots grow and seasons change.
Once you begin seeing drainage as a living system instead of a simple hole in the bottom of a pot, many frustrating problems become surprisingly logical.
The goal isn’t to make every pot drain as quickly as possible.
The goal is to create a healthy balance where water stays available long enough for the roots to drink, yet leaves often enough for fresh oxygen to return.
When that balance is right, plants usually tell you in the nicest way possible.
They simply start growing again.
FAQs
Does adding more drainage holes always improve drainage?
Not necessarily. Additional drainage holes only help if the existing holes are limiting water from leaving the pot. In many cases, the real problem is compacted potting mix, a root-bound plant, or water collecting underneath the container. If water cannot travel freely through the soil, extra holes won’t make much difference.
Why does my pot stay heavy several days after watering?
A heavy pot usually means a significant amount of water is still being held inside the potting mix. This can happen when the soil has become compacted, the container is much larger than the plant’s root system, or drainage is slowed by poor airflow around the roots.
Is it bad if water doesn’t immediately run out of the drainage holes?
No. Healthy potting mix usually absorbs water first before allowing the excess to drain away. If the soil dries naturally over the following days, the drainage system is normally functioning as intended.
Should I place rocks or gravel in the bottom of my pot?
Generally no. Modern container gardening recommends using quality potting mix throughout the container because rocks do not reliably improve drainage and can reduce available rooting space.
How often should I replace old potting mix?
Most container plants benefit from fresh potting mix every one to three years, depending on the plant species, growth rate, and condition of the existing soil.
Can poor drainage cause slow plant growth even if the leaves look healthy?
Yes. Roots that remain in waterlogged soil receive less oxygen, reducing their ability to absorb water and nutrients efficiently. Plants may continue looking green while growth gradually slows.