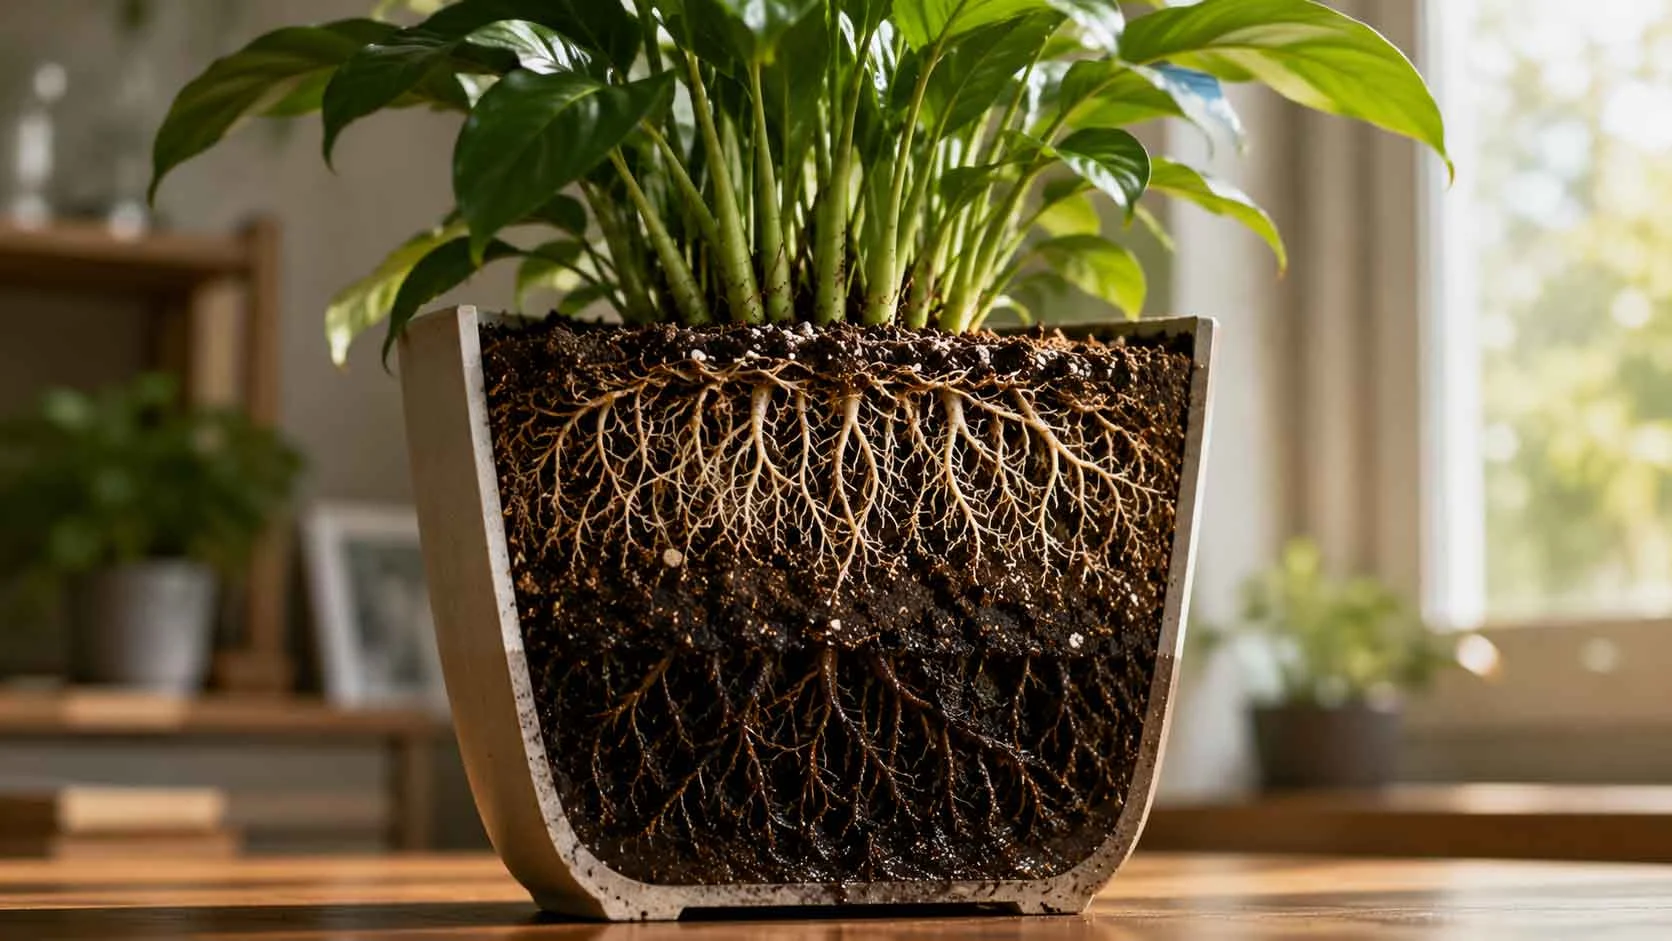

A plant can look remarkably normal while something far less cheerful is happening inside the pot. The leaves may still be green, the stems may still be upright, and from across the room there may be no obvious reason to worry. Meanwhile, below the soil, roots can be sitting in conditions that are becoming increasingly difficult – too much persistent moisture, too little oxygen, and the beginning of tissue decline that has not yet announced itself above ground.
This is what makes early root rot so easy to miss. Most of us naturally watch the leaves because they are visible, expressive, and occasionally dramatic enough to make a houseplant owner cancel the afternoon’s plans. Roots are quieter. They can begin changing colour, losing firmness, or developing an unhealthy smell before the foliage gives you a clear warning.
The good news is that you do not need to wait for half the plant to turn yellow before investigating. Early root trouble often leaves smaller clues: a pot that stays heavy for unusually long, soil that remains damp well beyond its normal rhythm, growth that suddenly slows, a lower stem that feels different, or a plant that seems strangely tired despite having enough water.
Learning to notice those clues can give you a much earlier opportunity to respond. The goal is not to pull every plant out of its pot whenever it looks mildly offended. It is to recognize when several quiet signals begin pointing toward the same hidden problem.
Why Root Rot Can Begin Before the Leaves Change Colour
Leaves are often treated as the plant’s early warning system, but they are not always the first part of the plant to experience trouble. A root can begin struggling in an overly wet, poorly aerated environment while the foliage above still looks reasonably healthy. The plant may continue using stored resources, older roots may still be functioning, and the first damaged areas may be too limited to cause an obvious change above the soil.
This creates a delay between what is happening below ground and what you can see from across the room. By the time several leaves turn yellow at once, the root problem may have been developing for days or even longer, depending on the plant, temperature, potting mix, container, and severity of the conditions.
Healthy Roots Need Water and Oxygen
It is easy to think of roots as tiny drinking straws whose main job is to absorb water, but healthy roots also need access to oxygen. A well-structured potting mix contains small air spaces between particles, allowing roots to function while moisture remains available nearby.
After watering, some of those spaces temporarily fill with water. As excess water drains and the potting mix begins to dry, air returns. This changing balance between moisture and oxygen is a normal part of life inside a healthy container.
Problems can begin when the root zone remains saturated or poorly aerated for too long. Water occupies more of the spaces that would normally contain air, oxygen availability can decline, and stressed root tissue may become increasingly vulnerable to decay and opportunistic microorganisms.
The important point is that wet soil does not automatically equal root rot. Many healthy plants naturally spend time in moist soil. The concern is persistent moisture combined with conditions that limit aeration, slow drying, or leave already stressed roots unable to recover.
The First Changes May Be Happening Where You Cannot See Them
Early root decline may begin with subtle changes in a limited part of the root system. Some roots may lose their healthy firmness. Pale or light-coloured roots may begin darkening. Fine feeder roots can deteriorate before thicker roots are noticeably affected.
At this stage, the plant may still have enough healthy roots to keep the leaves looking normal. That is why waiting for dramatic yellowing can sometimes mean waiting for the problem to become much larger.
Think of it less like a light switch and more like a gradual loss of working capacity. A plant does not usually go from “perfectly healthy roots” to “entire root system destroyed” in one tidy moment. Different roots can be in different conditions at the same time, especially in a large pot where moisture is unevenly distributed.
One reason early root trouble is easy to miss is that soil may look dry on top while remaining wet underneath, encouraging another watering before the root zone has had time to recover.
Why Yellow Leaves Can Be a Late Clue
When damaged roots can no longer support the plant as effectively, the symptoms above ground may finally become easier to see. Leaves can yellow, growth may stall, stems may lose firmness, or the plant may droop even though the soil is still wet.
The confusing part is that several of these symptoms can also appear when a plant is too dry. A drooping plant beside a dry-looking soil surface can make another watering seem like the obvious solution, even when persistent moisture around the roots is already part of the problem.
This is why the timeline matters. If a plant was watered recently, the pot remains unusually heavy, the deeper soil is still damp, and the plant is beginning to droop or slow down, the situation deserves a closer look before more water is added.
The leaves are still useful messengers. They are simply not always the first ones to hear the news.
The Earliest Signs of Root Trouble Are Often Surprisingly Quiet
Root rot rarely begins with a plant dramatically collapsing overnight. More often, the first clues are small changes that are easy to explain away individually. The pot feels heavier than expected. The soil has stayed damp for longer than usual. A new leaf seems to have stopped halfway through its grand entrance. Nothing looks disastrous, so the plant remains on the usual watering routine while the root zone quietly asks for a little more attention.
The useful approach is not to panic over one symptom. Instead, look for a pattern of several clues appearing together. A slow-growing plant in cool weather is not automatically developing root rot, and one yellow leaf on an older plant may simply be an old leaf retiring with dignity. The concern becomes stronger when moisture, growth, smell, root condition, and drainage begin telling the same story.
The Pot Stays Heavy for Much Longer Than Usual
A pot that remains heavy long after watering can be one of the earliest practical clues that the root zone is drying more slowly than expected. Water adds considerable weight, so if a familiar container normally becomes noticeably lighter after several days but suddenly stays heavy for much longer, something in the moisture cycle may have changed.
Sometimes the explanation is perfectly ordinary. The weather may have become cooler, light levels may have dropped, or the plant may have entered a slower period of growth. In other cases, compacted potting mix, a larger-than-needed container, blocked drainage, or reduced root activity may be keeping moisture around the roots for longer.
The change from the plant’s normal rhythm matters more than a universal number of days. A tropical plant in a warm, bright room and a slow-growing plant in a cool corner will not dry at the same speed. Rather than asking whether the pot has been wet for exactly three, five, or seven days, ask whether it is staying wet significantly longer than it usually does under similar conditions.
New Growth Slows Without an Obvious Reason
Roots support everything happening above the soil. When they begin functioning less effectively, one of the earliest visible changes may be a reduction in new growth rather than immediate yellowing.
A new leaf may emerge more slowly. A plant that was steadily producing growth may suddenly pause. New leaves may remain smaller than expected, or a growing tip may seem to sit there for weeks apparently reconsidering its career choices.
Slow growth alone does not prove root rot. Light, temperature, nutrition, season, transplant stress, and the plant’s natural growth cycle can all affect development. However, slow growth becomes more meaningful when it appears alongside persistently wet soil, unusual pot weight, poor drainage, or changes in the roots themselves.
The Plant Droops Even Though the Soil Is Wet
This is one of the most confusing early warnings because drooping is strongly associated with thirst. When leaves lose firmness, the instinctive response is often to add water.
But roots need to function properly for the plant to manage water effectively. If part of the root system is stressed or beginning to deteriorate, the plant may struggle even while moisture is readily available in the soil.
Before watering a drooping plant, check the root-zone conditions. If the pot is light and the deeper soil is dry, thirst may indeed be the likely explanation. If the pot is still heavy and the lower soil remains wet, another watering may be the opposite of what the plant needs.
A drooping leaf is a clue, not a watering instruction.
The Soil Develops an Unusual Smell
Healthy potting mix usually smells earthy, woody, or relatively neutral. A persistent sour, swampy, fermented, or unpleasant smell deserves attention, particularly when the soil has remained wet for a long time.
Odour can develop when persistently wet, poorly aerated organic material begins changing or when decaying root tissue is present. The smell may be strongest near the drainage holes or become more obvious when the root ball is carefully removed from the container.
Not every unusual soil smell means root rot, but smell is useful because it gives you another clue that cannot be seen from the leaves. If the pot is staying wet, growth is slowing, and an unpleasant odour has appeared, the case for a closer root inspection becomes much stronger.
Fine Roots Begin to Darken or Lose Firmness
When you can safely inspect the root system, texture is often more informative than colour alone. Healthy roots vary widely between species. Some are naturally white or cream, while others may be tan, brown, reddish, or covered in dark material from the potting mix.
This is why the simple rule that “white roots are healthy and brown roots are rotten” can be misleading.
A more useful question is: How does the root feel?
Healthy roots are generally firm for that species. Roots affected by decay may become unusually soft, mushy, hollow, fragile, or easy to pull apart. In some cases, the outer tissue can slip away and leave a thin inner strand behind.
Colour still matters, but it should be interpreted together with texture, smell, and the condition of the surrounding soil.
The Lower Stem or Crown Begins to Feel Different
For some plants, trouble can become noticeable near the point where the stem meets the soil. The area may darken, soften, or feel less firm than healthy tissue above it.
This deserves prompt attention because decay near the crown or stem base can be more serious than the loss of a few isolated feeder roots. However, natural stem colour and texture vary enormously between plants, so compare the suspicious area with healthy tissue on the same plant rather than relying only on a photograph of another species.
If the base feels genuinely soft, water-soaked, or unstable, avoid repeatedly pressing and squeezing it in the name of investigation. Plants appreciate diagnosis, but perhaps not a daily interrogation.
Fungus Gnats Keep Returning
Fungus gnats do not cause every case of root rot, and seeing one tiny fly does not mean the root system is collapsing. However, persistent fungus gnat activity can indicate that the upper layers of organic potting mix are remaining moist enough to support their life cycle.
If fungus gnats repeatedly return while the pot also dries slowly, consider the insects as part of the wider moisture picture. They may be telling you that the growing medium is staying damp more consistently than you realise.
Again, the pattern matters more than any single clue.
A pot that stays heavy, a plant that has stopped growing, damp soil that smells unpleasant, and roots that feel soft together tell a much more meaningful story than one lonely fungus gnat flying past your coffee.
Why Roots Begin to Rot in the First Place
Root rot is often described as an overwatering problem, which is partly true but also a little too simple. A watering can does not march into the pot and personally attack the roots. The real problem is usually a combination of persistent moisture, reduced oxygen, vulnerable root tissue, and conditions that allow decay-causing organisms to take advantage.
This distinction matters because two people can water similar plants with the same amount of water and get very different results. One plant may be growing actively in a warm, bright position with an airy potting mix and excellent drainage. The other may be sitting in a cool corner inside a large glazed pot filled with dense soil. The first container may move through its moisture cycle comfortably, while the second remains wet long after the plant has stopped using much water.
Understanding the conditions behind root rot makes prevention much easier than simply trying to water less.
Persistent Moisture Reduces the Air Available Around Roots
A healthy potting mix contains both moisture and air. After a thorough watering, water temporarily occupies many of the spaces between soil particles. As excess water drains and the mix gradually dries, more air returns to those spaces.
When the root zone remains saturated or densely packed for too long, that exchange becomes less effective. Oxygen availability can decline, particularly in the wettest areas of the container, and roots that depend on a reasonably aerated environment may begin experiencing stress.
This does not mean roots must remain dry. Many plants prefer consistently moist conditions, and some species tolerate wetter environments far better than others. The problem begins when the amount and duration of moisture exceed what the particular plant, potting mix, root system, and environment can comfortably manage.
Compacted Potting Mix Can Hold Water and Lose Air Space
Potting mix changes over time. Fine organic ingredients can break down, particles can settle, and repeated watering can gradually reduce some of the larger air spaces that once existed between them.
A mix that was loose and airy when the plant was first potted may eventually become denser. Water may move through it more slowly, the lower layers may remain damp for longer, and roots may have less access to air.
Compaction can be particularly difficult to notice from above. The surface may still look perfectly ordinary while the centre of the root ball has become dense and slow to dry.
This is one reason simply adding a layer of fresh potting mix to the top does not necessarily solve a deeper structural problem. The roots are living inside the entire container, not decorating the top two centimetres.
An Oversized Pot Can Stay Wet Around a Small Root System
Moving a plant into a much larger pot can feel generous. More room! More soil! A magnificent property upgrade! Unfortunately, roots do not always appreciate receiving a five-bedroom mansion when they were comfortably occupying a studio apartment.
A small root system surrounded by a large volume of wet potting mix may not use moisture quickly enough to create a healthy drying cycle. The outer and lower areas of the pot can remain damp long after the plant has absorbed what it needs from the soil immediately around its roots.
This does not mean a plant should be squeezed indefinitely into a tiny container. Roots need room to develop. The safer approach is usually to increase pot size gradually, allowing the root system and the volume of moisture-holding mix to remain reasonably matched.
Poor Drainage Can Keep the Bottom of the Pot Wet
Drainage holes are important, but the presence of a hole does not guarantee that moisture is moving efficiently through the entire container.
A drainage hole can become partly blocked by compacted soil, dense roots, decorative stones, or the flat surface beneath the pot. Water may also drain from the nursery pot and then remain trapped inside a decorative outer container, leaving the bottom of the inner pot sitting in runoff.
In other cases, the potting mix itself may be the problem. Water can leave the drainage hole while the central root ball still retains moisture for a very long time.
This is why drainage should be thought of as a whole-pot process, not simply as evidence that a few drops of water appeared at the bottom.
Cool Conditions Can Slow the Entire Moisture Cycle
Plants generally use water differently as their environment changes. When temperatures fall, light levels decrease, or growth slows, a plant may use water much more slowly than it did during warmer or brighter conditions.
If the watering routine stays exactly the same, the pot may begin remaining wet for longer with every cycle.
This is especially easy to miss indoors because the calendar still says, for example, “water every Sunday.” The plant, unfortunately, has not subscribed to the calendar.
A routine that worked beautifully during active growth may become excessive when the plant is growing slowly. This is why observing how long the pot actually takes to dry is more useful than assuming the same interval will work throughout the year.
Damaged Roots Are More Vulnerable
Roots can be damaged by rough repotting, extreme dryness, fertilizer stress, temperature extremes, physical injury, or previous periods of poor growing conditions. Once tissue is weakened, it may be less able to tolerate an environment that healthy roots could have handled more successfully.
This is why root rot is not always the result of one dramatic watering mistake. Sometimes it develops after several stresses overlap.
A recently disturbed root system placed into a dense, wet mix may struggle. A plant that has lost roots during repotting may suddenly be sitting in more moisture-holding soil than its smaller remaining root system can use. A severely dehydrated plant may also have damaged roots that do not immediately resume normal function the moment water is added.
The history of the plant matters.
Decay-Causing Organisms Take Advantage of the Conditions
Various fungi and fungus-like organisms can be involved in root diseases, but their presence alone does not tell the entire story. The condition of the root zone strongly influences whether a plant remains healthy or becomes vulnerable.
Persistent moisture, poor aeration, stressed roots, unsuitable temperatures, and contaminated growing material can create conditions in which damaging organisms have a greater opportunity to affect weakened tissue.
For the home gardener, the practical lesson is not to become obsessed with identifying every microorganism by name. Unless you are dealing with a valuable collection, repeated crop losses, or a situation requiring laboratory diagnosis, improving the conditions around the roots is often the most useful place to begin.
The pot is an ecosystem. When moisture, air, root activity, and drainage remain reasonably balanced, roots are much better equipped to function. When that balance stays disrupted, trouble has a much easier invitation.
Root Rot Is Usually a Process, Not a Single Moment
It is tempting to imagine root rot beginning on the exact day a plant receives “too much water,” but the real progression is often more gradual.
The pot stays wet longer than usual. Oxygen availability becomes less favourable in part of the root zone. Fine roots begin experiencing stress. Some tissue loses function. The plant uses even less water because part of its root system is no longer working normally. The pot then dries even more slowly, creating a cycle that can gradually reinforce itself.
That cycle explains why early detection matters so much. The earlier you notice that the moisture rhythm has changed, the more opportunity you have to investigate before widespread leaf symptoms appear.
You are not trying to catch the plant doing something wrong. You are trying to notice when the conditions inside the pot have stopped working as well as they once did.
How to Check for Root Rot Without Disturbing the Plant Too Soon
The moment root rot enters your mind, it can be tempting to pull the plant out of its pot immediately and begin examining every root like a detective arriving at a particularly muddy crime scene. Sometimes a root inspection is exactly what is needed, but repeatedly disturbing a plant that is otherwise stable can create additional stress and damage healthy roots.
A better approach is to begin with the least disruptive clues and move toward a full root inspection only when the evidence becomes stronger. Think of it as a gentle investigation: observe first, check the moisture pattern, inspect what you can reach, and only then decide whether the plant needs to come out of the pot.
Step 1 – Compare the Pot With Its Normal Drying Rhythm
Start by asking a simple question: Is this pot behaving differently from usual?
If a plant normally becomes noticeably lighter within several days but is now remaining heavy for much longer under similar conditions, pay attention. The same is true if the soil used to dry evenly but now stays damp near the bottom while the surface dries quickly.
One slow drying cycle does not prove root rot. Weather, lower light, cooler temperatures, and slower seasonal growth can all change water use. The clue becomes more important when the altered moisture pattern continues and appears alongside other changes such as stalled growth, drooping, odour, or unusual root texture.
Step 2 – Check Below the Surface
Do not judge the pot from the top layer alone. Insert a finger a few centimetres into the mix where practical, or use a plain wooden chopstick to investigate deeper moisture.
If the surface is dry but the deeper soil remains noticeably damp, give the root zone more time before watering again. If the pot has remained wet for an unusually long period, make a note of that rather than immediately trying to correct the situation with more water.
The goal at this stage is to understand the moisture pattern. A pot that is gradually drying is different from one that seems to remain persistently wet with very little change.
Step 3 – Smell Near the Soil and Drainage Holes
Yes, this is the part of plant care where you may find yourself smelling the bottom of a flowerpot. Gardening has many glamorous moments.
Healthy potting mix often has an earthy or neutral smell. A persistent sour, swampy, fermented, or decaying odour can be a warning, particularly when combined with prolonged wetness.
Check near the drainage holes as well as the soil surface. Problems developing in the lower root zone may be easier to notice from the bottom of the container.
Smell alone cannot diagnose root rot, but it can strengthen the case for a closer inspection.
Step 4 – Look Through Drainage Holes When Possible
If roots are visible through the drainage holes, inspect them without pulling or poking aggressively.
Look for changes in:
- Firmness
- Colour compared with other roots on the same plant
- Soft or collapsing tissue
- Roots that appear unusually fragile
- Dark, wet material collecting around the root area
Remember that healthy roots are not always bright white. Depending on the species, age of the root, and potting mix, perfectly healthy roots may be cream, tan, brown, reddish, or stained by organic material.
Texture and smell often tell you more than colour alone.
Step 5 – Check the Base of the Plant
Look at the point where the stems or crown meet the potting mix. The tissue should generally feel appropriately firm for that species.
Darkening, softness, a water-soaked appearance, or instability at the base deserves closer attention, particularly when the root zone has remained wet.
Be gentle. Repeatedly squeezing the stem every morning will not improve the diagnosis, although it may convince the plant that living with humans was a questionable evolutionary decision.
Step 6 – Decide Whether a Full Root Inspection Is Justified
A full inspection becomes more reasonable when several warning signs appear together, such as:
- The pot remains wet much longer than usual
- The plant is drooping despite moist soil
- Growth has slowed unexpectedly
- An unpleasant smell is coming from the pot
- Visible roots appear soft or damaged
- The lower stem or crown is becoming soft
- Leaves are beginning to yellow while the soil remains persistently wet
- The plant is declining despite adjustments to watering
At this point, carefully removing the root ball may provide information that you cannot obtain from above.
How to Inspect the Roots Safely
Choose a clean working area and support the plant gently. If the root ball is extremely wet and fragile, handle it carefully because damaged roots may break easily.
Slide the plant from the container rather than pulling hard on the stems. For flexible nursery pots, gently squeezing the sides can help release the root ball. If the plant is firmly attached to the container, work slowly rather than turning the inspection into a wrestling competition.
Once the root ball is visible, do not immediately remove every piece of soil. Start by looking at the overall pattern.
Look for Healthy Sections First
Identify roots that appear firm and structurally intact. Healthy roots may vary in colour, but they should generally hold together when handled gently.
Seeing healthy roots is useful because it gives you a comparison point. Instead of asking whether a brown root is universally “good” or “bad,” you can compare its texture and appearance with other roots on the same plant.
Then Look for Suspicious Areas
Roots affected by significant decay may be:
- Soft or mushy
- Unusually dark compared with healthy roots nearby
- Hollow or collapsing
- Easy to pull apart
- Covered in deteriorating outer tissue
- Associated with an unpleasant smell
One damaged root does not necessarily mean the entire root system is lost. Root systems are rarely all-or-nothing. A plant may have healthy sections, stressed sections, and severely damaged sections at the same time.
That is why the inspection should answer a more useful question:
How much healthy, functioning root system appears to remain?
Do Not Confuse Normal Root Colour With Rot
This is one of the easiest mistakes to make when inspecting roots.
Online advice often reduces the diagnosis to:
White roots = healthy.
Brown roots = rotten.
Real plants are less cooperative.
Root colour varies by species, root age, growing medium, fertilizer residue, mineral deposits, and staining from bark, peat, compost, or other organic ingredients. Older healthy roots may naturally be darker than fresh feeder roots.
Instead of judging colour alone, compare four things:
Colour + texture + smell + surrounding conditions
A brown root that is firm, intact, and growing in an otherwise healthy root system may be completely normal. A dark root that is soft, collapsing, unpleasant-smelling, and surrounded by persistently wet material deserves much more concern.
A Simple Root Check
Ask:
- Is it firm?
- Does it hold together when handled gently?
- Does it smell normal?
- Are healthy roots still present nearby?
- Has the surrounding soil been staying wet unusually long?
This approach is far more reliable than deciding that every root which failed to arrive dressed in perfect white must immediately be removed.
When Not to Repot Immediately
Not every plant with slow-drying soil needs an emergency repot.
If the plant is stable, the roots visible through the drainage holes appear firm, there is no unpleasant smell, the crown is healthy, and the potting mix is gradually drying, observation may be more appropriate than immediate intervention.
Repotting itself can damage roots. Replacing all the soil can disturb the root system further, and moving a stressed plant into a dramatically different environment can add another layer of adjustment.
Sometimes the best next step is simply to:
- Stop watering temporarily
- Empty standing water from the outer pot or saucer
- Improve appropriate airflow
- Return the plant to suitable light
- Allow the root zone to move through a healthier drying cycle
- Monitor changes over the next several days
The important word is monitor. Waiting should not mean forgetting about the plant until it sends a formal complaint through three yellow leaves and a collapsed stem.
If the condition worsens, the smell becomes unpleasant, the crown softens, or the plant continues declining while the soil remains persistently wet, a more direct root inspection becomes increasingly justified.
What to Do If You Find Early Root Rot
Finding damaged roots can feel alarming, but early root rot does not automatically mean the plant is finished. If a useful portion of the root system is still firm and healthy, the plant may have a good chance of recovering once the damaged tissue is addressed and the conditions that encouraged the problem are corrected.
The important part is to avoid turning one problem into five new ones. A stressed plant does not necessarily need every root scrubbed, every leaf removed, a dramatic fertilizer treatment, three home remedies, and an immediate move to the brightest window in the house. Recovery usually works better when the response is calm, clean, and appropriate to what you actually find.
Step 1 – Separate Clearly Damaged Roots From Healthy Roots
Begin by identifying roots that are genuinely deteriorating rather than removing everything that happens to look brown.
Healthy roots should generally feel firm and hold together when handled gently. Damaged roots may feel mushy, hollow, slimy, unusually fragile, or collapse with very little pressure. In some cases, the outer tissue may slip away from the root.
Work slowly and compare suspicious roots with healthier sections on the same plant. If you are uncertain about a firm root simply because of its colour, leaving it alone is often better than cutting away potentially healthy tissue.
The goal is not to create the cleanest-looking root system for a photograph. The goal is to preserve as much functioning root tissue as possible.
Step 2 – Use Clean Tools for Any Necessary Pruning
If clearly rotten roots need to be removed, use clean, sharp scissors or pruning tools. Remove tissue that is obviously soft, collapsing, or severely decayed while preserving healthy roots wherever possible.
Clean your tools before use and again afterward, particularly if you care for multiple plants. This reduces the chance of carrying contaminated organic material from one plant to another.
Avoid excessive cutting “just to be safe.” A plant recovering from root loss needs the healthy roots it still has.
Step 3 – Remove the Worst of the Wet, Degraded Potting Mix
If the existing potting mix is sour-smelling, badly compacted, breaking down, or remaining saturated around damaged roots, replacing at least the problematic material may be appropriate.
You do not always need to wash every particle of soil from every healthy root. Aggressive root washing can create additional physical damage, especially in plants with fine or fragile root systems.
Remove loose, degraded, or obviously problematic material carefully. The amount of old mix that should remain depends on the plant, the severity of the problem, and the condition of the root ball.
If the root system is severely affected or you are dealing with a plant known to be particularly sensitive to root disturbance, species-specific guidance can be valuable.
Step 4 – Choose a Pot That Matches the Remaining Root System
This is an important step that is easy to overlook.
If a plant has lost a significant portion of its roots, returning it to the same oversized container may leave the smaller remaining root system surrounded by more wet potting mix than it can use.
A slightly smaller, appropriately sized pot may sometimes provide a more manageable moisture environment during recovery. The container should have functional drainage and enough room for the remaining healthy roots without surrounding them with an unnecessarily large reservoir of wet soil.
Do not choose a tiny pot that crushes or sharply bends healthy roots. The aim is proportion, not punishment.
Step 5 – Use an Appropriate, Well-Structured Potting Mix
Fresh potting mix should suit the plant rather than following a universal recipe.
For many common houseplants that prefer an aerated root zone, a mix with suitable coarse structure can help water move through the container while maintaining air spaces around the roots. Depending on the species, this might include ingredients such as bark, perlite, pumice, coco chips, or other appropriate components alongside moisture-retentive material.
More drainage material is not automatically better. A plant that naturally prefers consistent moisture should not be placed into an extremely coarse mix simply because root rot occurred once.
The better question is:
What moisture and aeration balance does this particular plant need?
Step 6 – Repot Gently
Position the remaining healthy roots naturally rather than forcing them into a tight shape. Add the new potting mix around the root system and settle it gently without compressing it into a dense block.
The plant should be stable, but the potting mix does not need to be packed as firmly as concrete. Roots benefit from structure that can hold appropriate moisture while still allowing air movement.
Keep the plant at a suitable planting depth. Burying the crown or stem base more deeply than before can create additional moisture problems for species that prefer those tissues to remain above the soil line.
Step 7 – Be Careful With the First Watering Decision
This is where advice can become confusing because the correct approach depends on the plant, the condition of the remaining roots, the new potting mix, and how much moisture is already present after repotting.
The goal is not to place recently stressed roots straight back into another prolonged period of saturation. At the same time, roots should not necessarily be left in unsuitable extreme dryness.
If the fresh potting mix is already evenly moist, additional heavy watering may not be necessary immediately. If the mix is dry and the plant requires watering after repotting, water appropriately and allow excess moisture to drain freely.
What matters most is what happens next: do not return automatically to the same watering schedule that contributed to the previous moisture pattern.
Step 8 – Give the Plant Stable Recovery Conditions
After root stress and repotting, stability is valuable.
Place the plant in appropriate light for its species, avoiding a sudden jump into harsh conditions simply because you want the soil to dry faster. Maintain suitable temperatures and reasonable airflow without blasting the plant with a fan at close range.
Try not to move it repeatedly from one location to another while waiting for an immediate sign of improvement. Root recovery takes time, and the leaves may not look dramatically better the following morning.
A recovering plant does not need a daily tour of the house.
What Not to Do During Early Recovery
The recovery period is often when enthusiastic plant owners accidentally create additional stress. Once a plant has been repotted, it can be tempting to keep adding treatments in the hope of speeding things up.
Do Not Fertilize Heavily
A stressed root system may not be in the best condition to handle strong fertilizer applications. Fresh potting mix may also already contain nutrients.
Unless the plant has a specific need and the product is appropriate for the situation, recovery is usually not the moment for an aggressive feeding programme.
More fertilizer does not rebuild damaged roots overnight.
Do Not Keep Pulling the Plant Out to Check
Once you have inspected, treated, and repotted the plant, give it time.
Repeatedly removing the root ball to see whether new roots have appeared can damage fragile developing tissue and prevent the plant from settling into its new environment.
Monitor the plant from the outside first. Watch the moisture cycle, stem firmness, leaf condition, and eventually new growth.
Do Not Water Because the Plant Looks Sad
A plant recovering from root damage may continue to droop or look stressed for some time. That appearance does not automatically mean it needs more water.
Check the potting mix and pot weight before watering. The remaining root system may use water more slowly than it did before the damage occurred, particularly if many roots were removed.
This is one of the most important adjustments after root loss: less root mass can mean slower water use.
Do Not Expect Damaged Leaves to Become Perfect Again
Existing yellow, damaged, or severely stressed leaves may not return to their original appearance even if the root system begins recovering.
Instead of judging recovery only by old damage, look for stabilization and future growth. Has the decline slowed? Is the stem remaining firm? Is the moisture cycle becoming more predictable? Does new growth eventually appear?
Recovery is often easier to see in what happens next than in what has already happened.
The First Seven Days After Repotting Matter
The first week is less about forcing visible growth and more about watching whether the plant stabilizes.
Days 1-2 – Let the Plant Settle
Keep conditions stable and avoid unnecessary handling. Check that the container is draining properly and is not sitting in collected water.
Do not assume that wilting immediately after root disturbance means the plant needs another watering.
Days 3-4 – Watch the Moisture Pattern
Lift the pot and check how the new mix is drying. The remaining root system may use water differently from before, so this is the beginning of learning a new rhythm.
Look for worsening softness at the crown or stem base, rapidly spreading yellowing, or a returning unpleasant smell.
Days 5-7 – Look for Stabilization
A recovering plant may not produce new growth within a week, and that is perfectly normal. What you want to see first is a reduction in active decline.
The plant may begin holding its posture more consistently. The potting mix may move through a more predictable drying cycle. No new areas of soft tissue may appear.
Those quiet signs of stability are valuable.
The plant does not need to perform a dramatic comeback montage by Day 7. Sometimes simply not getting worse is the first good news.
When Root Rot Is Not the Only Possible Explanation
Root rot can explain a frustrating combination of wet soil, stalled growth, drooping, and yellowing leaves, but those symptoms are not exclusive to damaged roots. Plants are rather inconvenient that way. They have a limited collection of visible complaints, and they reuse them for almost everything from thirst to cold stress.
Before deciding that every unhappy plant needs an emergency root operation, compare the symptoms with the plant’s recent history and growing conditions. The strongest diagnosis usually comes from several clues agreeing with one another, especially evidence from the root zone itself.
A Thirsty Plant Can Also Droop
Both too little water and root dysfunction can leave a plant looking wilted. The difference is often found below the surface.
If the pot feels very light, the deeper potting mix is dry, and the plant has been using water normally, dehydration becomes a more likely explanation. If the pot remains heavy, the deeper mix is still wet, and the plant continues drooping despite available moisture, root stress deserves more attention.
This is why watering based on the leaves alone can become confusing. The same drooping appearance can lead to two completely different decisions.
Natural Leaf Ageing Can Look Like the Beginning of Trouble
Older leaves eventually decline. A single lower leaf gradually turning yellow while the rest of the plant is growing well may simply be reaching the end of its useful life.
Root problems are more concerning when yellowing is accompanied by other changes such as persistently wet soil, unusual smell, stalled growth, soft roots, or an increasing number of affected leaves.
Look at the pattern rather than one leaf in isolation.
Low Light Can Slow Growth and Water Use
A plant moved into lower light may grow more slowly and use less water. If the watering routine remains unchanged, the soil may begin staying wet for much longer than before.
At first, this can look like a drainage problem. In reality, the pot may simply be receiving water at a rate that no longer matches the plant’s reduced activity.
This is an important distinction because changing only the potting mix may not solve the underlying mismatch. The plant’s environment and watering rhythm need to be considered together.
Cold Stress Can Affect Both Growth and Moisture Use
Cooler conditions can slow plant growth and reduce water use. Sudden exposure to cold drafts or unsuitable temperatures can also cause leaf symptoms that overlap with other forms of stress.
If the plant has recently experienced a temperature change, consider that history before assuming the roots are rotting. At the same time, cool conditions can indirectly increase root problems by causing the potting mix to remain wet for longer.
Sometimes there is more than one factor involved.
Repotting Stress Can Temporarily Slow the Plant
A recently repotted plant may pause its growth, droop slightly, or behave differently while adjusting to root disturbance and a new growing medium.
That does not automatically mean root rot has begun.
However, repotting can also create conditions that increase risk if the new pot is much larger, the mix is substantially more moisture-retentive, or damaged roots are left in persistently wet conditions.
Ask what changed during the repotting process. A plant that began struggling immediately after moving from a small nursery pot into a very large decorative container may be responding to more than simple transplant shock.
Fertilizer Stress Can Damage Roots
Excessive fertilizer or accumulated salts can injure roots and create symptoms such as leaf-tip damage, stalled growth, wilting, or general decline.
Damaged roots may also become less effective at using water, which can cause the pot to dry differently from before.
If symptoms appeared after a strong fertilizer application or repeated feeding, include that information in your investigation. Root damage has more than one possible cause, and adding still more fertilizer to a struggling plant is unlikely to improve the conversation.
A Root-Bound Plant Can Behave Differently Too
A densely root-bound plant may dry very quickly because much of the container is filled with roots rather than moisture-holding potting mix. Water can also move unevenly through a tightly packed root ball.
This usually creates a different pattern from the persistently wet conditions associated with many root-rot situations, although compacted roots and degraded old potting mix can make the picture more complicated.
Again, the root inspection provides context. A container filled with firm, tightly circling roots is a different problem from one containing soft, collapsing, unpleasant-smelling tissue.
A Better Question Than “Does My Plant Have Root Rot?”
Instead of trying to answer that question from one symptom, ask:
- Is the root zone staying wet longer than normal?
- Has the plant’s water use changed?
- Are the roots firm or deteriorating?
- Is there an unusual smell?
- Is the crown or stem base healthy?
- Has growth slowed unexpectedly?
- Did the problem begin after a change in light, temperature, pot size, soil, watering, or fertilizer?
- Are several warning signs appearing together?
The more clearly these observations point in the same direction, the more confident you can be about the next step.
A diagnosis should help you make a better decision. It should not simply give an unhappy plant a dramatic label.
The Root Health Early Warning Framework
The easiest time to respond to a root problem is often before the leaves make the problem obvious. The Root Health Early Warning Framework is a simple way to organize the clues from least disruptive to most direct, so you can investigate without pulling every slightly grumpy plant out of its pot.
Stage 1 – Notice a Change in the Moisture Rhythm
Begin with the pot itself. Is it staying heavy longer than usual? Is the deeper soil remaining wet while the surface dries? Has the normal interval between waterings suddenly become much longer?
A change in moisture behaviour is often more useful than a fixed number of days because every plant, pot, and environment dries differently.
Stage 2 – Look for a Change in Plant Behaviour
Next, compare the plant with its own recent pattern. Has new growth slowed? Is the plant drooping despite moist soil? Are several leaves beginning to change rather than one old leaf naturally ageing?
One symptom may mean very little. Several changes appearing together deserve more attention.
Stage 3 – Check for Hidden Warning Signs
Smell near the soil and drainage holes. Look for visible roots where possible. Check the crown or stem base gently. Notice whether fungus gnats are repeatedly returning to persistently damp potting mix.
These clues move the investigation closer to the root zone without immediately disturbing the plant.
Stage 4 – Inspect the Roots When the Evidence Justifies It
If the pot remains unusually wet and the plant continues declining, a careful root inspection can provide the clearest evidence.
Compare colour, texture, smell, and the amount of healthy root tissue remaining. Do not diagnose rot from colour alone, and do not remove firm roots simply because they are not bright white.
Stage 5 – Correct the Conditions, Not Just the Symptom
Removing damaged roots may be necessary, but recovery also depends on changing the conditions that allowed the problem to develop.
That may mean adjusting pot size, improving the structure of the potting mix, checking drainage, changing the watering rhythm, or correcting environmental conditions that have slowed water use.
The final question is not only, “How do I remove the damaged roots?”
It is also, “What needs to change so the remaining healthy roots have a better place to grow?”
That is the difference between treating one episode and improving the plant’s long-term root environment.
How to Prevent Root Rot Before It Starts
Treating root rot can save a plant, but prevention is much easier than sitting at the kitchen table with a pair of clean scissors wondering how many roots are still invited to stay. Fortunately, prevention does not require keeping every pot perfectly dry or following a complicated watering formula. It mostly comes down to creating a root environment where moisture, air, drainage, and plant activity remain reasonably balanced.
The most useful prevention strategy is to pay attention to changes in the plant’s normal moisture rhythm. A plant that suddenly begins taking much longer to dry is giving you information before yellow leaves, soft stems, or widespread root damage appear.
Let the Root Zone Help Decide When to Water
A fixed watering schedule can be convenient, but the plant’s actual water use changes with light, temperature, season, growth rate, root development, and the conditions inside the pot.
Instead of treating “watering day” as an instruction, use it as a reminder to check.
If the surface looks dry but the pot still feels heavy and the deeper mix remains damp, the root zone may not be ready. If the surface is dry, the pot is noticeably lighter, and deeper checks also suggest that moisture has declined, the clues are beginning to agree.
This small change in thinking can prevent many repeated watering cycles that keep the lower part of a pot wet for too long.
Make Sure Water Can Actually Leave the Container
A functional drainage hole is essential for many common potted plants, but it is only the beginning. Water must be able to move through the potting mix, exit the container, and remain away from the bottom of the pot afterward.
Check whether:
- Drainage holes are open
- The pot is sitting flat against a surface that blocks the exits
- A saucer is holding runoff for long periods
- A nursery pot is standing in water inside a decorative cachepot
- Dense roots or compacted mix are slowing drainage
- The lower soil remains wet long after the upper layers have dried
A pot can technically have drainage holes and still maintain an unhealthy moisture pattern. The whole route that water takes through and out of the container matters.
Match the Potting Mix to the Plant and Environment
There is no single perfect potting mix for every plant. A mix that works beautifully for a moisture-loving plant may remain far too wet for another species, while an extremely coarse mix may dry frustratingly fast in a hot, bright environment.
Think about the combination of:
- The plant’s natural moisture preferences
- The size of the root system
- The pot material
- Indoor or outdoor conditions
- Temperature and light
- How quickly the plant is actively growing
- How frequently you are realistically able to check it
The goal is not simply to create the fastest-draining mix possible. The goal is to create a mix that holds enough useful moisture while still maintaining suitable structure and air around the roots.
Avoid Making the Pot Much Larger Than the Roots Need
When a plant needs more room, moving up gradually is usually easier to manage than placing a modest root system into a huge volume of moisture-holding mix.
An oversized pot can remain wet around areas that the roots have not yet reached. This is especially important after root damage, when the plant may have fewer functioning roots than it had before.
Choose a container that accommodates the healthy root system with reasonable room for future growth rather than assuming that the biggest available pot will save you another repot later.
Plants, rather inconveniently, do not always appreciate efficiency planning.
Adjust Watering When Growth Slows
A plant that is producing new leaves rapidly may use much more water than the same plant during a slower period. When growth decreases, water use often decreases too.
This can happen because of:
- Lower seasonal light
- Cooler temperatures
- A move to a different location
- Recent root damage
- Repotting stress
- Natural growth cycles
- Changes in indoor conditions
If the plant begins using water more slowly but the watering frequency remains unchanged, moisture can gradually accumulate in the root zone.
Watch the pot, not just the calendar.
Pay Attention After Repotting
Repotting changes several things at once. The plant may have a larger container, a different potting mix, disturbed roots, and a new moisture pattern.
Do not assume that the old watering routine will continue to work exactly as before.
For the first few weeks, notice:
- How long the new mix stays moist
- Whether the new pot feels heavy for longer
- How quickly the plant resumes active growth
- Whether water moves freely through the container
- Whether the pot size is appropriate for the root system
A plant that previously needed checking every few days may behave very differently after being moved into a larger pot with a more moisture-retentive mix.
Keep Tools and Containers Reasonably Clean
If you have removed decayed roots or handled a plant with a suspected root disease, clean pruning tools before using them on another plant. Reused containers should also be cleaned appropriately before receiving a new plant, particularly when the previous occupant had significant root problems.
This does not mean turning your plant shelf into a sterile laboratory. Plants live among microorganisms, and many are harmless or beneficial. The practical goal is simply to avoid unnecessarily moving decaying organic material or potential pathogens from a struggling plant directly onto healthy tissue elsewhere.
Check New Plants Before Adding Them to a Collection
A newly purchased plant may arrive in a potting mix designed for nursery production, shipping, or retail conditions rather than the environment inside your home.
That does not mean you should immediately repot every new plant. Instead, observe how the existing mix behaves.
Does it remain wet for an unusually long time? Is there standing water inside a decorative sleeve or outer pot? Are the visible roots firm? Does the plant have an unusual smell near the root zone?
A few minutes of observation can help you understand the plant’s starting conditions before it joins the rest of the collection.
Prevention Is Mostly About Noticing Change Early
You do not need to inspect the roots of every plant every week. In fact, please do not. Most plants would prefer to live without a recurring root audit.
What matters is becoming familiar with normal patterns.
You begin to notice how heavy a particular pot feels after watering, how quickly it becomes lighter, how the plant behaves during active growth, and how that rhythm changes with the seasons. Once you know what is normal, unusual changes become much easier to spot.
A pot that suddenly stays wet twice as long as usual is worth investigating. A plant that stops growing while its root zone remains persistently damp deserves a closer look. A strange smell combined with soft visible roots is more meaningful than any of those clues alone.
Early detection is not about becoming suspicious of every damp pot. It is about recognizing when the plant’s usual relationship with water has changed.
And that is often the moment when you still have the most options.
When to Get Professional Help With a Root Problem
Many early root problems can be managed at home by correcting the moisture pattern, inspecting damaged tissue, and improving the conditions around the remaining healthy roots. There are situations, however, where the problem becomes difficult to diagnose or continues despite your best efforts. That is when experienced local help can save a great deal of guesswork – and possibly save you from repotting the same unhappy plant for the third time while both of you quietly lose confidence in the arrangement.
Professional help is especially useful when the plant is valuable, rare, very large, difficult to replace, or part of a collection where the same problem appears to be spreading.
The Plant Continues Declining After the Root Problem Was Corrected
After damaged roots are removed and the plant is placed into more suitable conditions, recovery is rarely immediate. Existing yellow leaves may continue to decline, and new growth can take time to appear.
What matters is whether the overall direction begins to stabilize.
If the plant continues losing leaves rapidly, the stem or crown becomes softer, an unpleasant smell returns, or newly inspected roots continue deteriorating despite improved conditions, the original diagnosis may be incomplete.
There could be:
- More extensive root damage than first suspected
- Crown or stem rot
- A plant-specific disease
- An unsuitable environmental condition
- A pest problem affecting the roots
- Continued drainage or potting-mix problems
- Multiple stresses occurring at the same time
At that point, repeating the same treatment may not provide a different result.
The Crown or Main Stem Is Becoming Soft
Root damage is one concern. Decay moving into the crown or main stem can be more difficult to manage because these structures may be essential to the survival of the entire plant.
If the base of the plant becomes soft, unstable, darkened, or water-soaked, act promptly. The appropriate response varies considerably between species. Some plants can be propagated from healthy sections above the damaged area, while others require a different approach.
This is a good example of where generic advice has limits. A succulent, orchid, palm, aroid, and woody houseplant may respond very differently to damage near the crown.
A Valuable Plant Has Lost Most of Its Roots
When only a small amount of healthy root tissue remains, recovery becomes more delicate. The plant may have far less capacity to absorb water than before, yet the remaining roots still need conditions that prevent dehydration without returning them to prolonged saturation.
The balance can be difficult, particularly with rare plants or species that have specific propagation and recovery requirements.
An experienced nursery professional, horticulturist, or plant specialist may be able to help you decide whether the best option is to:
- Preserve the remaining root system
- Reduce the size of the plant where appropriate
- Propagate healthy material
- Change the growing medium
- Use a species-specific recovery method
Sometimes the best rescue plan is not to save the original root system at all, but to preserve healthy plant material before the damage progresses.
Several Plants Develop Similar Root Problems
One struggling plant may have an individual watering, drainage, or potting problem. Several plants developing similar symptoms within a short period deserve a wider investigation.
Look for shared factors such as:
- The same batch of potting mix
- Reused containers
- Shared tools
- A common watering routine
- The same environmental change
- Contaminated standing water
- Similar pests or disease symptoms
If the pattern continues, professional diagnosis can help distinguish a general growing-condition problem from a more specific disease issue.
You Cannot Tell Whether the Roots Are Actually Rotten
There is no embarrassment in being uncertain. Root colour varies widely, and online photographs often show dramatic advanced cases that look nothing like the early stages of a real problem.
If the roots are firm but dark, the plant is declining for unclear reasons, and the potting mix does not smell unusual, cutting away large portions of the root system based on colour alone may do more harm than good.
A local nursery or horticultural professional may be able to inspect the plant directly. For important or repeated cases, a plant diagnostic service or agricultural extension-style service, where available, may offer more specialized assessment.
The goal is not to obtain the most dramatic diagnosis. It is to avoid performing unnecessary surgery on a plant whose roots were simply brown.
What to Bring When Asking for Help
A photograph of one yellow leaf is rarely enough to explain what is happening below the soil. If you ask a nursery, horticulturist, or plant specialist for help, provide a short history of the problem.
Useful information includes:
- The plant species, if known
- How long you have owned it
- When symptoms began
- How often it has been watered
- How long the soil stays wet
- The amount of light it receives
- Recent temperature or location changes
- When it was last repotted
- The type of potting mix
- Whether the pot has drainage holes
- Whether water collects inside a cachepot or saucer
- Recent fertilizer use
- Clear photographs of the whole plant
- Close photographs of the stem base
- Photographs of the roots, if already inspected
This history can be more useful than saying, “My plant looks sad,” although, to be fair, that is how many excellent plant investigations begin.
What Recovery Actually Looks Like
Saving a plant from early root rot does not always produce an immediate burst of new leaves. Root recovery usually happens out of sight, and the first signs of improvement can be much quieter than the symptoms that caused concern.
The earliest positive sign may simply be that the plant stops getting worse.
Stabilization Comes Before New Growth
After damaged roots are removed or the growing conditions are corrected, the plant may pause. It has lost part of the system that supported its leaves and may need time to rebuild before investing heavily in new growth.
During this period, you may notice:
- No new yellowing
- No further softening at the crown
- The plant holds its posture more consistently
- The potting mix begins drying at a more predictable rate
- The unpleasant smell does not return
- Existing healthy leaves remain stable
These are meaningful improvements even if no new leaf has appeared.
Water Use May Change During Recovery
A plant with fewer roots may initially use water more slowly than it did before the damage occurred. This means the watering routine that worked before the problem may still be too frequent during recovery.
As new roots develop and growth resumes, water use may gradually increase again.
This is why recovery should be monitored as a changing process rather than managed with a permanent schedule created on the day of repotting.
New Growth Is Encouraging, but Look at Its Quality Too
When new growth eventually appears, it is a positive sign that the plant has enough functioning capacity to invest in development again.
The first new leaves may be smaller than usual, especially after significant stress. Over time, healthier root function should support more normal growth if the surrounding conditions remain suitable.
Do not expect the first recovery leaf to arrive looking ready for a plant catalogue cover. It has been through something.
Old Damage May Remain Visible
A leaf that has already turned yellow will not usually become green again simply because the roots are improving. Brown or damaged areas may also remain.
Judge recovery by the progression of the plant:
Is new damage continuing, slowing, or stopping?
That question is often more useful than asking whether the plant looks perfect.
A Simple 30-Day Root Recovery Check
For a plant recovering from early root damage, a longer observation period can reveal more than daily inspection.
Week 1 – Stabilize
Focus on appropriate moisture, drainage, light, temperature, and minimal disturbance. Watch for continued rapid decline or worsening soft tissue.
Week 2 – Learn the New Moisture Rhythm
Notice how quickly the pot is becoming lighter and how the new or adjusted potting mix behaves. Do not assume the plant should return immediately to its previous watering frequency.
Week 3 – Look for Quiet Improvement
Check whether the decline has slowed. Stable leaves, a firm stem base, a normal smell, and a predictable drying cycle are all encouraging.
Week 4 – Look for Signs of Renewed Activity
Depending on the species, season, and severity of the original damage, you may begin seeing new roots, buds, leaves, or other signs of resumed growth.
Some plants will take longer. The 30-day check is not a deadline; it is simply a useful point to compare the plant with where it started.
Take a photograph on Day 1 and another around Day 30. Plant recovery can be slow enough that improvement is difficult to notice when you look at the same leaves every morning.
And yes, you probably will look every morning. The plant does not need to know that.
Key Takeaways
Root rot is much easier to manage when you notice the conditions that encourage it before the leaves begin showing dramatic symptoms. The goal is not to become suspicious every time a pot stays damp for an extra day. It is to recognize when several changes begin appearing together and the plant’s normal moisture rhythm no longer makes sense.
- Root rot can begin before leaves turn yellow. A plant may still have enough functioning roots to keep its foliage looking reasonably healthy while part of the root system is already under stress.
- Persistent moisture matters more than one heavy watering. A thorough watering is not automatically harmful. The greater concern is a root zone that remains poorly aerated and wet for longer than the plant can comfortably tolerate.
- Healthy roots need both moisture and oxygen. Potting mix structure, drainage, pot size, root activity, temperature, and light all influence the balance around the roots.
- A change in the pot’s normal drying rhythm can be an early warning. If a familiar pot suddenly remains heavy for much longer than usual, investigate what has changed before automatically watering again.
- Drooping does not always mean thirst. A plant with stressed or damaged roots may droop even while the soil remains wet, which is why checking below the surface is so important.
- Root colour alone cannot diagnose rot. Healthy roots can naturally be white, cream, tan, brown, reddish, or stained by the growing medium. Texture, smell, surrounding moisture, and the condition of nearby roots provide a much better picture.
- Several clues together are more useful than one symptom. Persistently wet soil, stalled growth, unusual smell, soft roots, and a declining plant create a stronger case for root trouble than any one of those signs alone.
- Do not remove healthy roots simply because they look dark. Preserve firm, intact tissue whenever possible and remove only roots that are clearly deteriorating when treatment is necessary.
- Correct the conditions as well as the damaged roots. Repotting alone will not prevent the problem from returning if the plant goes back into an oversized pot, unsuitable mix, blocked drainage, standing water, or the same excessive watering rhythm.
- Recovery often begins with stabilization. A plant does not need to produce a new leaf immediately to show improvement. Stopping the decline, maintaining a firm stem base, developing a more predictable moisture cycle, and avoiding new damage are all encouraging signs.
The most useful question is not simply, “Does this plant have root rot?” A better question is, “What has changed around the roots, and do several clues suggest that the root environment is no longer working properly?”
That question encourages observation before panic, investigation before unnecessary cutting, and changes that address the reason the problem developed in the first place.
Professional Perspective
The difficult thing about early root problems is that people naturally trust what they can see. Green leaves look reassuring. A dry soil surface looks thirsty. A drooping plant looks as though it needs water. Unfortunately, the root zone can be operating on a completely different timeline from the visible parts of the plant.
This is why the most useful early warning is often not a dramatic symptom but a change in behaviour. A pot that used to become lighter in five days now stays heavy for ten. A plant that was steadily producing leaves suddenly pauses while the soil remains damp. A familiar earthy smell becomes sour. None of these clues proves root rot by itself, but together they tell you that something below the surface deserves attention.
It is also important not to overcorrect. Once people learn about root rot, every brown root can begin looking suspicious and every damp pot can feel like an emergency. That can lead to unnecessary repotting, excessive root removal, and repeated disturbance of plants that might have recovered with a simpler adjustment to watering, drainage, light, or potting conditions.
The strongest approach is progressive. Begin with observation. Compare the pot with its normal moisture rhythm. Check deeper moisture and drainage. Look for changes in growth, smell, and stem firmness. Inspect the roots when the evidence justifies it, then preserve as much healthy tissue as possible.
Root health is rarely about keeping a plant as dry as possible. It is about creating a root environment that can move through moisture and drying in a way that suits the plant. Some species prefer more consistent moisture, others need a more pronounced drying period, and the same plant can use water very differently as light, temperature, growth, and root mass change.
Once you begin paying attention to those patterns, root care becomes less mysterious. You stop waiting for yellow leaves to announce that something has gone wrong and start noticing the quieter changes that happen earlier.
And that is the real advantage of early detection: not that you will prevent every root problem, but that you are more likely to notice when the plant still has plenty of healthy roots worth protecting.
Final Thoughts
A healthy-looking plant can hide an unhealthy pocket of roots, but that does not mean every green plant needs to be pulled from its pot for inspection. The aim is not to become a nervous root detective. It is to notice when the clues stop matching.
If the leaves look green but the pot remains unusually heavy, the deeper soil stays wet, growth has slowed, and an unpleasant smell begins appearing, the hidden part of the plant may be telling a different story from the visible one. That is the moment to investigate more carefully.
Start with the least disruptive checks. Learn the plant’s normal moisture rhythm. Compare pot weight, deeper moisture, drainage, growth, smell, and visible roots. If several warning signs agree, inspect the root system carefully and judge suspicious roots by more than colour alone.
When early damage is found, protect the healthy roots that remain and correct the conditions around them. A better-sized pot, more appropriate potting mix, functional drainage, suitable light, and a watering rhythm based on actual moisture conditions can give the plant a much better environment for recovery.
The leaves may be the most visible part of a plant, but they are not always the first place the story begins.
Sometimes the most important chapter is already being written below the soil.
Frequently Asked Questions
Can root rot start before leaves turn yellow?
Yes. Part of a plant’s root system can begin experiencing stress or decay while enough healthy roots remain to support green leaves. Early clues may include soil that stays wet longer than usual, a pot that remains heavy, slower growth, drooping despite moist soil, an unusual smell, or soft roots.
What are the earliest signs of root rot?
Early signs can include a change in the pot’s normal drying rhythm, persistently wet soil, unexpectedly slow growth, drooping while the root zone is still moist, an unpleasant smell, and roots that become soft or begin losing their normal structure. Several clues appearing together are more meaningful than one symptom alone.
What do healthy roots look and feel like?
Healthy root colour varies by plant species, root age, and growing medium. Roots may be white, cream, tan, brown, reddish, or stained by potting materials. Firmness and structure are often more useful than colour alone. Healthy roots generally remain intact when handled gently, while severely decayed roots may become soft, mushy, hollow, fragile, or easy to pull apart.
Are brown roots always rotten?
No. Brown roots are not automatically rotten. Some healthy roots are naturally dark or become stained by bark, peat, compost, fertilizer residue, or other materials in the potting mix. Compare colour with texture, smell, surrounding moisture, and the condition of nearby roots before deciding that a root is damaged.
Can a plant with root rot still have green leaves?
Yes. Early or localized root damage may affect only part of the root system, leaving enough healthy roots to support green foliage for some time. This is why changes in soil moisture, pot weight, growth, root texture, and smell can sometimes reveal trouble before obvious leaf symptoms appear.
Should I repot a plant immediately if I suspect root rot?
Not always. Begin with less disruptive checks such as deeper soil moisture, pot weight, drainage, smell, visible roots, and the condition of the stem base. A full root inspection becomes more reasonable when several warning signs appear together or the plant continues declining while the root zone remains persistently wet.
Can a plant recover from early root rot?
A plant may recover when enough healthy root tissue remains and the conditions contributing to the problem are corrected. Recovery may involve removing clearly decayed roots when necessary, using an appropriately sized container and suitable potting mix, improving drainage, and adjusting the watering routine to the plant’s remaining root system.
Should I water a plant after removing rotten roots?
The correct first watering depends on the plant, the amount of healthy root tissue remaining, the moisture already present in the new potting mix, and the species’ needs. The main goal is to avoid placing stressed roots straight back into prolonged saturation while also avoiding unsuitable extreme dryness. After repotting, monitor the new moisture cycle rather than automatically returning to the old watering schedule.
Why does a plant with wet soil sometimes look thirsty?
Roots that are stressed or damaged may not function normally even when water is available in the soil. This can contribute to drooping or other symptoms that resemble thirst. Before adding more water, check whether the pot is still heavy and whether the deeper root zone remains wet.
How long does it take a plant to recover from root rot?
Recovery time varies with the plant species, severity of root loss, season, environmental conditions, and amount of healthy root tissue remaining. The first positive sign may simply be that the plant stops declining. New growth can take several weeks or longer, so stabilization and a healthier moisture cycle are often more useful early indicators than immediate new leaves.