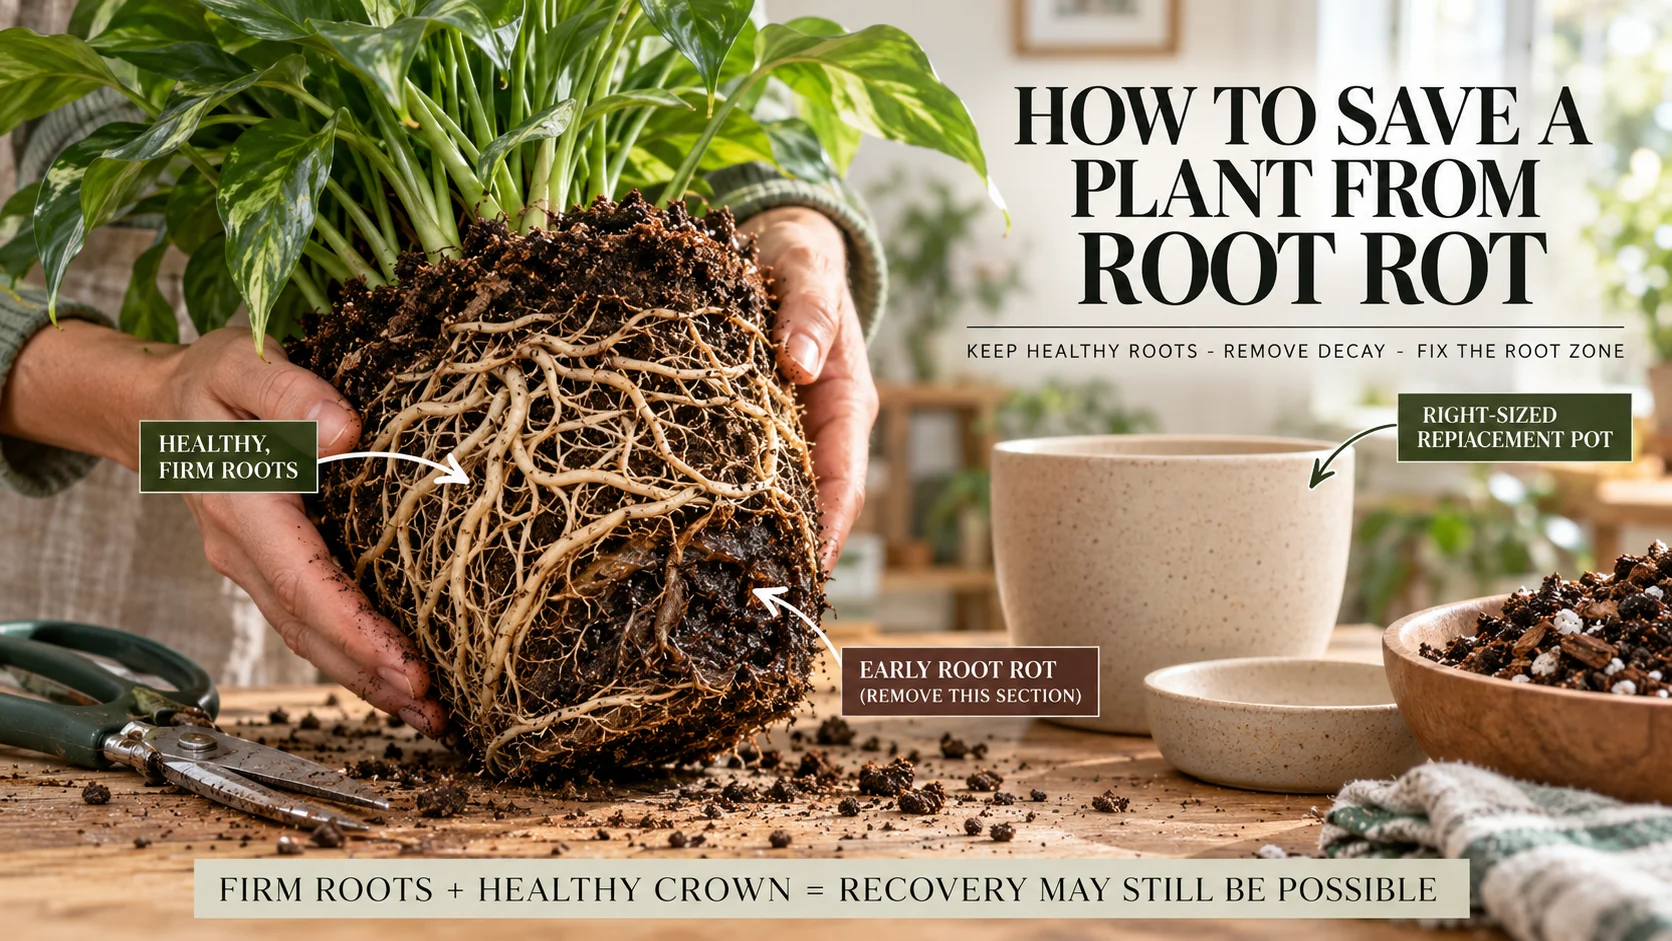

A plant with root rot can often be saved if enough firm, living roots and healthy stem or crown tissue remain. The priority is to remove genuinely decayed roots, correct the wet or poorly aerated root environment that caused the damage, and then adjust the pot and watering routine to the smaller root system that survives.
Can a Plant Actually Recover From Root Rot?
Recovery depends less on how unhealthy the leaves look and more on what is still alive below the soil. A badly wilted plant may retain enough functional roots to recover, while a plant with relatively modest leaf symptoms can already have extensive decay underground. This is why leaf color alone is a poor way to decide whether a plant is salvageable.
The most useful first step is to inspect the root system. Healthy roots vary considerably by species, age and growing medium, so color should never be used as the only test. Many healthy roots are cream or pale tan, while others naturally become brown, woody or stained by potting mix. Texture, structure and smell usually tell you more.
A plant is generally worth attempting to save when:
- A meaningful portion of the roots remains firm rather than soft, hollow or collapsing.
- The stem base or crown is still structurally sound.
- Decay can be removed without cutting away nearly the entire viable root system.
- The remaining plant tissue is capable of producing new roots or shoots.
- The growing conditions that contributed to the problem can actually be corrected.
A plant becomes much harder to rescue when decay has advanced into the crown or main stem, nearly all fine roots have disintegrated, or the remaining tissue continues to soften after damaged material is removed. At that stage, propagation from an unaffected cutting, division or other viable plant part may offer a better chance of preserving the plant than repeatedly repotting a failing root system.
First, Make Sure You Are Dealing With Root Rot
Yellow leaves, wilting and slow growth are warning signs, but none of them confirms root rot on its own. Plants can show similar symptoms when they are severely dry, recently transplanted, exposed to temperature stress, receiving unsuitable light, or dealing with other root problems.
The suspicion becomes stronger when above-ground decline appears alongside persistent moisture in the root zone. A pot that remains unusually heavy for a long period, a stale or unpleasant smell from the growing medium, water collecting inside a cachepot, or soft tissue near the stem base gives you more reason to inspect below the surface.
One especially misleading situation occurs when the top of the potting mix looks dry while the lower root zone remains wet. The exposed surface can lose moisture quickly while deeper material stays saturated, particularly in deep pots, dense mixes or containers where drainage is restricted. Watering again because the surface appears dry can keep already stressed roots in unfavorable conditions.
If the plant is continuing to decline despite apparently moist soil, remove it carefully enough to examine the roots rather than continuing to diagnose the problem from the leaves.
What Healthy and Rotten Roots Actually Feel Like
How to Save a Plant From Root Rot Step
Do not automatically remove a root because it is brown. Mature roots can darken naturally, mineral deposits can stain them, and particles of bark or peat can make healthy tissue look much less pristine than roots shown in simplified plant-care photographs.
Use several characteristics together:
| What to check | More consistent with viable roots | More concerning for decay |
|---|---|---|
| Texture | Firm, resilient and structurally intact | Soft, mushy, hollow or easily crushed |
| Outer tissue | Remains attached when handled gently | Slips away or separates easily from the inner strand |
| Color | May be white, cream, tan or naturally darker depending on the plant | Darkening combined with softness or tissue breakdown is more significant |
| Smell | Earthy or relatively neutral | Sour, stagnant or distinctly unpleasant odor can support the diagnosis |
| Root structure | Fine roots and larger roots retain their form | Fine roots have disappeared or larger roots collapse when touched |
The practical distinction is viability rather than appearance. A stained brown root that remains firm may still be functional, while a pale-looking root that collapses between your fingers is not healthy simply because its color appears normal.
That distinction matters because excessive root pruning creates another problem. Every viable root you remove reduces the plant’s remaining capacity to take up water and support new growth, so the goal is to remove tissue that has clearly failed while preserving as much sound root structure as possible.
Why Root Rot Develops in the First Place
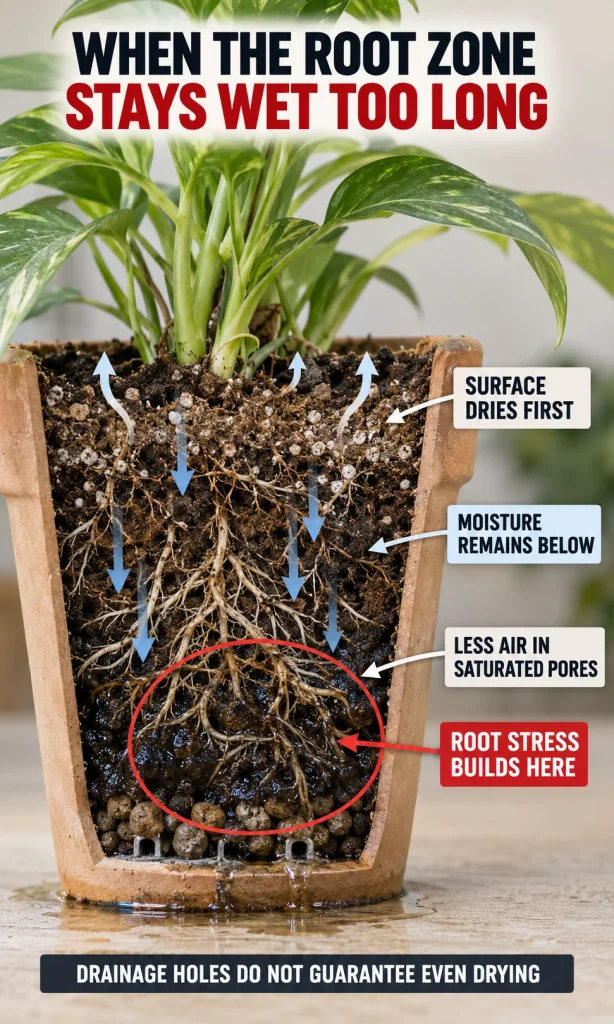
Root rot is often described as an “overwatering problem,” but that shorthand can lead to the wrong correction. The more useful question is why the root zone remained wet or poorly aerated for long enough to damage roots.
Roots need access to both moisture and oxygen. When pore spaces in the growing medium remain filled with water for prolonged periods, gas exchange around the roots is restricted. Root function can deteriorate, vulnerable tissue begins to die, and microorganisms capable of exploiting damaged tissue may become part of the decline.
This explains why two people can water similar plants at apparently similar intervals and get very different results. The amount of water applied is only one part of the root-zone environment. Pot dimensions, drainage, growing-medium structure, temperature, light, root density and how quickly the plant is actually using moisture all influence how long that water remains around the roots.
The Pot May Be Holding Water Longer Than the Plant Can Use It
An oversized pot deserves particular attention after root damage. A large volume of growing medium surrounding a relatively small root system can remain wet for much longer because there are fewer functioning roots drawing water from it.
That relationship becomes even more important after rotten roots have been removed. A container that was appropriately sized for the plant before the damage may suddenly contain far more moist growing medium than the reduced root system can manage.
This is one of the easiest mistakes to make during rescue: treating repotting as a simple soil replacement while automatically returning the plant to the same pot size.
The better question is:
How much healthy root system is left now?
Your next decisions – how much to prune, whether to reduce the pot size, what growing medium to use and when to water again – should be based on that surviving root system rather than the size the plant used to be.
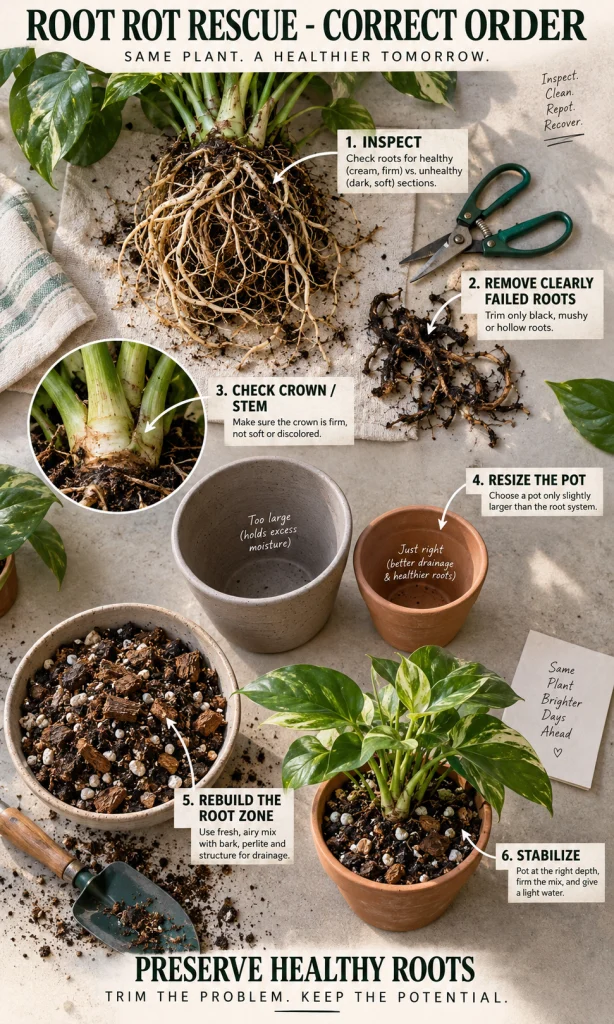
How to Save a Plant From Root Rot Step by Step
Once you have confirmed that roots are genuinely decaying, the rescue process should be controlled rather than aggressive. The plant is already functioning with a compromised root system, so every intervention should remove a source of trouble or improve the conditions around the roots.
1. Remove the Plant From the Pot Carefully
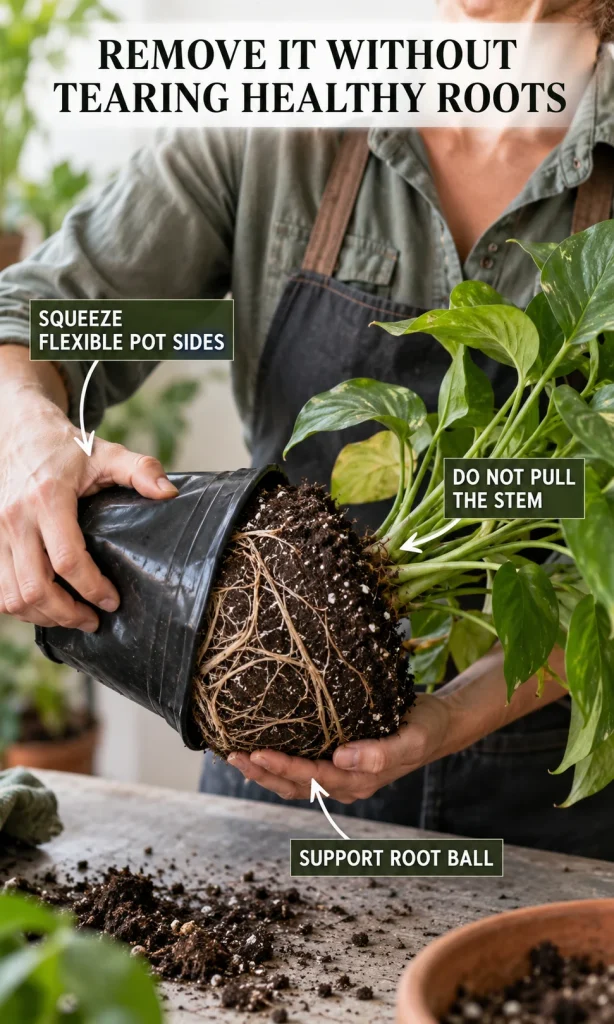
Slide the root ball from the container while supporting the base of the plant. If roots have grown through drainage holes, avoid pulling hard enough to tear healthy tissue unnecessarily.
Remove enough of the old potting mix to see the root system clearly. Loose material may fall away with gentle movement or finger work. When wet mix is tightly packed around delicate roots, forcing every particle off can cause more damage than leaving a small amount attached.
At this stage, look at the whole root system before reaching for scissors. You are trying to establish the boundary between viable roots and tissue that has already broken down.
2. Remove Clearly Rotten Roots
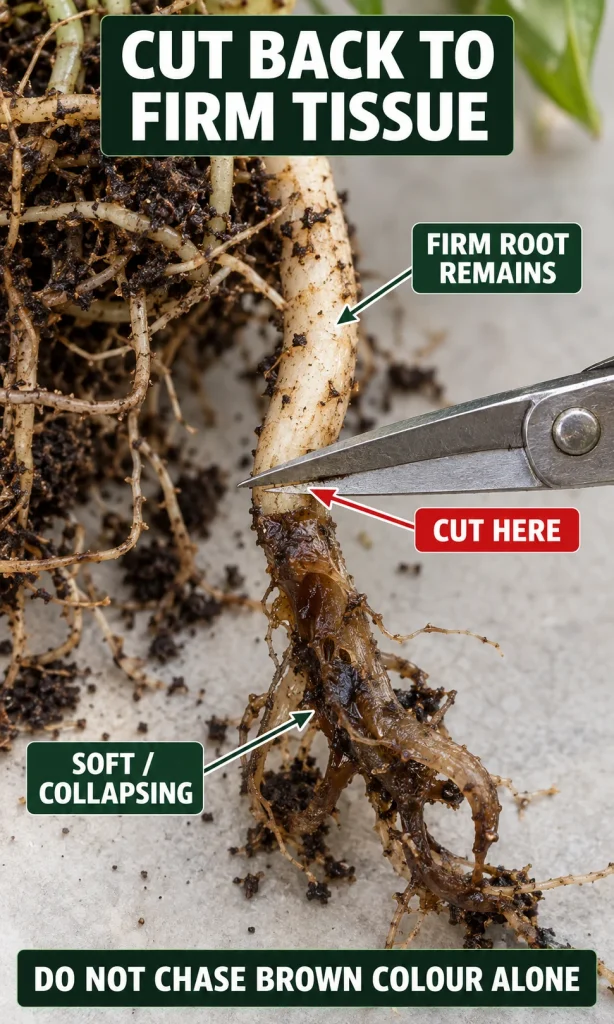
Use clean, sharp pruning scissors or snips. Cut away roots that are unmistakably soft, collapsing, hollow, decomposed or structurally unsound, working back toward firm tissue.
Avoid pruning solely by color. A darker root that remains firm can be worth keeping, particularly on species that naturally develop tan or brown mature roots.
As you work:
- Preserve firm roots wherever reasonably possible.
- Remove decomposed material that separates easily from the root system.
- Make clean cuts rather than repeatedly crushing or tearing roots.
- Reassess after each major section instead of automatically removing everything that looks imperfect.
- Clean the cutting tool before moving between different plants.
The objective is not to produce a photographically clean, white root system. It is to leave the plant with the greatest practical amount of living, structurally sound root tissue.
3. Check the Crown and Stem Base
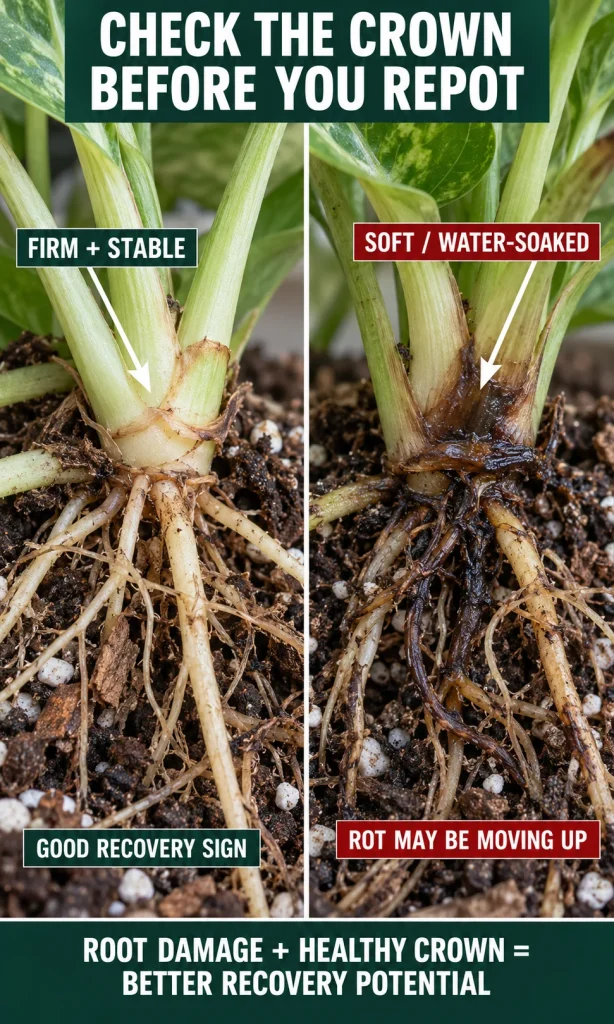
Before repotting, inspect where the roots meet the crown or main stem. This is an important checkpoint because root damage and crown or stem decay do not carry the same recovery outlook.
Firm tissue at the plant base is encouraging. Softening, spreading discoloration, collapsing tissue or a deteriorating crown suggests that the problem has progressed beyond expendable roots.
For plants that can be propagated, healthy material above the affected area may sometimes be more valuable than attempting to preserve a severely compromised original root system.
Rescue checkpoint: If you can remove the failed roots and still retain firm roots attached to a sound crown or stem base, continue with rehabilitation. If decay has reached most of the crown or main stem, consider whether propagation of healthy tissue offers the stronger recovery route.
4. Decide Whether the Pot Is Still the Right Size
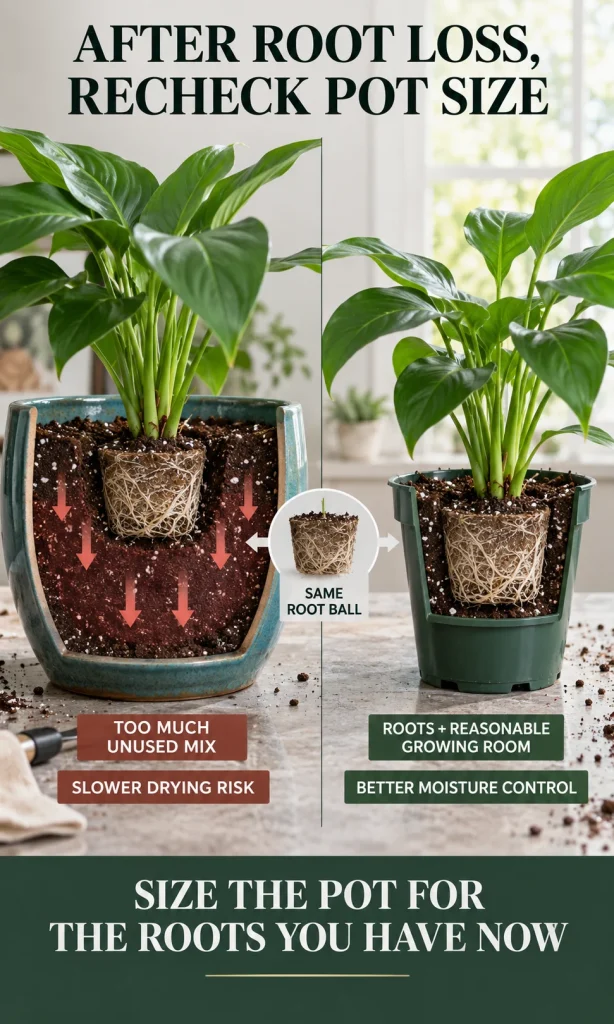
Do not automatically return the plant to its previous container.
After pruning, compare the remaining root mass with the pot. The new container should accommodate the surviving roots comfortably without surrounding them with a large reservoir of unused, slow-drying potting mix.
A slightly smaller pot may therefore be appropriate after substantial root loss. The purpose is not to squeeze the plant into the smallest possible container. It is to restore a sensible relationship between root mass and growing-medium volume.
A useful practical test is to place the cleaned root system loosely inside the empty container before adding mix. There should be room for roots to sit naturally and for fresh mix to surround them, without a broad unused zone extending far beyond the root system.
5. Rebuild the Root Environment
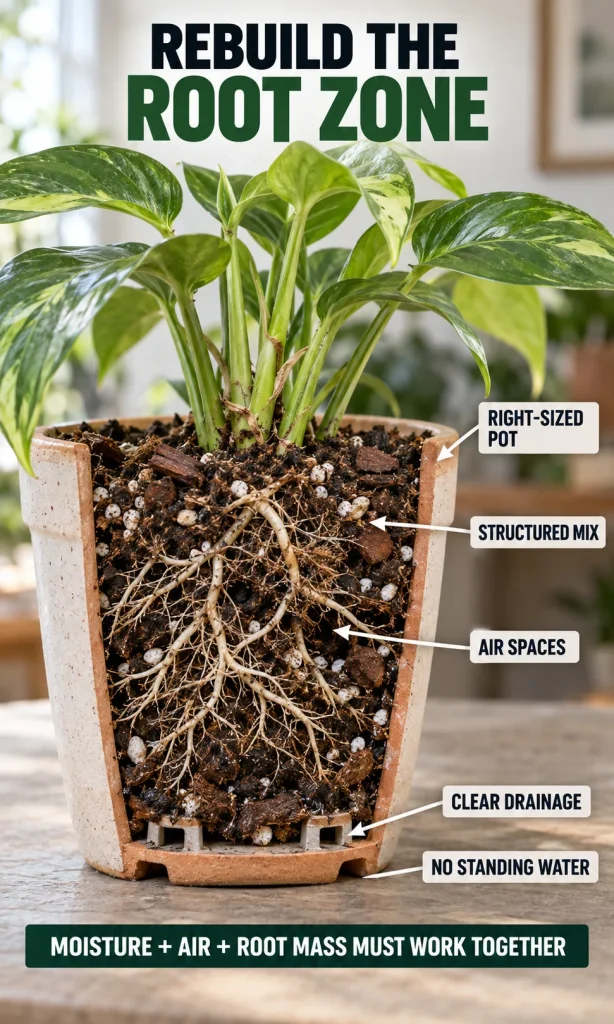
Fresh potting mix should provide the combination of moisture retention and aeration appropriate for the plant rather than simply being described as “well draining.”
That distinction matters. A mix can drain visibly from the bottom of a pot and still remain excessively wet internally if its particles are fine, compressed or poorly structured. Conversely, making a mix extremely coarse in response to root rot can cause it to dry faster than the recovering plant can tolerate.
Choose the mix according to the plant’s normal root requirements, then consider the conditions in which it will actually be grown.
Important variables include:
- the plant species and root type;
- particle size and structural stability of the mix;
- the amount of moisture-retentive material;
- container material and dimensions;
- drainage-hole design;
- indoor or outdoor growing conditions;
- temperature, airflow and light.
The goal is a root zone that can become thoroughly moist when watered and then return toward an appropriate aerated condition instead of remaining saturated for an unnecessarily long period.
Should You Wash All the Old Soil Off the Roots?
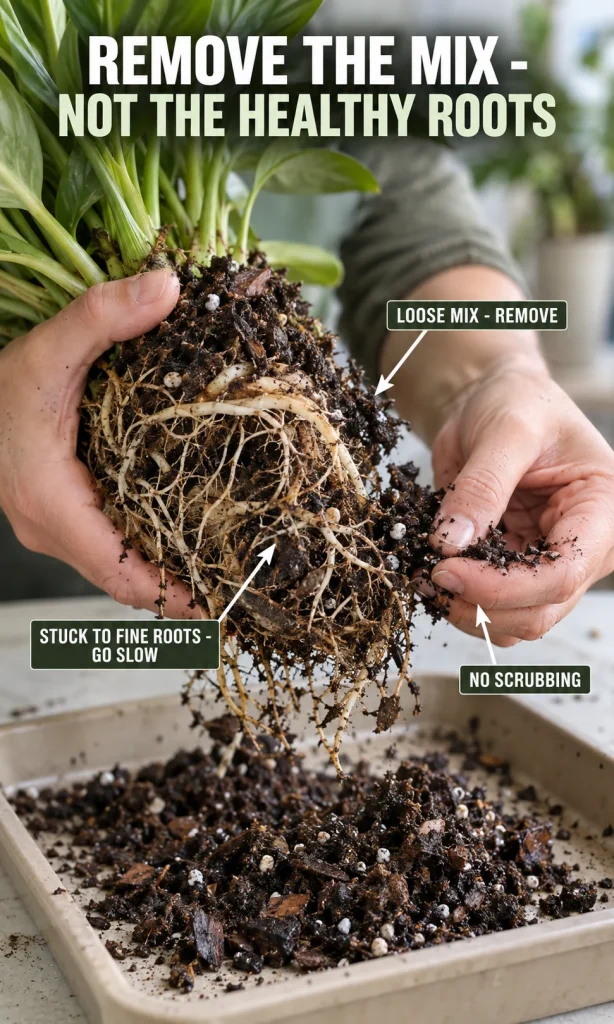
Not always.
Removing old, saturated or decomposed growing medium can be useful because it exposes damaged roots and prevents obviously unsuitable material from immediately surrounding the repaired root system. Complete washing, however, is not automatically necessary for every plant.
Fine roots can be surprisingly easy to damage when wet. If healthy roots are embedded in material that does not release easily, aggressive rinsing, rubbing or untangling may sacrifice viable roots simply to make the root system look cleaner.
Use the least destructive method that lets you accomplish the rescue:
- Let loose potting material fall away naturally.
- Gently tease away material that separates without resistance.
- Expose questionable areas sufficiently to inspect root texture.
- Remove obviously degraded or unsuitable mix.
- Avoid stripping stubborn material from healthy fine roots merely for completeness.
This is a good example of why root-rot recovery should be based on plant condition rather than a rigid internet recipe. Two plants with the same diagnosis may need different amounts of root disturbance.
Should You Disinfect the Roots?
Routine household disinfectants should not be applied to roots simply because root rot is suspected. Products that damage microorganisms can also injure living root tissue when their chemistry, concentration or exposure is unsuitable for the plant.
Likewise, adding a treatment cannot compensate for a root zone that remains chronically wet. If the physical cause is excessive moisture retention, poor aeration, unsuitable container sizing or standing drainage water, correcting that environment is central to recovery.
Where a specific plant disease has been professionally identified, treatment becomes a different question. Product choice and use then depend on the pathogen, plant, formulation and local label requirements rather than on a universal “root rot cure.”
For an ordinary home-plant rescue, focus first on removing dead tissue and correcting the growing conditions that allowed the decline to develop.
How to Repot the Plant After Removing Rotten Roots
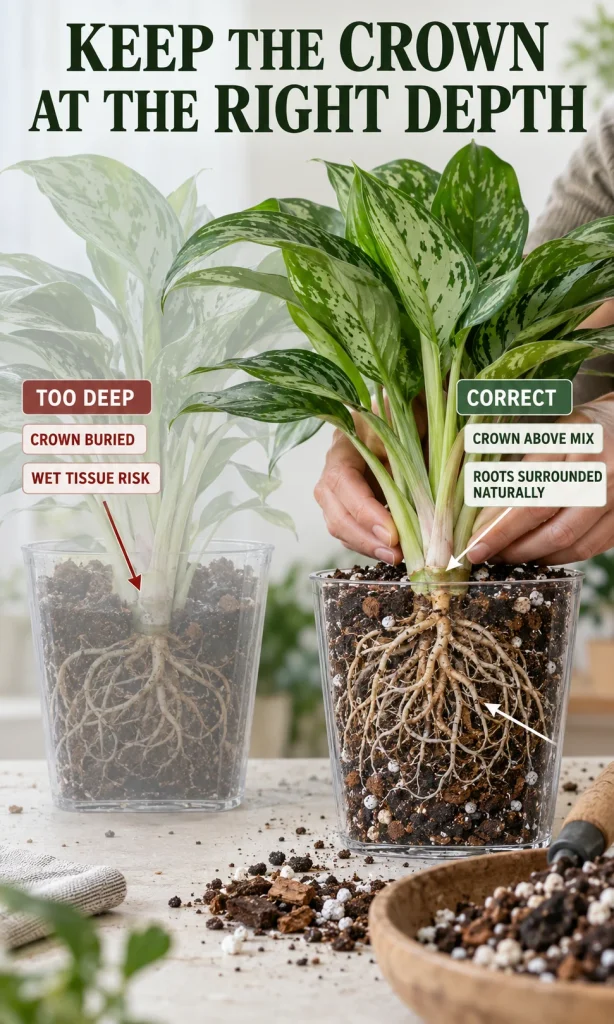
Add enough fresh mix to the container to position the plant at an appropriate depth. Spread or settle the surviving roots naturally rather than forcing them into a tight knot, then work fresh medium around them without compacting it excessively.
Keep the crown or stem at a suitable depth for that plant. Burying previously exposed stem tissue simply because the root system has become smaller can create another persistently damp zone.
Once repotted, check that:
- drainage openings are unobstructed;
- the plant is stable without being planted excessively deep;
- the mix surrounds the roots without being compressed into a dense mass;
- the container is proportionate to the remaining roots;
- excess drainage water will be able to leave the pot rather than remain trapped around it.
The plant may look disproportionately large above the soil after substantial root loss. That appearance does not mean it needs a larger pot. Pot size should follow the functioning root system, not the visual size of the foliage.
Should You Water Immediately After Repotting?
There is no useful universal rule that every root-rot rescue should either be watered immediately or kept dry for a fixed number of days.
The correct decision depends on how wet the roots and remaining mix already are, how much root tissue was removed, what type of plant is involved, and the moisture characteristics of the fresh growing medium.
If the roots are already extremely wet and the plant has just been transferred from saturated conditions, immediately soaking another large volume of mix may recreate the environment you were trying to correct. On the other hand, allowing moisture-sensitive roots to become severely dehydrated after extensive handling can add a second stress.
Instead of following a calendar, assess the new root zone.
A Better First-Watering Decision
| Condition after repotting | What it suggests | Practical response |
|---|---|---|
| Roots and surrounding material remain very wet | The plant has not yet escaped its excess-moisture condition | Avoid adding water automatically; reassess moisture as the root zone begins to change |
| Fresh mix is only lightly moist and roots are no longer saturated | Moisture is present without recreating a waterlogged root zone | Monitor rather than watering by habit |
| Fresh mix is dry and the plant normally requires consistently available moisture | Excessive post-repotting drying could add stress | Restore appropriate moisture without leaving the root zone saturated |
The larger lesson is more useful than a fixed waiting period: after root rot, watering should respond to the condition of the recovering root zone rather than to the day of the week.
The Recovery Period Is Where Many Rescues Fail
Repotting removes damaged tissue and changes the environment, but it does not instantly restore the root system. The plant may now have considerably fewer functioning roots supporting the same leaves and stems.
That imbalance explains why a rescued plant can continue looking stressed for a while even when the intervention was appropriate. Existing leaf damage may remain visible, some leaves may be shed, and new growth may pause while the plant reallocates resources toward root recovery.
The most useful sign of progress is therefore not an immediate cosmetic transformation. You are looking for stabilization first, followed by evidence that normal function is returning.
Where to Put the Plant During Recovery
After root pruning and repotting, keep the plant in conditions that reduce unnecessary stress while still matching its normal light requirements. A damaged root system has less capacity to supply water to the foliage, so suddenly moving the plant into intense direct sun can increase leaf water loss faster than the remaining roots can support it.
For many common houseplants, bright indirect light is a sensible recovery position when that level of light already suits the species. The important point is stability. Avoid repeatedly moving the plant between dim shade, strong sun, warm rooms and cool windowsills while trying to make it recover faster.
Do Not Use Darkness as a Recovery Strategy
Low light may reduce water use, but it also reduces photosynthesis and can slow the plant’s ability to rebuild. Keeping a recovering plant in a very dark corner simply because the pot will stay moist longer can extend the same slow-drying conditions that contributed to the original problem.
Instead, aim for enough appropriate light to support normal plant function without creating excessive heat or sudden sun stress.
Keep Temperature Reasonably Stable
Temperature influences both plant activity and how quickly the growing medium dries. Very cool conditions can slow root activity and keep the pot wet for longer, while excessive heat can increase water loss from already stressed foliage.
Avoid extremes and strong drafts. A recovering plant benefits more from a stable environment than from being moved beside a heater, air-conditioning vent or powerful fan in an attempt to control drying speed.
Should You Increase Humidity After Root Rot?
Humidity can help some plants reduce excessive leaf water loss, but higher humidity is not a universal root-rot treatment. A recovering plant with reduced roots may benefit from avoiding extremely dry air, yet placing it in stagnant, persistently humid conditions while the potting mix remains wet can create another difficult environment.
Think about the plant’s normal preference first.
A tropical foliage plant may tolerate or prefer moderate to higher humidity. A succulent adapted to drier air may not benefit from the same treatment. The goal is to reduce unnecessary leaf stress without making the whole growing area stagnant.
If you use a humidifier, maintain normal room airflow rather than directing a constant stream of damp air onto the plant or soil surface.
Should You Fertilize a Plant Recovering From Root Rot?
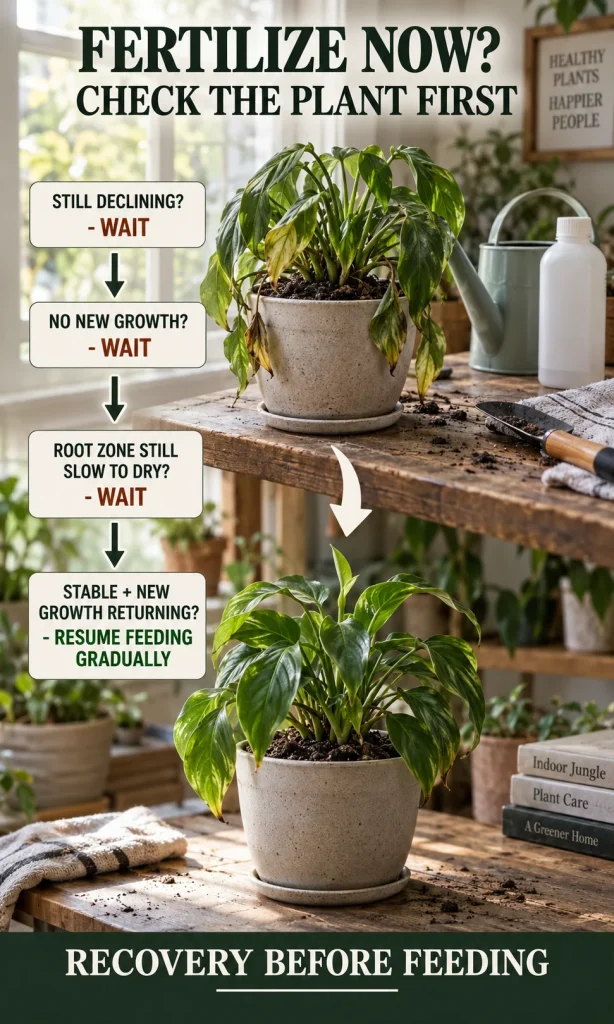
Usually, strong fertilization should wait until the plant shows evidence that root function and active growth are returning.
A newly pruned root system does not need to be pushed into rapid top growth while it is still rebuilding underground. Concentrated fertilizer can also add salt stress to roots that are already damaged or newly developing.
Delay routine feeding when:
- extensive root pruning was necessary;
- the plant is still visibly declining;
- the root zone remains unusually slow to dry;
- there is no new growth;
- fresh potting mix already contains fertilizer.
Resume feeding according to the needs of the plant once recovery is established rather than because a certain number of days have passed.
A plant producing stable new roots and new foliage is in a very different position from one that was repotted three days ago and is still deciding whether it approves of the arrangement.
How to Tell Whether the Root Rot Rescue Is Working
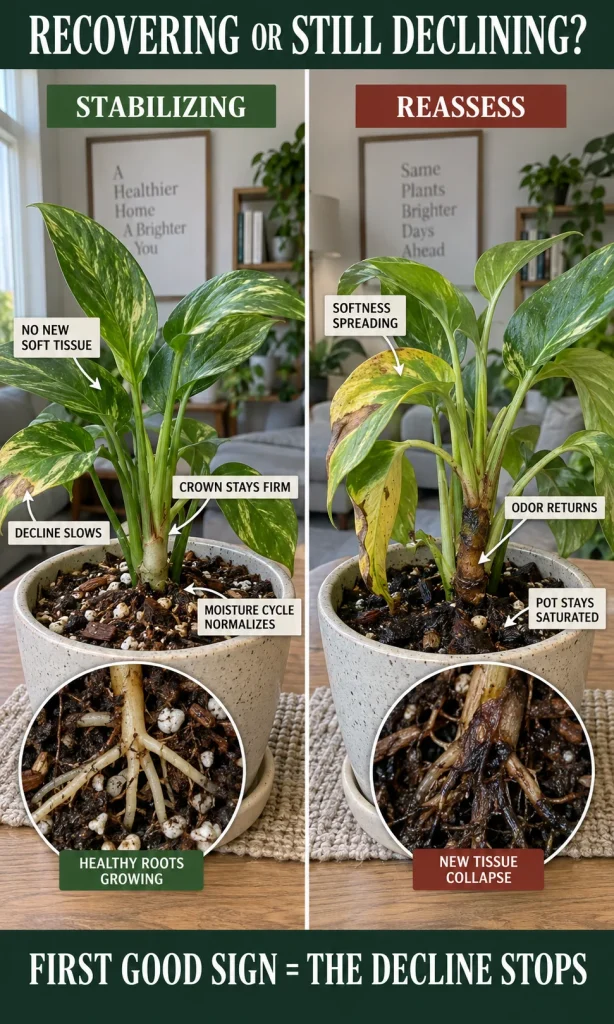
Successful recovery often begins quietly. The first useful sign is usually that deterioration slows rather than that the plant immediately produces new leaves.
Watch the direction of change over time.
Early Signs of Stabilization
During the first stage of recovery, encouraging signs include:
- the stem or crown remains firm;
- no additional areas become soft or water-soaked;
- the unpleasant smell does not return;
- leaf collapse slows or stops;
- remaining healthy leaves hold their condition;
- the pot begins losing moisture at a more predictable rate.
These clues suggest that the root environment has become more stable, even if the plant still looks visibly stressed.
Later Signs of Recovery
Once the plant has stabilized, stronger evidence of recovery may appear:
- new root growth;
- a new leaf, shoot or bud;
- firmer foliage;
- more normal water use;
- improved anchorage in the pot;
- longer periods without additional decline.
Do not expect old damage to disappear. Yellow leaves may remain yellow, brown edges will not become green again, and damaged tissue may eventually be shed.
Judge recovery by what the plant does next, not by whether previously injured tissue becomes perfect.
Warning Signs That the Rescue Is Failing
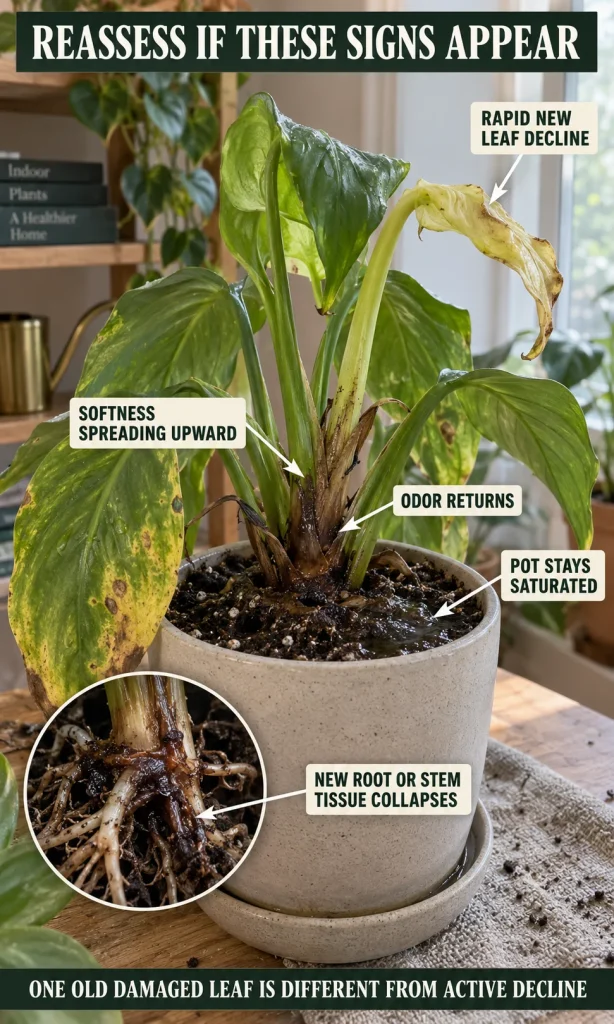
Some post-repotting stress is normal, particularly after extensive root loss. Continued deterioration is different.
Reassess the plant if you notice:
- soft tissue spreading upward from the root zone;
- a returning sour or decaying smell;
- the crown becoming unstable;
- newly inspected roots becoming soft;
- rapid loss of otherwise healthy leaves;
- the pot remaining saturated with very little change;
- increasing stem collapse;
- no healthy root, stem or growth-point tissue remaining.
One warning sign alone may not determine the outcome. A combination of worsening structural tissue, persistent wetness and continued decay is far more significant.
Do Not Respond to Every Drooping Leaf With Water
A recovering plant can droop because its remaining root system cannot support the same amount of foliage as before. Adding water without checking the root zone can return the plant to the exact moisture conditions you just corrected.
Lift the pot. Check below the surface. Compare the current moisture with the plant’s new drying pattern.
After severe root loss, the plant may need water less frequently than before, simply because fewer roots remain to use it.
Why a Rescued Plant Can Look Worse Before It Looks Better
Root pruning solves a structural problem, but it also leaves the plant temporarily operating with less capacity. The foliage above the soil may still demand more water than the reduced root system can provide, and some leaves may be sacrificed while the plant establishes a new balance.
This can produce a short period of additional yellowing, wilting or leaf loss even when the root environment has improved.
The key distinction is whether the decline is slowing and stabilizing or continuing to spread through living tissue.
A plant that loses one older leaf and then remains stable is behaving very differently from one whose crown becomes progressively softer each day.
How Long Does Root Rot Recovery Take?
There is no reliable universal recovery timeline. The speed depends on the species, the amount of healthy root tissue that survived, growing conditions, season, temperature, light and how much tissue had to be removed.
A useful way to think about recovery is in stages rather than fixed deadlines.
| Recovery stage | What you are looking for | What to avoid |
|---|---|---|
| Initial stabilization | No spreading softness, no returning odor, slower decline | Repeated repotting, unnecessary watering, major environmental changes |
| Root rebuilding | More predictable moisture use, firmer anchorage, healthy new roots where visible | Heavy feeding or disturbing the root ball to check progress |
| Return to active growth | New leaves, shoots or buds and gradually stronger water use | Immediately returning to the old watering schedule |
Some plants may begin producing new growth relatively quickly, while others need much longer before visible recovery appears. A plant that remains stable without new growth can still be progressing normally if the root system is rebuilding below the soil.
When to Stop Trying to Save the Whole Plant
There is a point where continued whole-plant rescue becomes less useful than preserving healthy material elsewhere.
Consider propagation instead when the original plant has lost almost all functional roots, decay is advancing into the lower stem, or a healthy node, offset, division or other propagatable part can be separated from the failing tissue.
The exact method depends on the species. Some plants root readily from stem cuttings, while others depend on divisions, rhizomes, bulbs, offsets or specialized structures. A healthy leaf alone is not automatically capable of producing a new plant.
The Save, Backup, Propagate or Replace Decision
Use the remaining viable tissue to guide the decision:
- Save the whole plant when firm roots, sound central tissue and viable growth points remain.
- Save plus make a backup propagation when recovery looks reasonable but substantial root loss creates uncertainty.
- Propagate healthy material when the original root system is failing but healthy propagatable tissue remains.
- Replace the plant when no functional roots, viable growing structure or suitable propagation material remains.
This is often a more useful framework than asking whether a plant is simply “alive” or “dead.” The real question is what living structure remains and which recovery route gives that structure the best chance.
The Root Rot Rescue Decision Sequence
A successful rescue is easier to manage when each decision follows from the one before it.
1. Confirm
Verify that the root tissue is actually deteriorating. Do not diagnose root rot from yellow leaves, wet soil or brown roots alone.
2. Compare
Find the healthiest roots on the plant and compare questionable tissue with them. Firmness, structure, smell and tissue integrity matter more than a single color rule.
3. Assess
Determine how much viable root system remains and whether the crown, stem or growing points are still healthy.
4. Preserve
Remove clearly failed tissue while keeping as many functioning roots as possible.
5. Correct
Identify why the root zone remained unfavorable. Check pot size, drainage, potting-medium structure, standing water, light, temperature and watering behavior.
6. Resize
Match the container to the remaining root system, particularly when substantial root pruning has reduced root mass.
7. Stabilize
Provide suitable light, temperature, moisture and airflow without repeatedly changing the environment or adding unnecessary treatments.
8. Recheck
Judge progress by stabilization, moisture behavior, stem integrity and future growth rather than by expecting old damaged leaves to recover.
The sequence matters because cutting roots without correcting the environment only treats the visible damage. The rescue becomes much stronger when the reason the roots failed is changed at the same time.
Small Changes That Make Root Rot Recovery Easier
Once the damaged roots have been dealt with, recovery often depends on fairly ordinary decisions made consistently. The temptation is to keep improving the rescue with another additive, another repotting, another location change or another inspection. In practice, a recovering root system usually benefits more from a suitable environment that remains predictable.
One useful change is to stop treating the plant’s old watering rhythm as relevant. If root pruning reduced the functioning root mass, the plant may now use moisture much more slowly. Check the actual root-zone condition before watering, and pay attention to whether the pot is becoming lighter rather than relying on the interval that worked before the damage occurred.
Keep drainage water from remaining around the container. If a nursery pot sits inside a decorative cachepot, remove it for watering and allow excess water to drain before returning it. If a saucer collects runoff, empty it rather than allowing the bottom of the pot to remain in contact with standing water.
It also helps to keep a short recovery record. You do not need a complicated plant journal. Note when the plant was repotted, when it was watered, whether the pot felt lighter, whether additional leaves declined, and when you first noticed stable or new growth. A few observations over time are often more informative than repeatedly removing the plant to inspect its roots.
Common Root Rot Rescue Mistakes
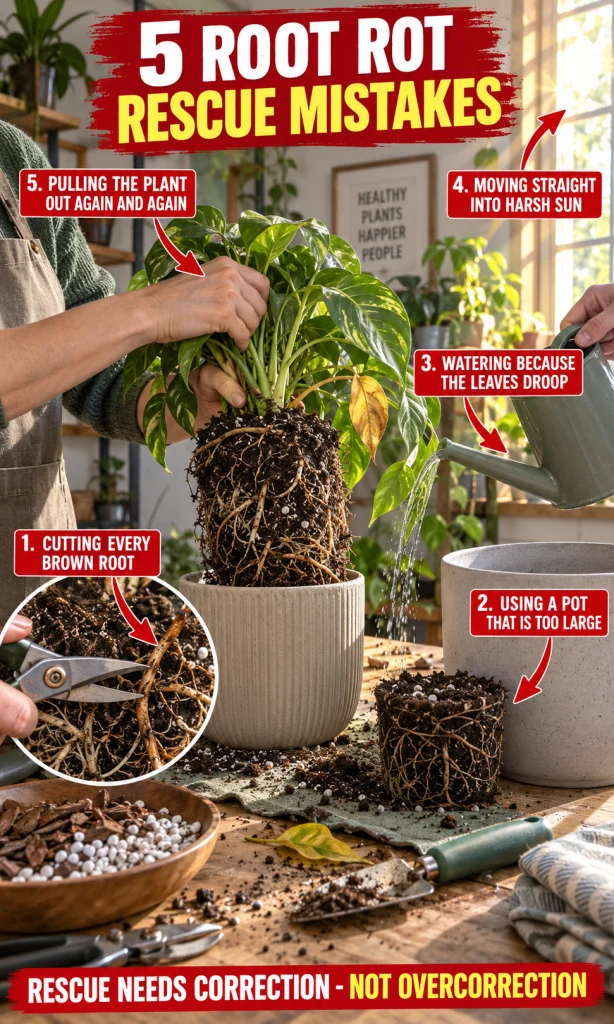
Most rescue failures cannot be reduced to one mistake, because the roots may already have been badly compromised before treatment began. Still, several interventions can make recovery unnecessarily difficult.
Cutting Every Brown Root
Root colour varies naturally. Removing every dark root can leave the plant with far less functional root tissue than necessary.
Cut according to evidence of deterioration – softness, collapse, tissue separation and other signs considered together – rather than using brown as an automatic removal signal.
Putting the Reduced Root System Back Into a Large Pot
This can recreate a slow-drying root zone immediately after the rescue. Reassess container size after pruning instead of assuming the old pot remains appropriate.
Watering Because the Leaves Are Drooping
Drooping does not prove that the new root zone is dry. A plant with severe root loss may wilt because the remaining roots cannot yet supply the foliage efficiently.
Check moisture before responding with water.
Trying to Dry the Pot With Harsh Sun
Sudden strong sunlight can increase water loss through the leaves while the reduced root system is least capable of replacing it. Give the plant appropriate light for the species rather than using intense sun as a soil-drying treatment.
Fertilizing to Force New Roots
Recovery requires functioning tissue and suitable conditions. Heavy feeding does not compensate for a damaged root system and may introduce additional stress.
Checking the Roots Repeatedly
New roots are delicate. Pulling the plant out of the pot every few days to see whether anything has happened can disturb the very growth you are waiting for.
Use above-ground stability and changing moisture behaviour as your routine observations. Reinspect the roots when there is a meaningful reason, such as renewed deterioration, spreading softness or persistent saturation that cannot otherwise be explained.
Professional Perspective
Root rot rescue becomes much easier to reason through when you stop treating it as a single disease with a single recipe. What matters operationally is the condition of the plant’s remaining living structures and whether the root environment can be changed enough to support them.
That is why an unattractive plant can still be a good rescue candidate. A plant may have lost several leaves and much of its fine root system, yet retain firm structural roots, a healthy crown and viable growing points. Those surviving structures give it something to rebuild from.
The reverse can also occur. Green leaves may remain temporarily above a root system whose essential structures are continuing to deteriorate. Appearance above the soil can therefore lag behind what is happening below it.
The most useful rescue question is:
What is still functioning, and can the conditions around it now support recovery?
That question prevents two opposite mistakes – discarding a plant that still has strong recovery potential and repeatedly treating a plant whose original structure can no longer recover when viable propagation material could have been saved instead.
Key Takeaways
Root rot does not automatically mean a plant is lost. Recovery is more realistic when firm roots remain, the crown or main stem is structurally sound, viable growth points are present, and the environmental cause of the damage can be corrected.
Do not diagnose or prune roots by colour alone. Compare texture, structural integrity, smell and the pattern of deterioration, then preserve as much genuinely viable root tissue as possible.
After pruning, reassess the pot. A container sized for the old root system may hold too much slow-drying growing medium for the smaller root system that remains.
Water according to the recovering root zone rather than the plant’s old schedule. Drooping leaves alone are not evidence that more water is needed.
During recovery, look for stabilization before dramatic new growth. Slower decline, a firm crown, predictable moisture use and no spreading decay are meaningful early signs.
If the original root system is no longer viable but healthy propagatable tissue remains, saving part of the plant may be more realistic than continuing to rescue the whole plant.
Frequently Asked Questions
Frequently Asked Questions
Can a plant fully recover from root rot?
Yes, some plants can recover from root rot when enough viable root tissue remains and the conditions that contributed to the damage are corrected. Recovery depends on the species, the severity of root loss, the condition of the crown or main stem, and whether the new root environment supports better aeration and moisture control. The earliest positive sign is often stabilization rather than immediate new growth.
Can a plant survive after losing most of its roots?
Sometimes. A plant with only a small amount of healthy root tissue may still be able to produce new roots if its crown, stem, or growing points remain viable. Because the reduced root system usually uses water more slowly, the container size and watering routine may need to change during recovery.
Should I cut off every brown root?
No. Brown root colour alone does not confirm that a root is rotten because mature roots, mineral deposits, and potting materials can naturally darken healthy tissue. Compare colour with texture, structure, smell, and nearby root condition, and remove roots that are clearly soft, collapsing, hollow, or decomposing rather than cutting every dark root.
Should I remove all the soil when treating root rot?
Remove enough of the old growing medium to inspect the roots properly and eliminate material that is badly degraded, compacted, sour-smelling, or staying excessively wet. Complete bare-root washing is not always necessary and can damage healthy fine roots if done aggressively. Use the least disruptive method that still lets you identify and remove clearly damaged tissue.
Should I use a smaller pot after cutting rotten roots?
It is often worth reassessing pot size after substantial root pruning. A container that matched the original root system may hold too much slow-drying potting mix for the smaller root system that remains. Choose a pot that comfortably fits the surviving roots without surrounding them with a large unused volume of wet growing medium.
Should I water immediately after repotting a plant with root rot?
There is no universal waiting period. The decision depends on how wet the roots already are, the moisture level of the fresh mix, how much root tissue was removed, and the plant’s normal moisture requirements. The goal is to provide appropriate moisture without returning damaged roots to prolonged saturation.
How do I know whether the plant is recovering?
Early recovery often looks like stabilization rather than sudden new growth. Encouraging signs include a firm crown or stem base, no new soft tissue, slower leaf decline, no returning unpleasant smell, and a more predictable moisture cycle in the pot. New roots, shoots, leaves, or buds provide stronger evidence later.
How long does root rot recovery take?
There is no single reliable recovery timeline because plant species, root loss, season, light, temperature, and growing conditions all affect the pace. Some plants stabilize quickly while others may need much longer before visible growth resumes. Judge progress by the sequence of stabilization, root rebuilding, and eventual return to active growth rather than expecting recovery by a fixed date.
Can root rot come back after repotting?
Yes. Repotting removes damaged tissue and changes the growing medium, but root rot can return if the new root zone still stays excessively wet or poorly aerated. Reassess pot size, drainage, standing water, potting-mix structure, light, temperature, and future watering habits so the same moisture pattern is not recreated.
When should I propagate instead of trying to save the whole plant?
Propagation becomes worth considering when the original root system is severely compromised, decay is moving into essential lower tissue, or the whole plant continues to deteriorate while healthy propagatable material remains. The correct method depends on the species because some plants root from stem cuttings while others rely on divisions, rhizomes, offsets, bulbs, or other specialized structures. If suitable healthy material is available, you can sometimes attempt whole-plant rescue and create a backup propagation at the same time.
Action Checklist – What to Do When You Find Root Rot
Before you finish the rescue, run through the sequence once more:
- Confirm – Look for genuine root deterioration rather than relying on leaf symptoms or root colour alone.
- Compare – Identify healthy roots on the same plant and use them as your reference.
- Assess – Check how much functional root tissue remains and whether the crown, stem and growing points are viable.
- Preserve – Remove clearly failed tissue without sacrificing healthy roots simply to make the root ball look clean.
- Correct – Identify why the root zone stayed unfavorable, including pot size, standing water, growing-medium structure, light and watering behaviour.
- Resize – Match the container to the surviving root system if substantial root loss has occurred.
- Stabilize – Give the plant suitable light, temperature, moisture and time without unnecessary repeated interventions.
- Recheck – Watch the direction of change. Stabilization comes before visible rebuilding.
If you reached this article because the surface of the pot appeared dry while the lower layers remained wet, the next useful reference is Why Soil Looks Dry on Top but Wet Underneath. That moisture-layer pattern can explain why repeated surface-based watering keeps deeper roots wet long after the top of the pot has changed colour.