
Low-maintenance flower gardens need watering that reaches the roots when the soil needs it, rather than a fixed weekly soak. Newly planted flowers, established borders and containers can need very different treatment, even when they stand beside one another. Start by separating those needs, then check what your watering actually wets before changing the timer.
The most useful improvement is often better coverage, not a longer run. A drip line can leave a new plant’s root ball dry while wetting the surrounding bed, and a watering can can create runoff without replenishing much soil moisture. Both problems look like a thirsty plant; neither is reliably solved by watering the whole garden more often.
For an existing flower border, the recommendation here is to commission one small watering area properly before automating the rest. Confirm the root-ball moisture, the wetted footprint and the output of that area. This takes some attention initially, but it gives you a reason for the settings you keep and a way to recognize a change later.
Which flowers can share the same watering routine?
Flowers can share irrigation when their moisture needs, rooting stage and growing conditions are compatible. Similar flower colour or a common “easy-care” label tells you very little about that compatibility. An established sun-loving perennial on freely draining soil and a recently planted bedding flower may need separate attention even within the same border.
Drought tolerance describes a plant’s ability to endure water shortage; it does not mean every drought-tolerant plant stores water in fleshy leaves. Different plants use different adaptations, and tolerance often depends on roots becoming established in a suitable site. A small nursery plant has not acquired the water access of a mature clump simply because its label says drought tolerant.
Nor does a humid climate automatically call for water-loving plants. Humidity affects water loss, but the bed’s drainage, rainfall distribution, sun and plant selection still matter. A sheltered strip beside a wall can miss useful rainfall while a hollow a few metres away stays wet. Design around those actual conditions rather than assigning one schedule to a whole climate.
| Condition | Useful first action | Why the usual shortcut fails |
|---|---|---|
| New transplant in an established border | Compare its root ball with nearby soil; water individually when needed. | An established-plant schedule may miss a small, drying root ball. |
| Established flowers suited to the site | Assess moisture across their occupied root area before irrigating. | A dry-looking surface does not establish water shortage below. |
| Water flowing onto the path | Reduce flow and allow infiltration; stop if ground is saturated. | Longer watering can increase loss without improving root access. |
| One dry clump on a drip circuit | Check outlet flow and wetted footprint before extending the run. | More minutes affect every connected plant, including wet ones. |
| Containers beside an in-ground bed | Manage separately when their moisture needs differ. | Container storage and exposure differ from a continuous soil bed. |
Group the bed by water demand
Begin with the planting you already have. Identify flowers that prefer freely draining soil and relatively dry conditions once established, plants that perform best with more consistent moisture, and recent transplants that still depend heavily on their original root balls. Containers belong outside this bed-level grouping because their limited soil volume and exposed sides change the water balance.
- Compare plant labels or reliable species guidance for sun, drainage and moisture requirements. Treat named cultivars individually where their requirements differ.
- Look for places where those requirements agree with the site. Keep a damp-shade group apart from a dry, sunny border rather than trying to correct an unsuitable site with irrigation.
- Give incompatible groups separate watering control. That can mean separate circuits, a closed branch or targeted hand-watering; it does not require rebuilding the entire garden immediately.
- Keep new transplants accessible for individual watering until their root balls and the surrounding soil can be managed together.
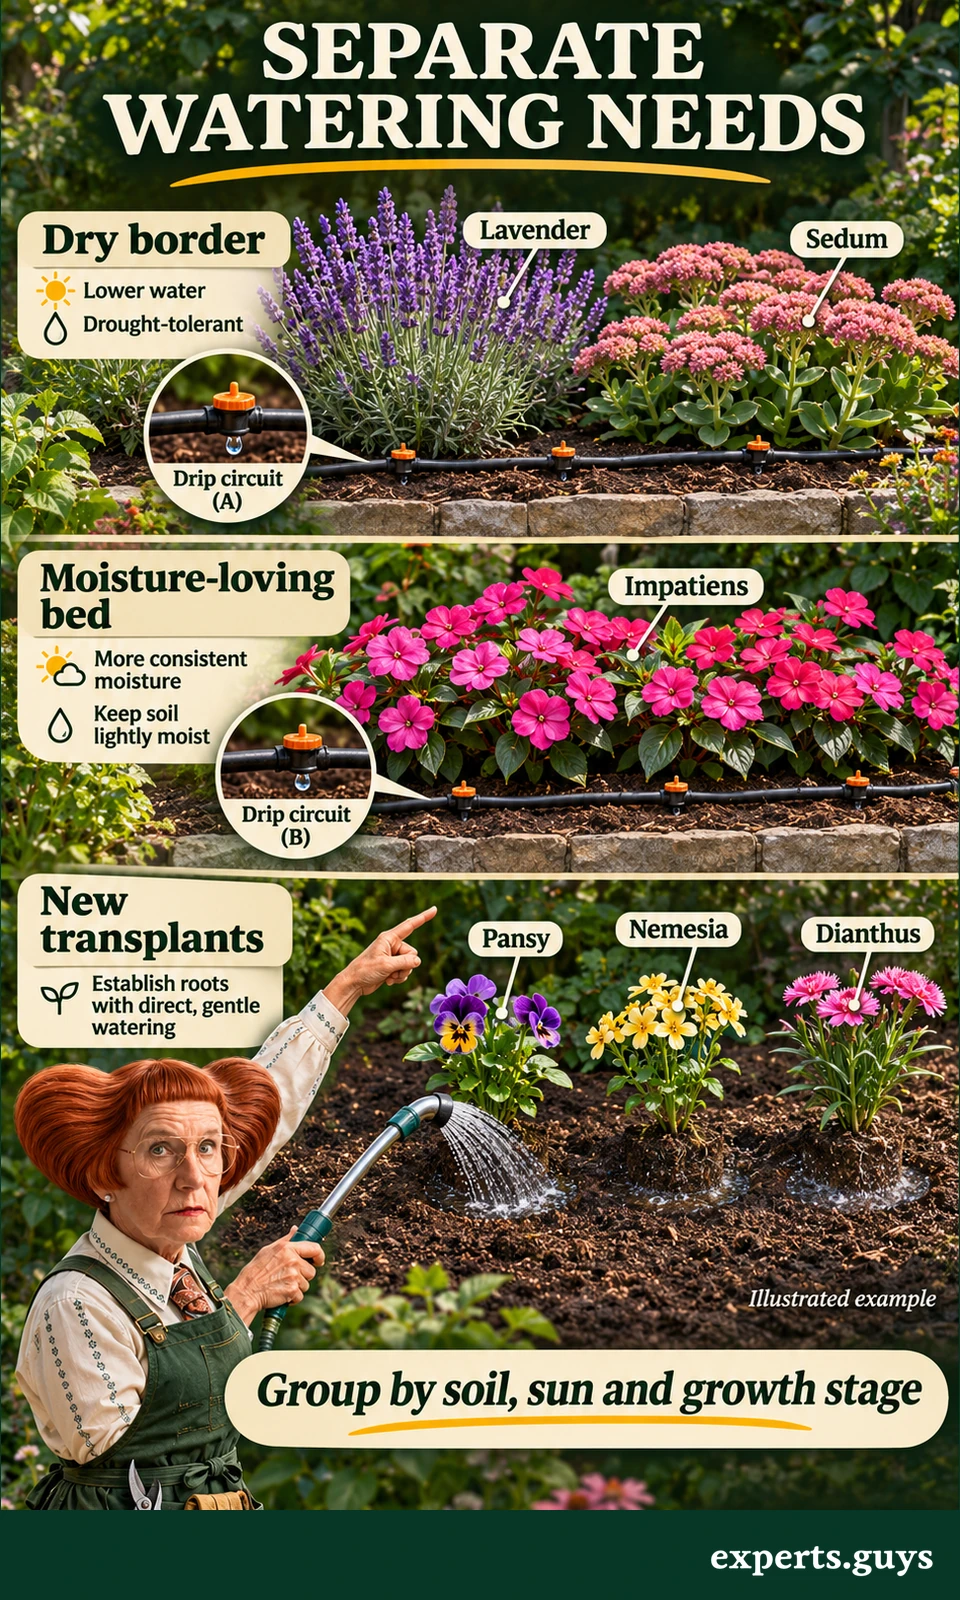
Lavender, stonecrop and yarrow are examples worth considering for suitable sunny, well-drained sites, but their names are not watering instructions. Shade bedding plants such as impatiens commonly need a different moisture regime. Aquatic plants such as water lilies belong in a different growing system altogether; a pond-water depth is not a useful comparison with a flower bed.
A common mistake is increasing the run time of a mixed circuit because one plant wilts. The extra water also reaches every other connected plant, including those already wet enough. The easier correction is to hand-water the newly planted or more demanding patch while leaving the established dry border alone. Longer term, reorganize the circuit or planting so routine irrigation serves compatible needs.
For example, imagine a mature perennial border with three newly added plants along the front edge. The mature clumps may still have accessible moisture while the three small root balls are drying. Watering those three plants directly addresses the temporary establishment problem; soaking every mature clump treats an entire bed for a problem affecting only a small part of it.
If you are still choosing the border’s position and planting layout, the flower-garden planning overview covers that earlier stage. Here, the narrower task is deciding which existing plants can receive the same water without one group’s needs continually overriding another’s.
How can you tell whether water reached the flower roots?
Compare moisture where roots are growing, rather than judging the dark patch on top. For new transplants, check both the original root ball and adjacent garden soil. For established plants, inspect a representative part of the active root zone without repeatedly disturbing the crown or cutting through a dense root mass.
A nursery root ball and garden soil can hold and transmit water differently. Water applied beside a transplant may move through the bed without evenly rewetting its original growing medium. Conversely, that root ball can remain wetter than its surroundings. The useful question is whether the plant has access to suitable moisture, not whether one visible surface looks uniformly brown.
Compare the root ball with the surrounding soil
Use a narrow hand trowel and work from an accessible edge, avoiding major roots. Draw back any mulch first. Take only a small sample beside the root ball and gently check an accessible outer part of the root ball itself; do not pull the plant out or dig a trench through its roots. Where access is difficult, prioritize a shallow, careful check over forcing a tool deeper.
- Before watering, compare the two locations at a depth relevant to the actual roots. A few centimetres below the surface is a start for a small transplant, not a universal endpoint for mature plants.
- If the root ball needs water, apply a gentle flow across it and the nearby rooting area. Stop if water ponds or runs away.
- Allow water to infiltrate, then compare the same kinds of locations nearby. Look for moisture reaching the root-bearing soil rather than remaining only in a thin surface layer.
- Replace the small amount of disturbed soil. Stop digging once you have enough information; the purpose is a watering check, not root excavation.
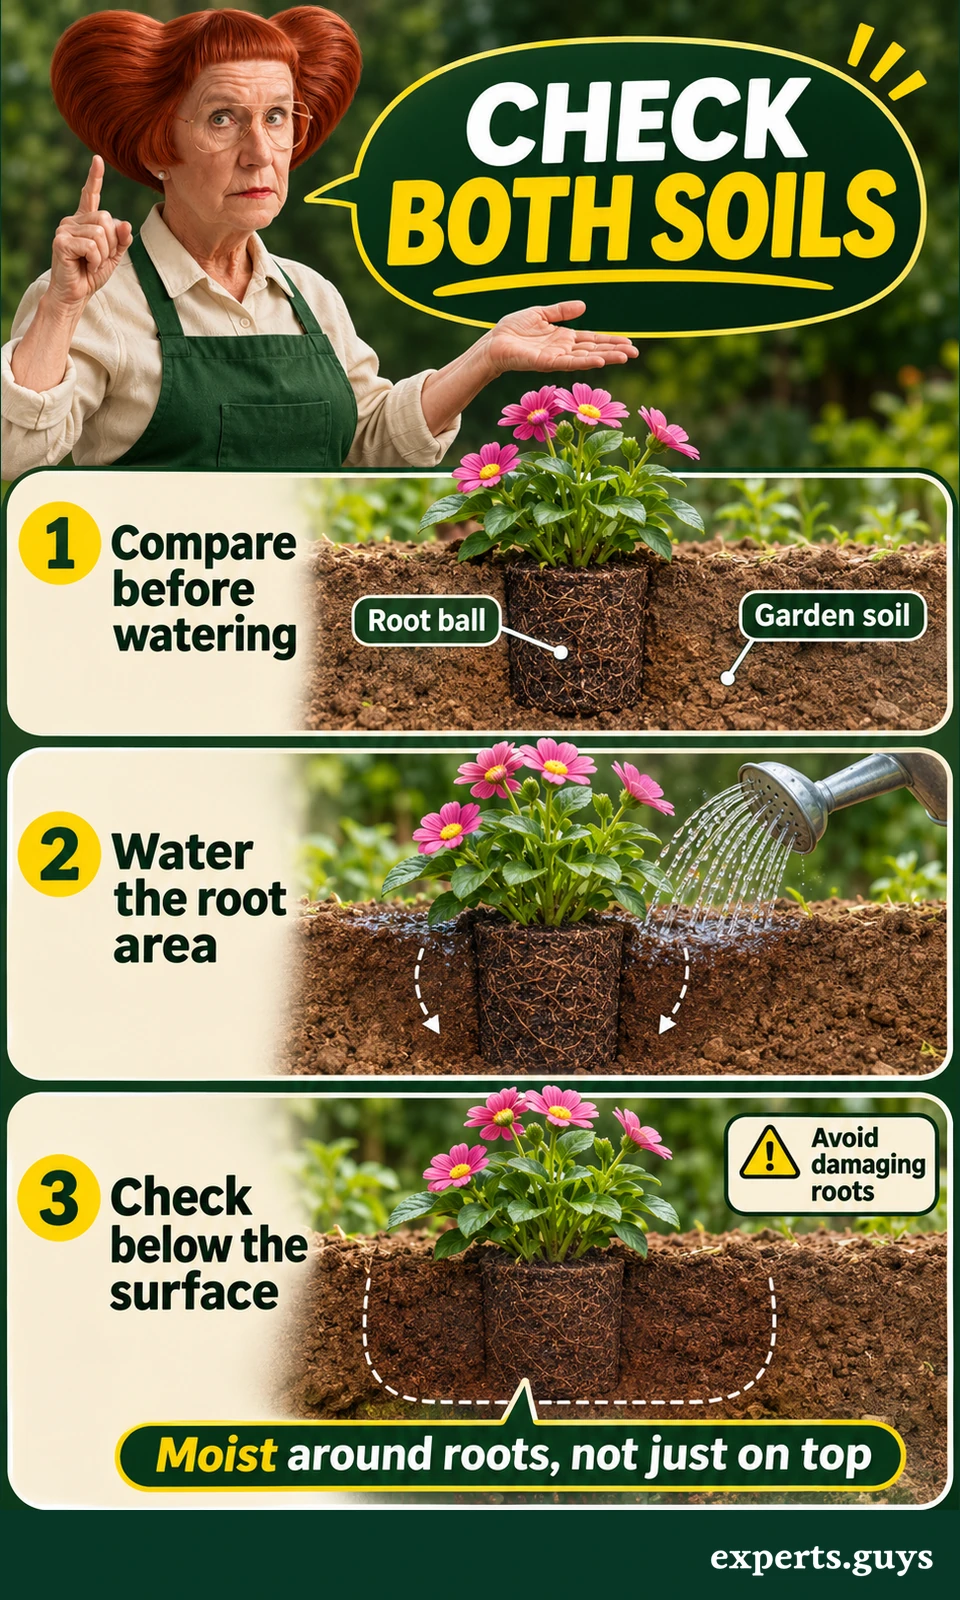
The checkpoint is moist soil around the relevant roots without prolonged saturation. Sandy soil may not form a stable ball in your hand even when moist, while clay can remain cohesive across a wider moisture range. Compare moisture and texture together; do not require every soil to pass an identical squeeze test. A sample that is obviously wet or releases free water is not evidence that the plant needs another soak.
With an established border, an initial check around 10–15 cm below the surface can reveal whether irrigation is only wetting the top. That is an inspection example, not a prescribed rooting depth or a demand to soak every plant to the same level. Plants, soil layers and root distribution differ. The University of Minnesota’s bed-watering guidance likewise emphasizes feeling the soil and directing water to the base.
Do not replace this comparison with a cheap moisture meter’s unexplained number. Probe contact, soil composition and position can change a reading. A meter may help you compare familiar locations, but it cannot tell you that a dry root ball is adequately watered because a nearby pocket is wet. When the clues conflict, resolve the location difference before adding more water.
The related guide to dry surface soil with moisture underneath explains that broader mismatch, especially in containers. This article adds the outdoor-bed distinction: two adjacent materials can need different treatment even at similar depths.
Slow the application when water starts escaping
Use a slower, interrupted application when water runs across the surface before it can enter the soil. This is an application-rate correction, not a universal instruction to water in short bursts. If the ground is already saturated or water remains standing, stop; more cycles will not create drainage.
- Direct a gentle flow toward the rooting area, keeping the nozzle close enough to avoid splashing soil away.
- When you see surface ponding or runoff, stop the flow. Let the surface water disappear into the soil rather than following it with more.
- Resume at a lower flow if the root zone still needs moisture. Repeat only while infiltration is occurring and the soil below remains insufficiently wetted.
- Check the wetted soil beside the roots. Stop when the intended area has received useful moisture, rather than continuing to meet an arbitrary number of minutes.
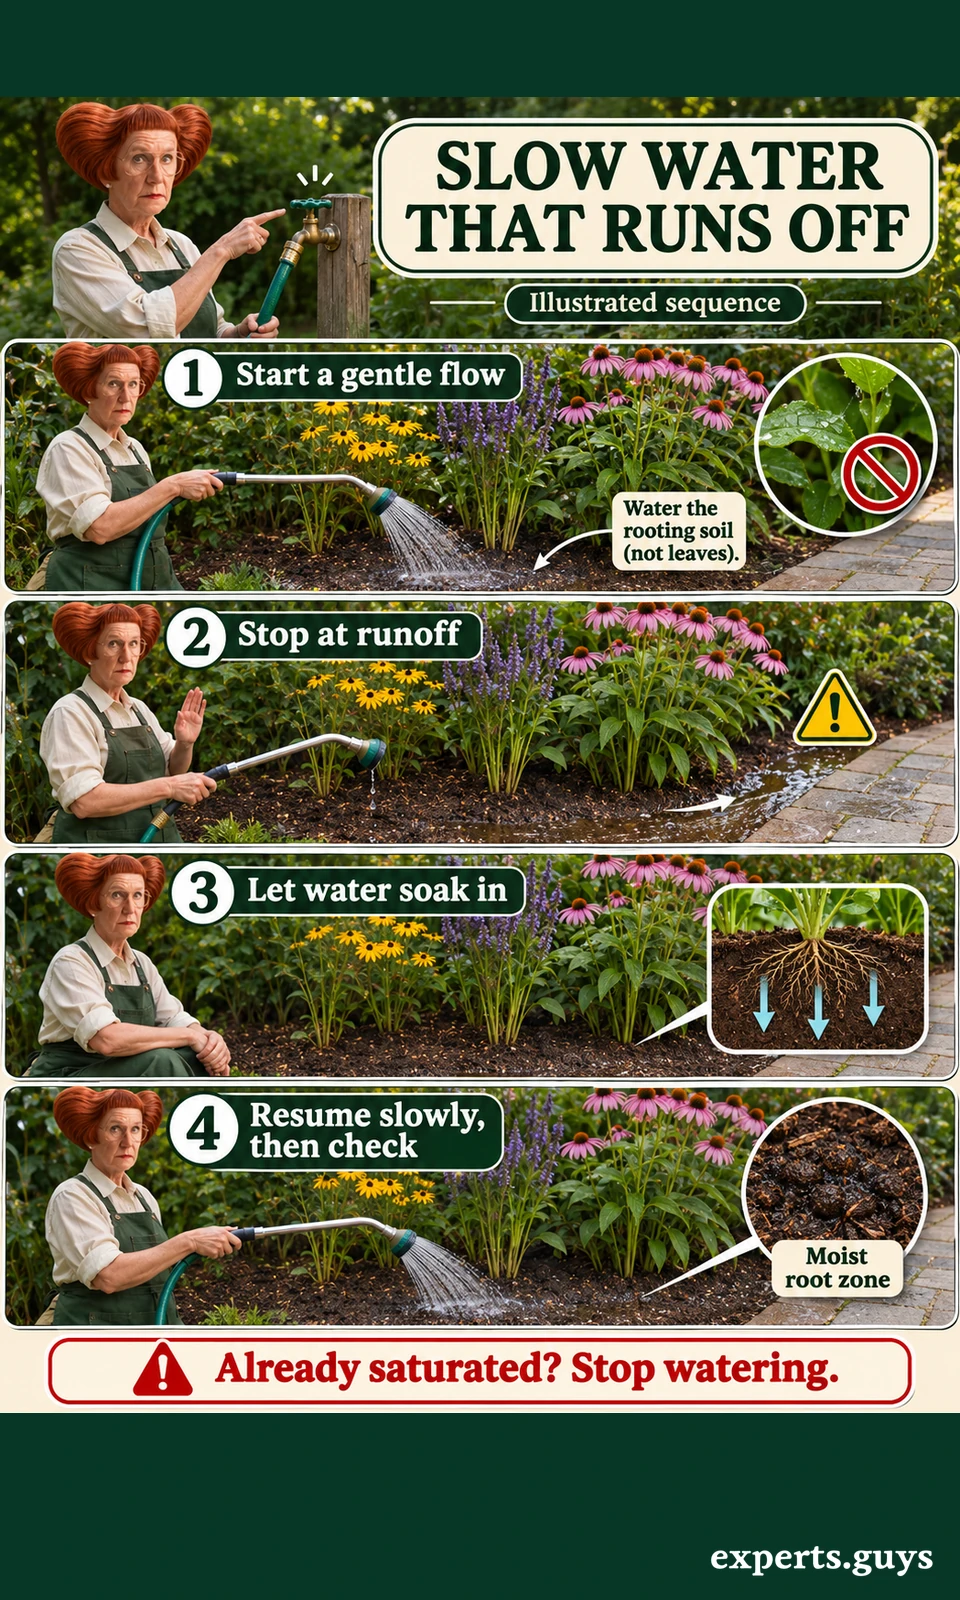
There is no single pause length for this method. A short wait may be enough on one soil, while slow infiltration elsewhere points to a more persistent surface or drainage problem. If repeated gentle applications still leave the root area dry, reconsider water placement and soil condition. Repeatedly flooding the same spot is a sign that the method needs changing, not that the garden demands an unlimited volume.
A watering wand with a shut-off near the handle offers an easier version where lifting a full can is difficult. Work from a stable path and avoid stretching over the bed. Use smaller cans if carrying water is the only option; several manageable deliveries are preferable to a heavy container that makes controlled watering awkward.
“Water deeply and less often” is useful only when it means replenishing the soil the roots can use, then allowing an appropriate interval. It does not mean forcing roots deeper by letting a new transplant repeatedly wilt, or sending water below the plant’s root zone. Deep watering also does not automatically prevent compaction or root disease. Soil structure, drainage, pathogens and repeated saturation remain separate issues.
How do you make drip irrigation dependable?
A dependable drip system has suitable coverage and a known output under its actual operating conditions. Water appearing at an emitter proves that water is leaving the line; it does not prove that the adjacent plant is receiving enough across its roots. Check the wetted footprint before relying on a timer.
Water generally moves farther downward relative to sideways in coarse sandy soil and spreads more laterally in finer soil. Real beds contain cracks, organic material, old planting holes and compacted layers, so that general pattern cannot determine exact spacing by itself. A surface wet spot may also be much smaller than the wetted area below, or hide a narrow channel that misses roots.
Adjust the wetted footprint before the run time
Start with the system’s specified emitter spacing, pressure requirements and maximum run length. Use the filter, pressure regulation and supply-protection equipment required for that system and your local water connection. This is not a case where a universal pressure setting or a borrowed plumbing rule is safe to assume.
- Position emitters so water reaches the original root balls of new plants. For an established clump, cover the occupied root area rather than concentrating every outlet against its crown.
- Run the area briefly while watching for leaks, detached fittings and immediate runoff.
- Check moisture beneath an emitter and between neighbouring emitters at a suitable depth. Look for dry gaps where roots need water.
- Reposition a line or add suitable emitters when coverage is missing. Check again before increasing the run time across the whole circuit.
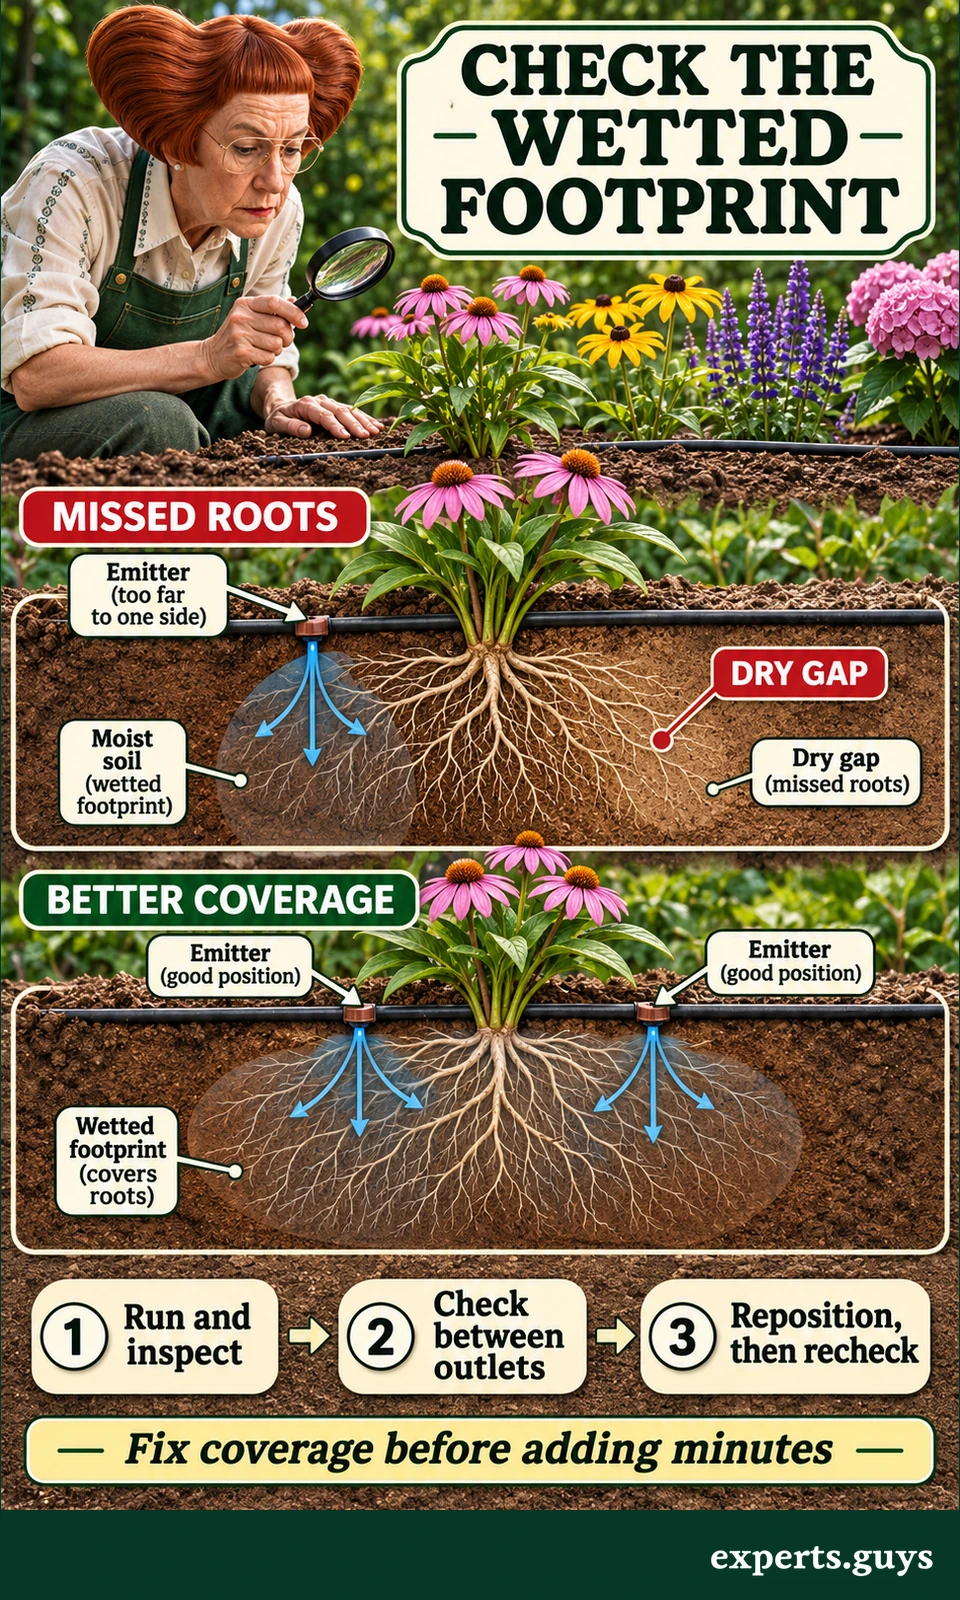
Suppose one outlet creates a narrow wetted column beside a broad clump. Running it longer may send more water downward without efficiently covering the dry side of the plant. Another outlet positioned to serve that side can be the more sensible change. The outcome to assess is a suitably wetted root area, not a larger dark circle at the soil surface.
Pressure-compensating emitters can help maintain output within their stated operating range; they do not compensate for a blocked outlet or unsuitable placement. Soaker hoses release water along their length and may be useful in a small, relatively level bed, but they do not necessarily deliver evenly along a long or sloping run. Use the particular product’s instructions and verify what it does in your bed.
Colorado State University’s home drip guidance explains the relationship between emitter placement, soil and plant roots. Its regional quantities are starting guidance rather than a watering prescription for every garden. For this article’s purpose, the transferable principle is to inspect moisture at the roots and adjust coverage and operation together.
Adding mulch can hide tubing, so finish the first coverage check while the line is accessible. Later, leave connections and service points reachable. A clean-looking bed is not low maintenance if finding a disconnected fitting requires lifting an entire layer of mulch every time one patch begins to wilt.
Check emitter output with a timed catch
A catch test turns an assumed flow into an observable volume and helps distinguish a supply problem from a plant problem. Use small containers that can collect an outlet’s water without kinking the line or changing its operating position, a measuring jug and a timer. Choose comparable emitters; outlets intentionally rated at different flows should not be expected to match.
- With the system operating normally, collect water from representative outlets near the beginning, middle and end of the run for the same timed interval.
- Measure the collected volumes. If one is clearly different, inspect for a kink, leak, blockage or a different emitter rating before changing the garden-wide schedule.
- For a single outlet, calculate flow as collected litres divided by elapsed hours. Keep the units consistent.
- After correcting a fault according to the manufacturer’s instructions, repeat the catch and confirm that water is still reaching the intended soil area.
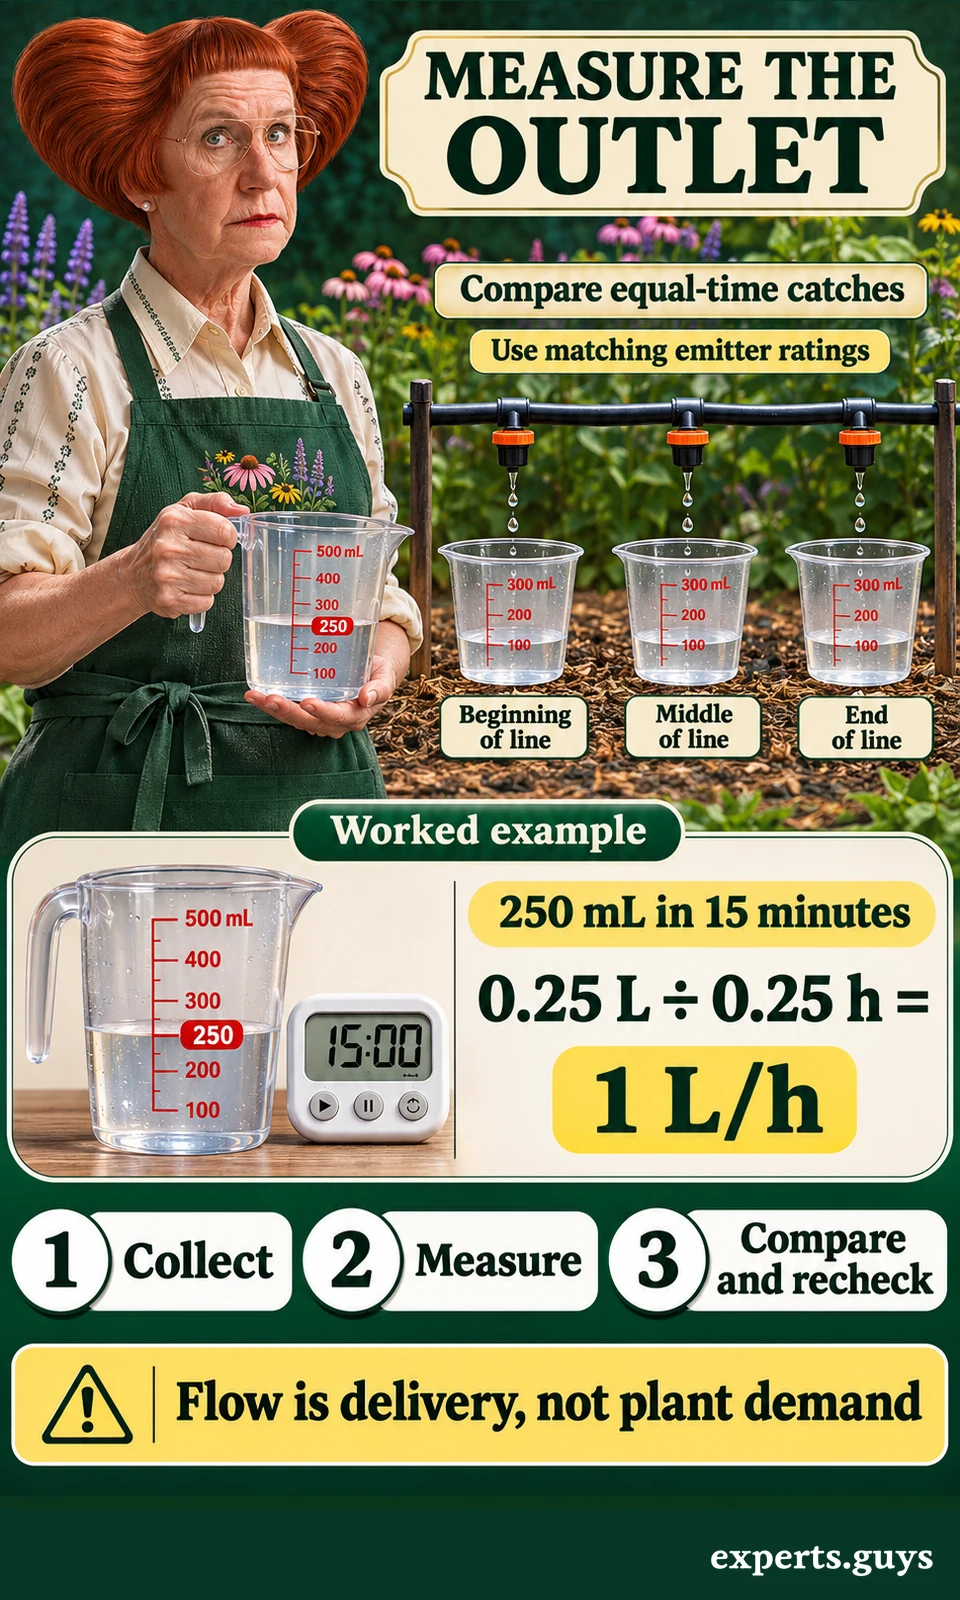
In an illustrative calculation, an emitter releases 250 mL in 15 minutes. That is 0.25 litres in one-quarter of an hour, giving 1 litre per hour. Two comparable emitters would deliver about 1 litre together during a 30-minute run if each maintains that flow. These figures describe delivery, not a flower’s water requirement or the amount retained around its roots.
This distinction prevents a familiar mistake: calculating litres accurately and then treating those litres as proof of adequate watering. Some may run off, move below the roots or remain concentrated in the wrong spot. Use the catch test to understand the supply and the footprint check to understand where that supply goes. Both are needed before a run time becomes meaningful.
For an easier check, compare equal-time catches from two accessible, identically rated outlets first. A large visible difference is enough to justify inspecting the line; you do not need to invent a percentage score or buy a controller that claims to diagnose everything. Do not push wire into an emitter or add cleaning chemicals unless its manufacturer specifically directs that procedure.
Check the system when it is first set up, after maintenance or a pressure change, and when plant performance becomes uneven. Revisit it periodically during use, with frequency suited to your water quality and system. A timer removes the task of turning water on; it does not remove the need to notice a blocked outlet, a split tube or a run continuing after substantial rain.
What changes keep watering low effort through the season?
Keep moisture in the useful soil volume and change irrigation when conditions change. Mulch can reduce evaporation and weeds, while a rain-aware routine prevents an old schedule from applying water the bed no longer needs. Neither replaces an appropriate plant-site match.
Apply mulch without burying flower crowns
Organic mulch is useful in many ordinary perennial borders because it protects the soil surface and reduces competition from weeds. It is not the right finish for every dryland or low-growing plant. A plant that needs an open, dry crown can be harmed by having damp organic material piled against it; choose the surface treatment to suit the planting.
- Remove existing weeds and assess moisture before adding mulch. If soil needs water, wet the root area first; mulch is not a way to rehydrate already dry soil.
- Spread a suitable loose organic material over exposed soil in compatible borders. A roughly 5–7.5 cm layer is common guidance, adjusted for the material and plants.
- Pull material back from stems, crowns and low foliage. Keep drip outlets and fittings accessible rather than pressing mulch tightly around them.
- Check beneath the mulch after watering or useful rain. The checkpoint is moist soil below, with plants remaining clear of a piled-up collar.
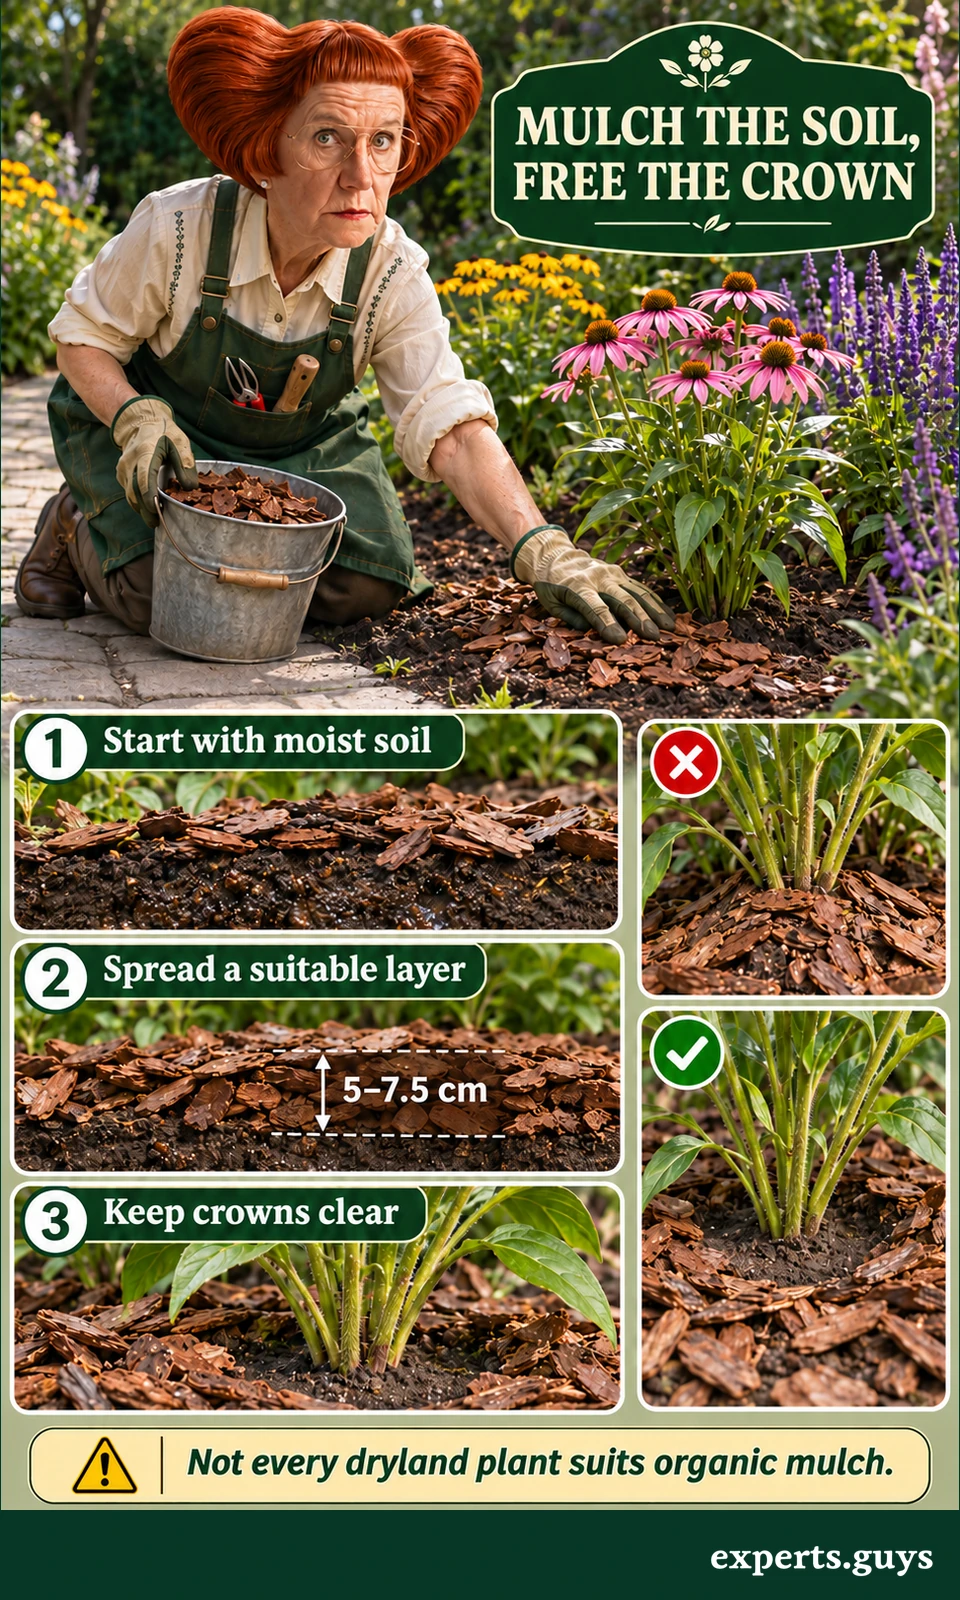
The RHS mulching guide supports applying an adequate layer over moist soil and avoiding smothering plants. The amount already present matters: topping up a thin area is different from adding another full layer to a bed that is already deeply covered. Judge the total depth rather than repeating the same application each season.
A common failure is spreading mulch over dry ground and assuming every brief shower will now reach the roots. Light rain can wet only the covering, and poorly placed irrigation can do the same. Draw back a small section to inspect the soil rather than using the appearance of wet bark as your evidence. Replace the covering after checking.
If a decorative gravel finish suits the species and site better, treat it as a different design decision, not an automatic substitute with identical effects. It does not add organic matter as it decomposes, and the planting’s drainage requirements still apply. A smaller, appropriately mulched border can be easier to maintain than a much larger mixed bed with conflicting needs.
Use rain and heat to change the next action
After meaningful rain, reassess the bed before the next scheduled run. In hot or windy weather, check vulnerable groups sooner, especially recent transplants and containers. Temperature changes the likelihood of water loss; it cannot tell you how much moisture remains around a particular plant.
- After rain, check whether moisture reached the rooting area, including sheltered edges and new root balls. Wet leaves and paving do not establish that it did.
- If the soil is adequately moist, pause the next routine run. A rain sensor is useful support, but it may not represent a sheltered part of the bed.
- During heat, compare a wilted plant’s root-zone moisture before adding water. Dry soil calls for appropriate watering; wet soil calls for a different explanation rather than another automatic soak.
- Prioritize new transplants and genuinely dry patches. Resume the usual circuit only when the connected planting needs it, following local restrictions.
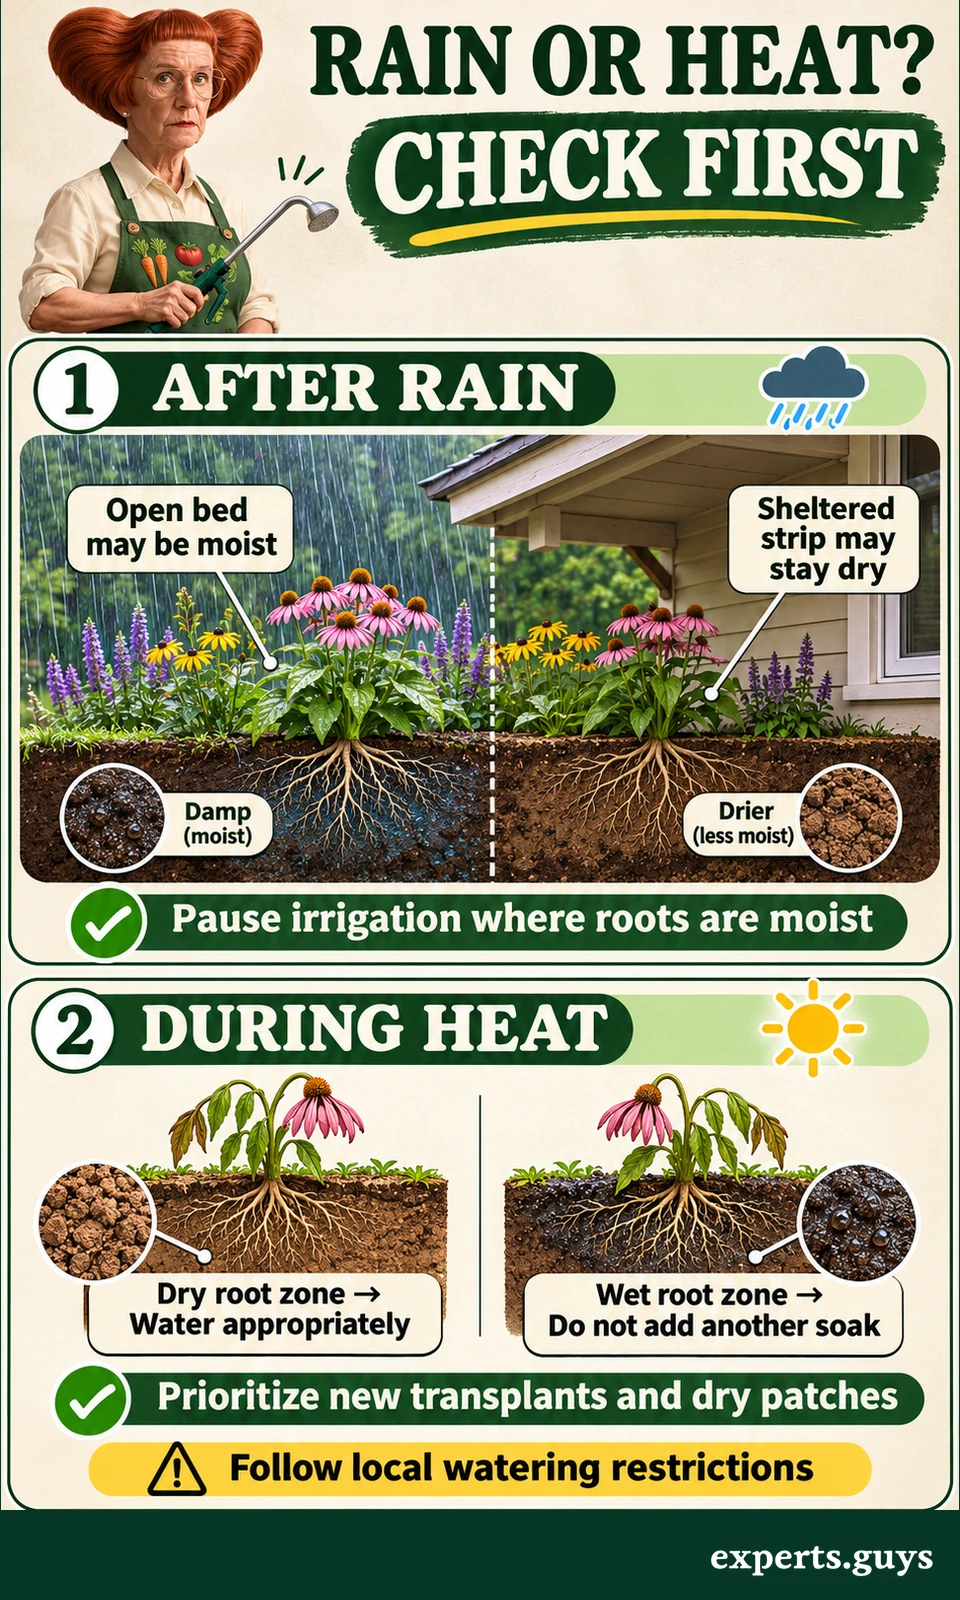
Midday drooping can occur when leaves lose water faster than roots can replace it, even with moisture available below. Repeatedly soaking already wet soil can make the root environment worse. Where the plant is stable enough to observe, compare its condition as heat eases; persistent collapse, soft tissue or progressively damaged foliage deserves closer investigation rather than a timer adjustment based on appearance alone.
The RHS guidance on watering wisely helps distinguish priority plants and effective watering. Early morning is generally a useful routine because evaporative demand is lower and wetted foliage can dry during the day. A genuinely dry, distressed plant should still receive needed water rather than waiting solely for the preferred clock time.
| Observation | Correction to prioritize |
|---|---|
| Root ball dry; surrounding soil moist | Target the root ball and verify moisture enters it. Do not automatically soak the entire bed again. |
| Soil damp under outlets; dry between them | Correct line placement or outlet coverage before adding run time. |
| Comparable outlet gives much less water | Inspect its rating, line and outlet. Follow manufacturer maintenance guidance, then retest. |
| Runoff starts before the soil below is moist | Slow or interrupt application while infiltration continues; reconsider placement if it still bypasses roots. |
| Crown buried in damp mulch | Pull the material back and retain a suitable layer on the surrounding soil. |
| Wilted foliage with wet root-zone soil | Stop the automatic extra soak; investigate heat, drainage and plant condition. |
| Rain reaches the open bed but misses an overhang | Treat the dry strip separately rather than averaging both areas into a longer run. |
Consider a second illustrative situation: a storm wets the open part of a bed but misses the strip under an overhang. The sensible response is to leave the moist section alone and water the dry strip if its roots need it. Averaging those two conditions into a longer whole-bed run gives the already wet section unnecessary water without resolving the underlying zoning problem.
Containers near the border need their own judgment. Water can drain out quickly while substantial moisture remains inside, so their dry-down cannot be predicted from the in-ground bed. The guide to how potting soil changes after watering covers that separate cycle. Keep containers independently controlled when their needs repeatedly differ from the border.
Questions that remain after setting up the bed
Can I water flowers in the evening?
Yes, especially when it is the practical time to deliver needed water. Direct it toward the soil and avoid unnecessarily wetting foliage that will remain damp overnight. Early morning is often the easier routine for combining lower evaporative demand with daytime leaf drying, but the clock should not override a genuinely dry root zone.
Will a rain barrel run an ordinary drip kit?
Not necessarily. A barrel can supply useful water, but gravity pressure may be below the operating requirement of a kit designed for a mains tap. Use equipment specified for the available head and flow, and check its output in use. A labelled emitter flow at mains pressure is not proof of the same delivery from a barrel.
Should established flowers keep the same watering schedule in winter?
No. Growth, rainfall, evaporation and freezing conditions change the need for supplemental water. A dormant plant in moist ground should not continue receiving a summer program. Evergreen foliage and sheltered planting may still lose water during dry weather; assess those conditions individually rather than interpreting winter as either automatic watering or automatic neglect.
Do yellow leaves prove that I have overwatered?
No. Yellowing can accompany several root, nutrient, weather and plant-age problems. Wet soil is relevant evidence, but neither leaf colour nor a single moisture check identifies a specific disease. Stop adding water to already wet ground and investigate the conditions and pattern of decline; do not diagnose root rot solely from a yellow leaf.
Does low maintenance mean accepting fewer flowers?
It can involve a trade-off, but it does not mean abandoning a flowering border. Species suited to the site may maintain a satisfactory display with less intervention, while some bedding displays require more consistent moisture to keep flowering strongly. Choose the display you can support within your water supply and available effort; survival through drought and continuous peak flowering are different targets.
Choose the correction that matches the evidence
Start with the part of the bed that repeatedly needs attention. A dry new root ball calls for targeted establishment watering; a dry gap between emitters calls for a coverage change; a weak outlet calls for a supply check. If the soil is already wet, adding minutes is the wrong first correction.
The useful result is a border whose compatible plants receive water across their roots without avoidable runoff or prolonged saturation. Once that is happening, a timer and mulch can reduce routine work. Keep the settings conditional on the soil and season, and let the physical checks settle disagreements between a thirsty-looking leaf and a wet patch of ground.