
For an air fryer baked potato, cook a scrubbed, thoroughly dried and lightly oiled russet unwrapped at 400°F (about 200°C), starting your doneness checks at 30 minutes. Let the center, rather than a fixed timer, decide when it is ready: a skewer should slide through easily, and a thermometer will often read about 210°F (99°C). Budget extra time for a thick potato or a fuller basket, then follow the preparation and cooking steps below.
The crisp skin and fluffy filling are separate targets. Moving hot air helps dry the outside, while heat must still reach and soften the middle. A brown jacket can therefore look finished before the center is ready, which is why checking the thickest part matters.
Which potatoes and preparation give the best texture?
A russet is the simplest choice when you want a light, fluffy center and a sturdy skin. Yellow potatoes can also be baked whole, but their filling is generally creamier and less floury. Choose two similarly sized potatoes so that one is less likely to finish long before the other.
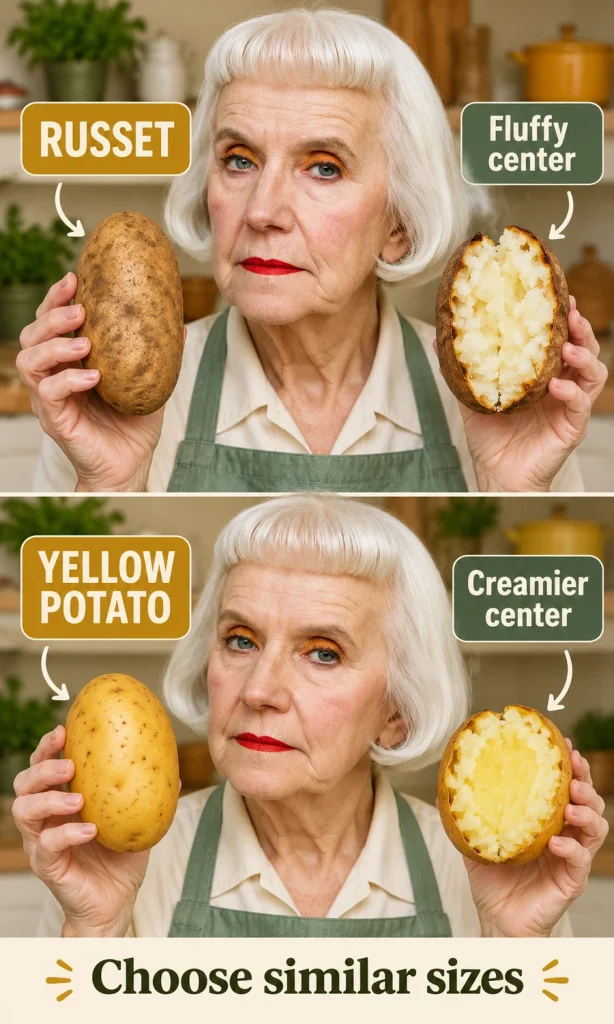
The difference comes partly from the potato variety and its starch structure. As the potato cooks, starch absorbs water and swells, contributing to the change from hard raw flesh to a tender filling. The Idaho Potato Commission’s potato chemistry explanation describes why high-starch russets develop their characteristic fluffy texture; choosing a variety helps set expectations, but does not determine an exact cooking time.
Ingredients for two potatoes
- 2 medium russet potatoes: choose similar thickness as well as similar weight.
- 1 teaspoon cooking oil: enough for a thin coating across both potatoes; use a little less or more if their surfaces require it.
- ¼ teaspoon fine salt: divide over the skins, or adjust to taste.
- Optional finishing ingredients: butter, sour cream or plain yogurt, grated cheese and chopped chives.
Use an oil suitable for high-temperature cooking and follow your appliance instructions. A thin film helps seasoning adhere; there should be no oil dripping from the potatoes or pooling in the drawer. Save butter and wet toppings for serving so that you can judge the plain skin first.
Prepare two potatoes
Scrub the potatoes under running water before you begin, then dry them all over with a clean towel. Surface water has to evaporate before the skin can dry and crisp, so leaving wet patches works against the result you want. Keep the potatoes whole for this method and use a stable chopping board for piercing.
- Clean: scrub away visible dirt under running water.
- Dry: pat the entire skin dry, including the ends.
- Pierce: use a fork to puncture each potato in two or three places so steam has an escape route.
- Season: rub or brush on a thin coat of oil, then distribute the salt.
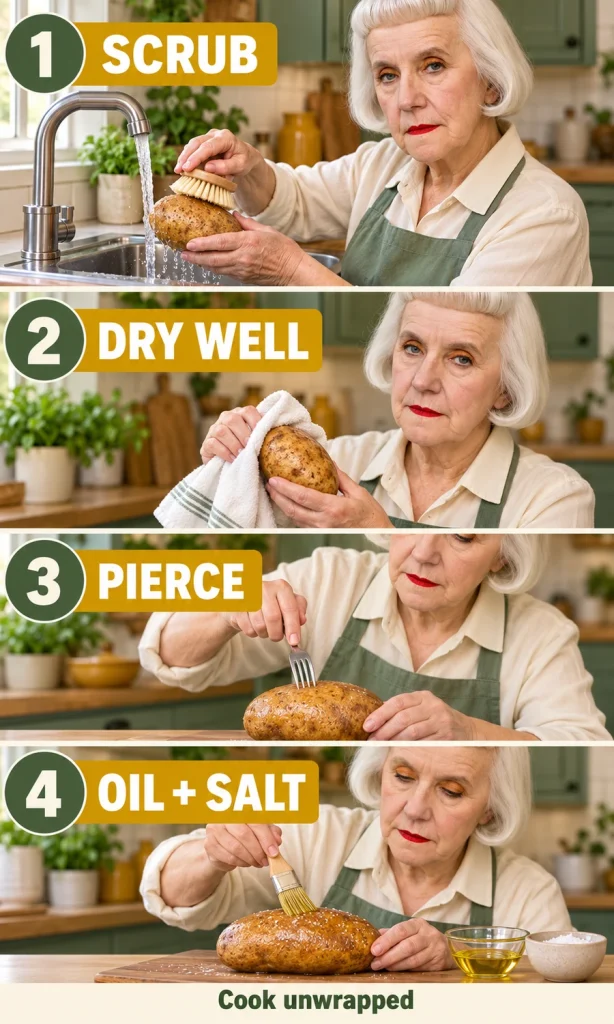
Cook the potatoes unwrapped when crisp skin is the goal. Foil holds moisture against the surface, so a foil-wrapped potato has a different texture from one exposed to moving air. For a broader explanation of the moisture trade-off, read how different cooking methods change texture, then keep the surface dry and uncovered for this recipe.
How do you cook a whole potato in an air fryer?
Use the air-fry setting at 400°F, or about 200°C if your machine uses Celsius, and check from 30 minutes onward. The Idaho Potato Commission’s air-fryer method gives a 30–40-minute reference, while explicitly noting that size, appliance and batch load change the time. Treat that as a checking window rather than a promise, especially with large supermarket baking potatoes.
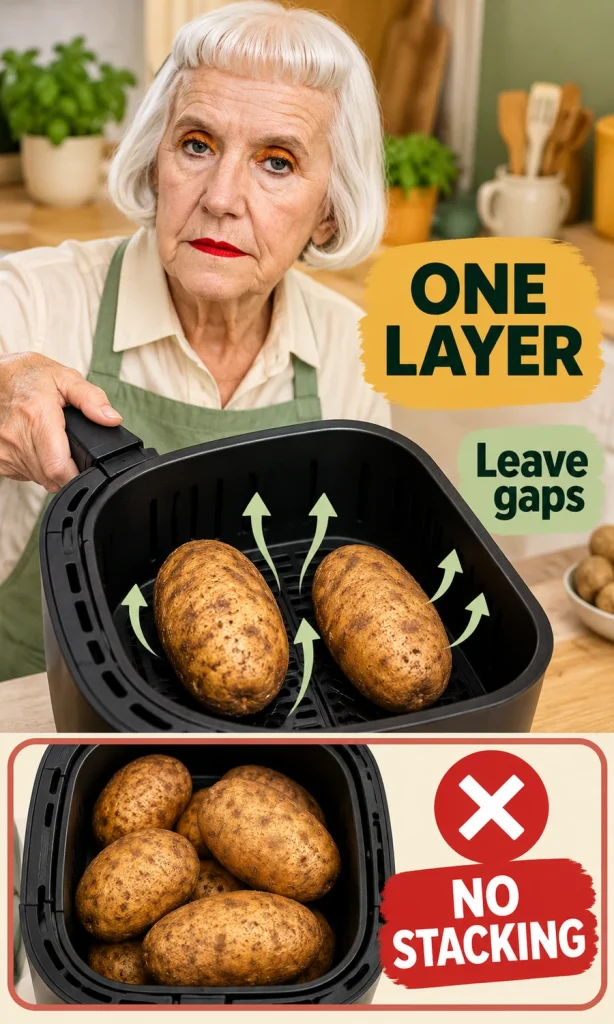
Air fryers heat the surface with circulating hot air, but the middle still takes time to warm through. Space around each potato keeps more of its skin exposed instead of shielding contact patches beneath another potato. Use one layer and cook in batches when the basket is too small; adding another batch does not mean doubling the first batch’s cooking time.
| Stage | What to do | What decides the next step |
|---|---|---|
| Heat | Choose air fry at 400°F / about 200°C. | Follow your model’s preheating instructions. |
| Load | Arrange whole potatoes in one layer with gaps. | If they need to stack, use another batch. |
| First check | Begin checking at 30 minutes. | A firm center means it needs more cooking. |
| Finish | Continue in 5-minute increments as needed. | Check each potato; remove finished ones individually. |
| Confirm | Aim for easy center penetration; about 210°F / 99°C is a useful reference. | This is a fresh-potato texture checkpoint, not a universal safety minimum. |
Cook and check
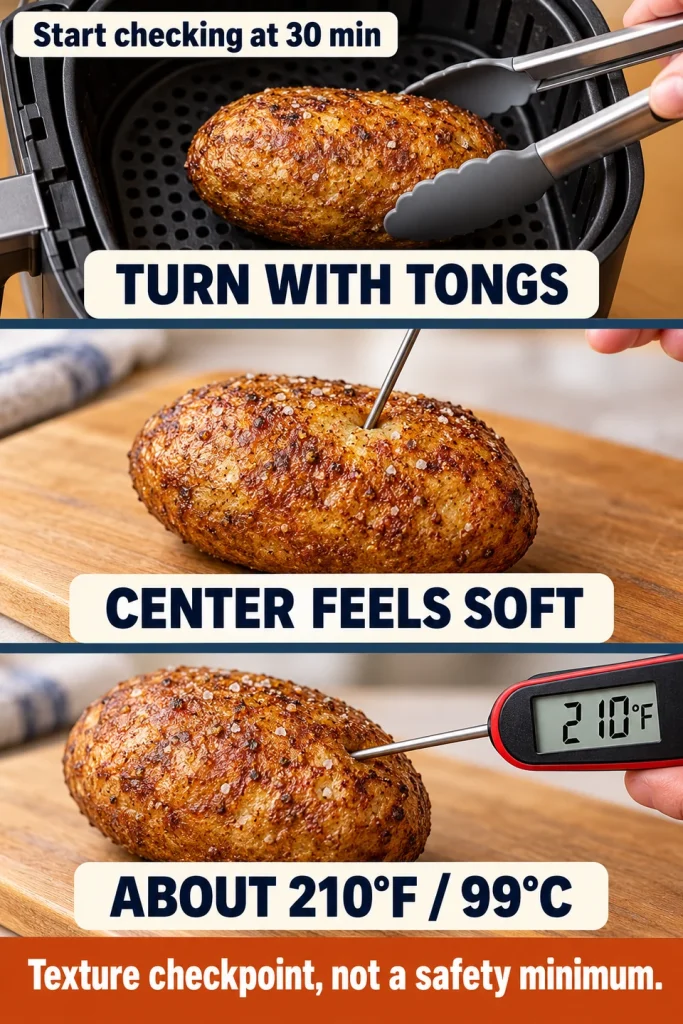
Preheat if your model requires it, then place the prepared potatoes in the basket. Turn them once around the middle of the expected cooking period if the skins are browning unevenly, using tongs and keeping clear of the hot basket. Start checking at 30 minutes even if you expect a longer cook, because discovering that one potato is ready is more useful than waiting for both to overcook.
- Load safely: place the potatoes apart on the crisper plate, following your appliance’s capacity instructions.
- Cook: use 400°F / about 200°C; turn with tongs if needed for more even exposure.
- Check the thickest center: insert a skewer into the middle, not just through the skin; it should enter with little resistance.
- Measure if useful: insert an instant-read probe into the center from the side; about 210°F / 99°C supports a fluffy result.
- Continue if firm: return an underdone potato for another 5 minutes, then check again. Remove each potato when its own center is tender.
A single potato may finish sooner than a fuller basket, but its thickness can matter more than its weight alone. A long, narrow potato and a round, thick one of similar weight do not present the same distance for heat to travel. On your first batch, allow spare time and use the center check rather than converting weight into a precise minute count.
The air fryer is convenient for a small batch that fits without crowding. For a larger meal, the baked potato in oven guide covers the separate oven method, where tray capacity may suit the job better. Choose the appliance that gives the potatoes room instead of squeezing a large oven batch into a small drawer.
Why is the potato hard inside or soft outside?
A hard middle usually means the potato needs more cooking, even when its skin has already browned. A soft jacket points you toward surface moisture, wrapping or restricted airflow, although toppings and holding time can also soften it after cooking. Diagnose the center and skin separately before changing the temperature or adding more oil.
| What you find | Likely explanation | What to change |
|---|---|---|
| Brown skin, firm center | The outside is ahead of the thick middle. | Continue cooking and check again in 5 minutes. If browning is excessive, lower the heat. |
| Tender center, soft skin | Moisture has stayed at the surface. | Remove wrapping, separate the potatoes and cook uncovered briefly, checking frequently. |
| Very dark skin before the center softens | Surface heating is too aggressive for this potato or appliance. | Reduce to about 375°F / 190°C and continue until the middle is tender. |
| One done, one hard | The potatoes differ in size, shape or exposure. | Remove the finished potato; keep cooking the other. |
| Skin softens after topping | Wet toppings and trapped steam have changed the surface. | For the next serving, split and top only when ready to eat. |
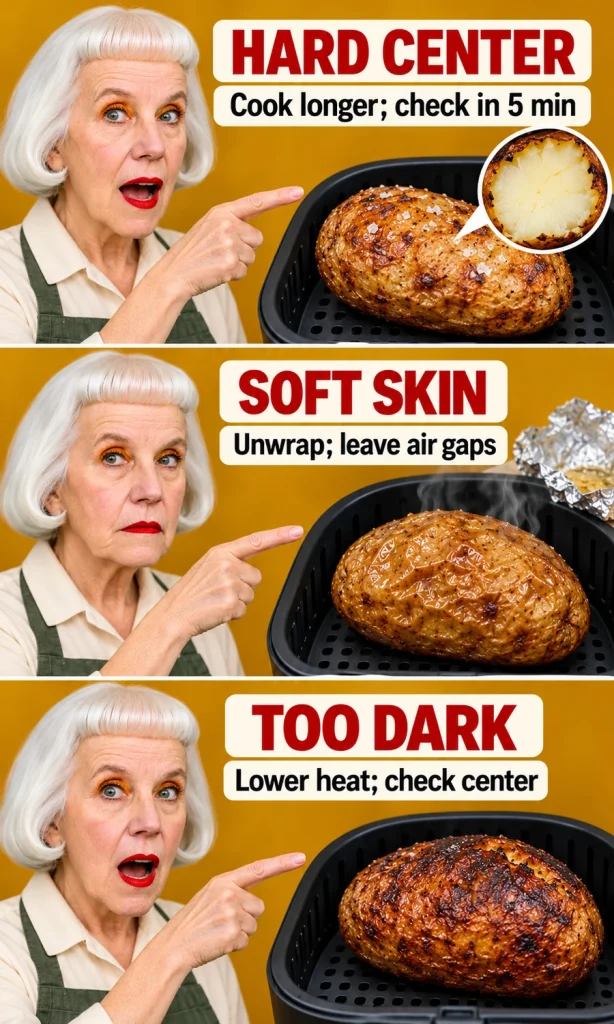
The lower temperature is a practical adjustment when the exterior is getting too dark, not a second guaranteed timing formula. It reduces further surface browning while you give the middle more time. If the appliance smokes or behaves abnormally, stop and follow its safety instructions rather than continuing a food-texture experiment.
Foil is not a crisping shortcut. The Idaho Potato Commission’s foil explanation describes the moisture problem with wrapped baked potatoes. Likewise, browning alone cannot tell you whether the center is fluffy, so finish the diagnosis with a skewer instead of repeatedly increasing the heat.
How do you serve, store and reheat baked potatoes?
Split and fluff the potato when you are ready to eat, then add toppings to the opened center. For leftovers, separate the storage decision from the serving decision: refrigerate promptly instead of leaving the remaining potatoes on the counter until the meal is over. A little preparation here makes it easier to reheat just the portion you need.
Finish at the table
- Protect your hand: place the potato on a stable board or plate and use a clean oven mitt to steady it.
- Split: cut a lengthwise opening, keeping your face and fingers clear of escaping steam.
- Fluff: gently loosen the cooked center with a fork rather than mashing the whole potato into a paste.
- Top: add butter and chives, sour cream or yogurt, or cheese according to your preference; keep wetter toppings in the opening if you want the skin exposed.
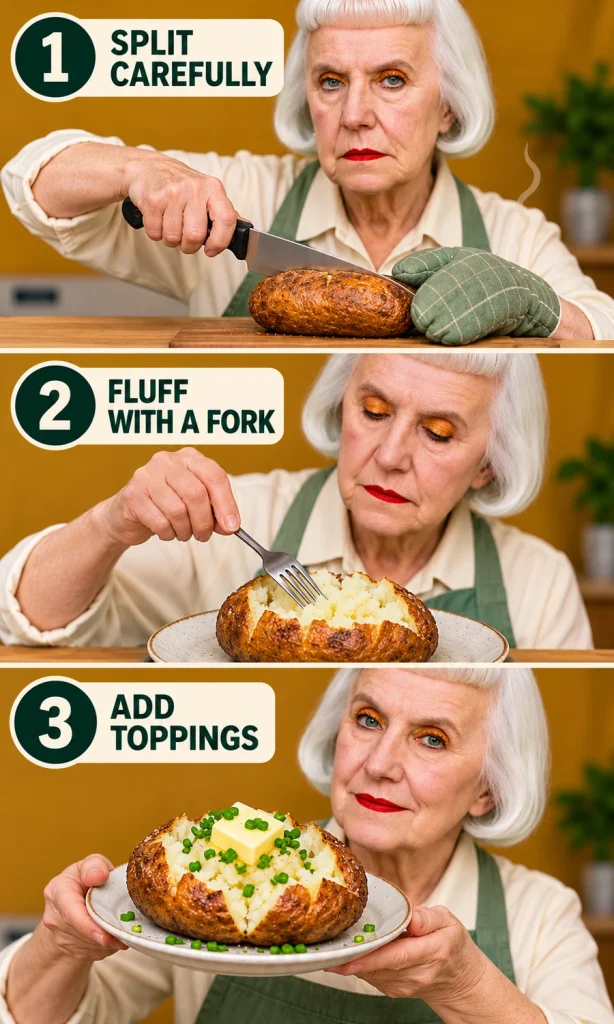
Toppings should complement a fully cooked potato rather than conceal an underdone center. A simple butter-and-chive finish lets you assess the texture of the first batch without adding another cooking procedure. If you want other dishes for the same appliance, browse 23 healthy easy air fryer recipes to try and plan them around the basket space you have available.
Store promptly and reheat the center
Follow USDA leftover food-safety guidance: refrigerate within 2 hours, or within 1 hour above 90°F (32°C). Portion the potatoes into shallow containers so they cool more quickly, keep the refrigerator at 40°F (4°C) or colder, and use refrigerated leftovers within 3–4 days. Do not wait for potatoes to become completely cold on the counter, and discard leftovers that exceeded those room-temperature limits.
For reheating, take only the portion you intend to eat, halve a plain cooked potato if needed, and put it directly in the air-fryer basket rather than leaving it in its storage container. Start around 350°F (175°C), check during reheating, and continue until a thermometer reads 165°F (74°C) in the thickest center. There is no reliable universal reheating time: cold starting temperature, thickness and quantity all matter, and crisp skin does not prove the center is hot enough.
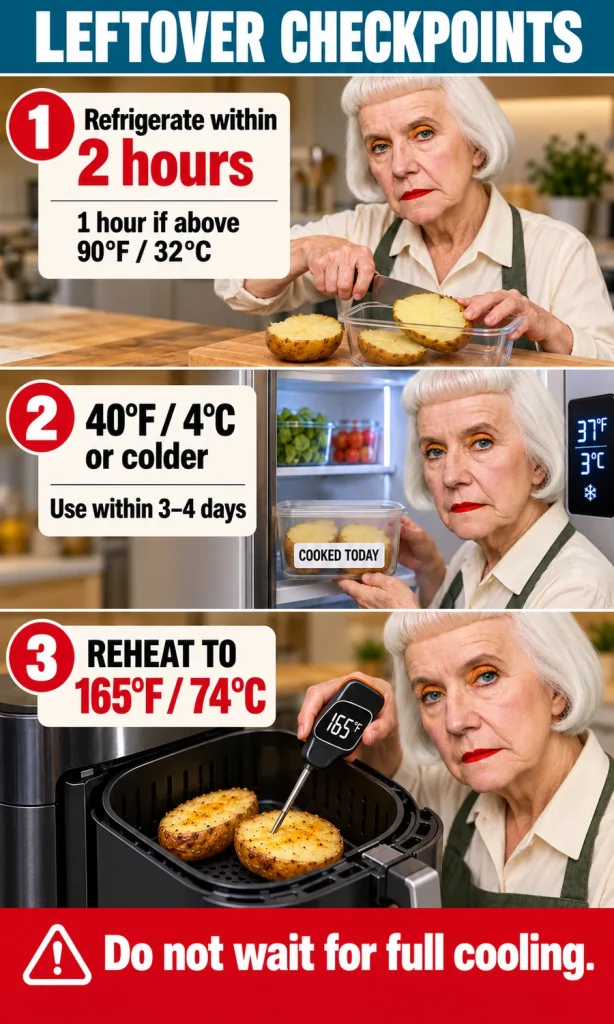
- Before storing: portion into a shallow container and refrigerate within the applicable time limit.
- Before reheating: check how long the leftovers have been stored; reheating does not rescue food kept unsafely.
- Before serving: measure the reheated center at 165°F / 74°C and add fresh cold toppings afterward.
Frequently asked questions
Can I skip the oil?
You can cook a whole potato without oil, but its skin and seasoning adhesion will differ. A light coating is useful for this crisp-skin method and does not mean filling the drawer with oil. Follow the appliance instructions and judge the result before adding more.
Do I need to soak a whole potato first?
This whole-potato method does not include soaking. Scrubbing removes surface dirt, while thorough drying prepares the skin for cooking. Soaking instructions for cut fries belong to a different procedure and should not be transferred automatically to a whole baked potato.
Can I use the microwave when I need dinner sooner?
A microwave is a separate option when speed matters more than a dry, crisp jacket. Use the dedicated microwave baked potato guide for its timing and handling instructions. Do not apply a microwave’s short cooking time to a raw potato in an air fryer.
Is an air fryer baked potato automatically healthier?
The appliance alone does not decide the nutritional value of the meal. Potato size, oil quantity, toppings and the rest of the meal affect what you eat. This recipe makes no calorie-saving or weight-loss promise, and optional toppings are not included in a calculated nutrition claim.
Next steps
Start with two similar russets and leave room around them in the basket. Check the center from 30 minutes onward, then adjust the cooking to the potatoes in front of you. Once you know how your appliance handles that size and load, use the same checkpoints for the next batch rather than treating one successful timer setting as a rule for every potato.