
Stucco water damage can affect the visible finish, the layers behind it, or both. Before patching a stain or crack, check the water route and whether the wall assembly needs investigation; the size of the mark alone cannot settle the repair scope.
Which stucco signs change the repair decision?
Start by separating a change in appearance from a change in the wall itself. A rain streak can be a surface deposit, while a small crack beside a poorly detailed window can be part of a concealed leak. Neither a dramatic stain nor an almost clean wall tells you how sound the backing is. The useful question is what the visible clue leaves unresolved.
For a homeowner deciding what work to authorise, repeated wetting deserves priority over colour matching. A beautiful patch has little value if runoff keeps reaching the same opening. Conversely, a mark that remains after a correctly resolved leak does not automatically justify removing an entire elevation. Source control and repair extent are separate decisions, and the evidence needed for each differs.
| Visible clue | What to investigate | What it does not prove |
|---|---|---|
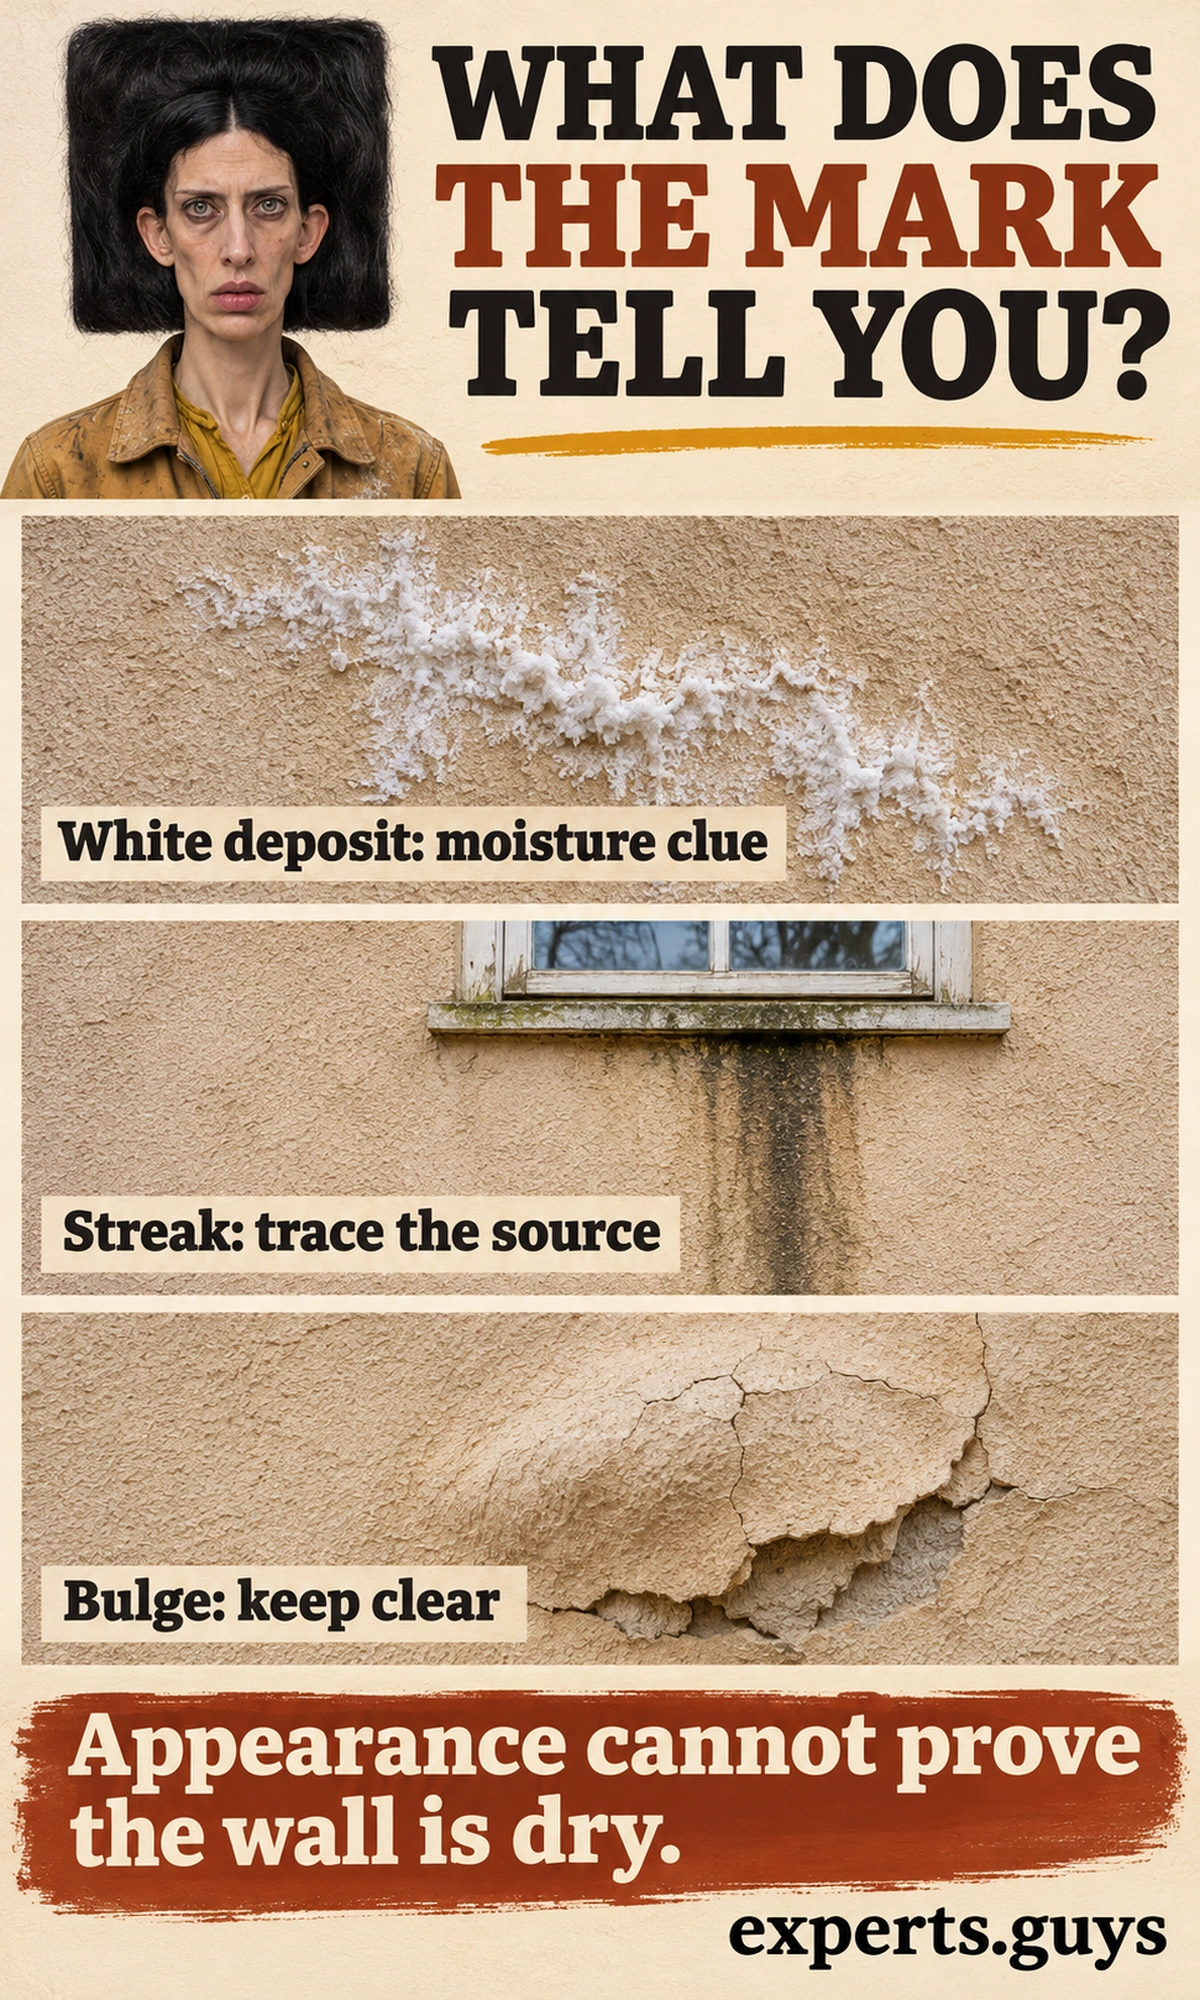
| Dark streak below a junction | Water shedding from the window, roof edge or penetration above | The precise entry point or depth of damage |
| White powdery deposit | Moisture movement and possible soluble salts | That every white mark is mould or that framing is rotten |
| Blistered coating or recurring patch failure | Coating compatibility, moisture and the condition beneath | That another coat will stop the cause |
| Bulging, loose or falling finish | Cladding attachment and condition of the backing; restrict access below | That the damaged area ends at the visible edge |
| Interior dampness at the same wall | Possible connection between exterior water and interior layers | That the nearest exterior crack is necessarily the source |
Keep clear of bulging or falling stucco and the area below it. Do not press, knock, pull or lean a ladder against suspect material to see whether it holds. Active water near electrical equipment, a changing wall shape or visibly deteriorated structural material calls for prompt qualified assessment rather than a cosmetic repair appointment. These are access and scope decisions, not reasons to test the wall yourself.
- Surface appearance only: consider finish work after the cause and substrate condition are adequately understood.
- Recurring wetting or an uncertain junction: arrange a focused water-entry assessment before choosing a patch.
- Loose cladding or signs of deeper deterioration: keep people clear and have the affected assembly assessed before finishing.
Read patterns without turning them into a diagnosis
A vertical streak beneath a sill suggests where water has travelled over the surface. It can help you decide where to look upward, but it is not a picture of the route inside the wall. Water can enter above the stain, move sideways along a layer, and emerge lower down. A stain aligned with a window corner deserves attention to that junction without assuming the glass unit, perimeter sealant or stucco is individually responsible.
White deposits need a similarly careful interpretation. Cementitious surfaces can show salts carried by moisture and left behind as water evaporates. Paint chalking, residues and other deposits can also look pale. Their appearance does not identify the condition of concealed timber. Do not choose a mould treatment, acid wash or waterproof coating solely because the wall has changed colour.
Cracks also need context. Their movement, location, adjoining materials and relationship to leakage matter alongside their width. A narrow opening at a water-loaded junction can be consequential, while a stable superficial crack may have a more limited repair. There is no single crack width that makes every wall safe to patch. The International Masonry Institute’s stucco restoration guidance explains why system identification and the nature of the defect govern repair choices.
A safe outside-in viewing sequence
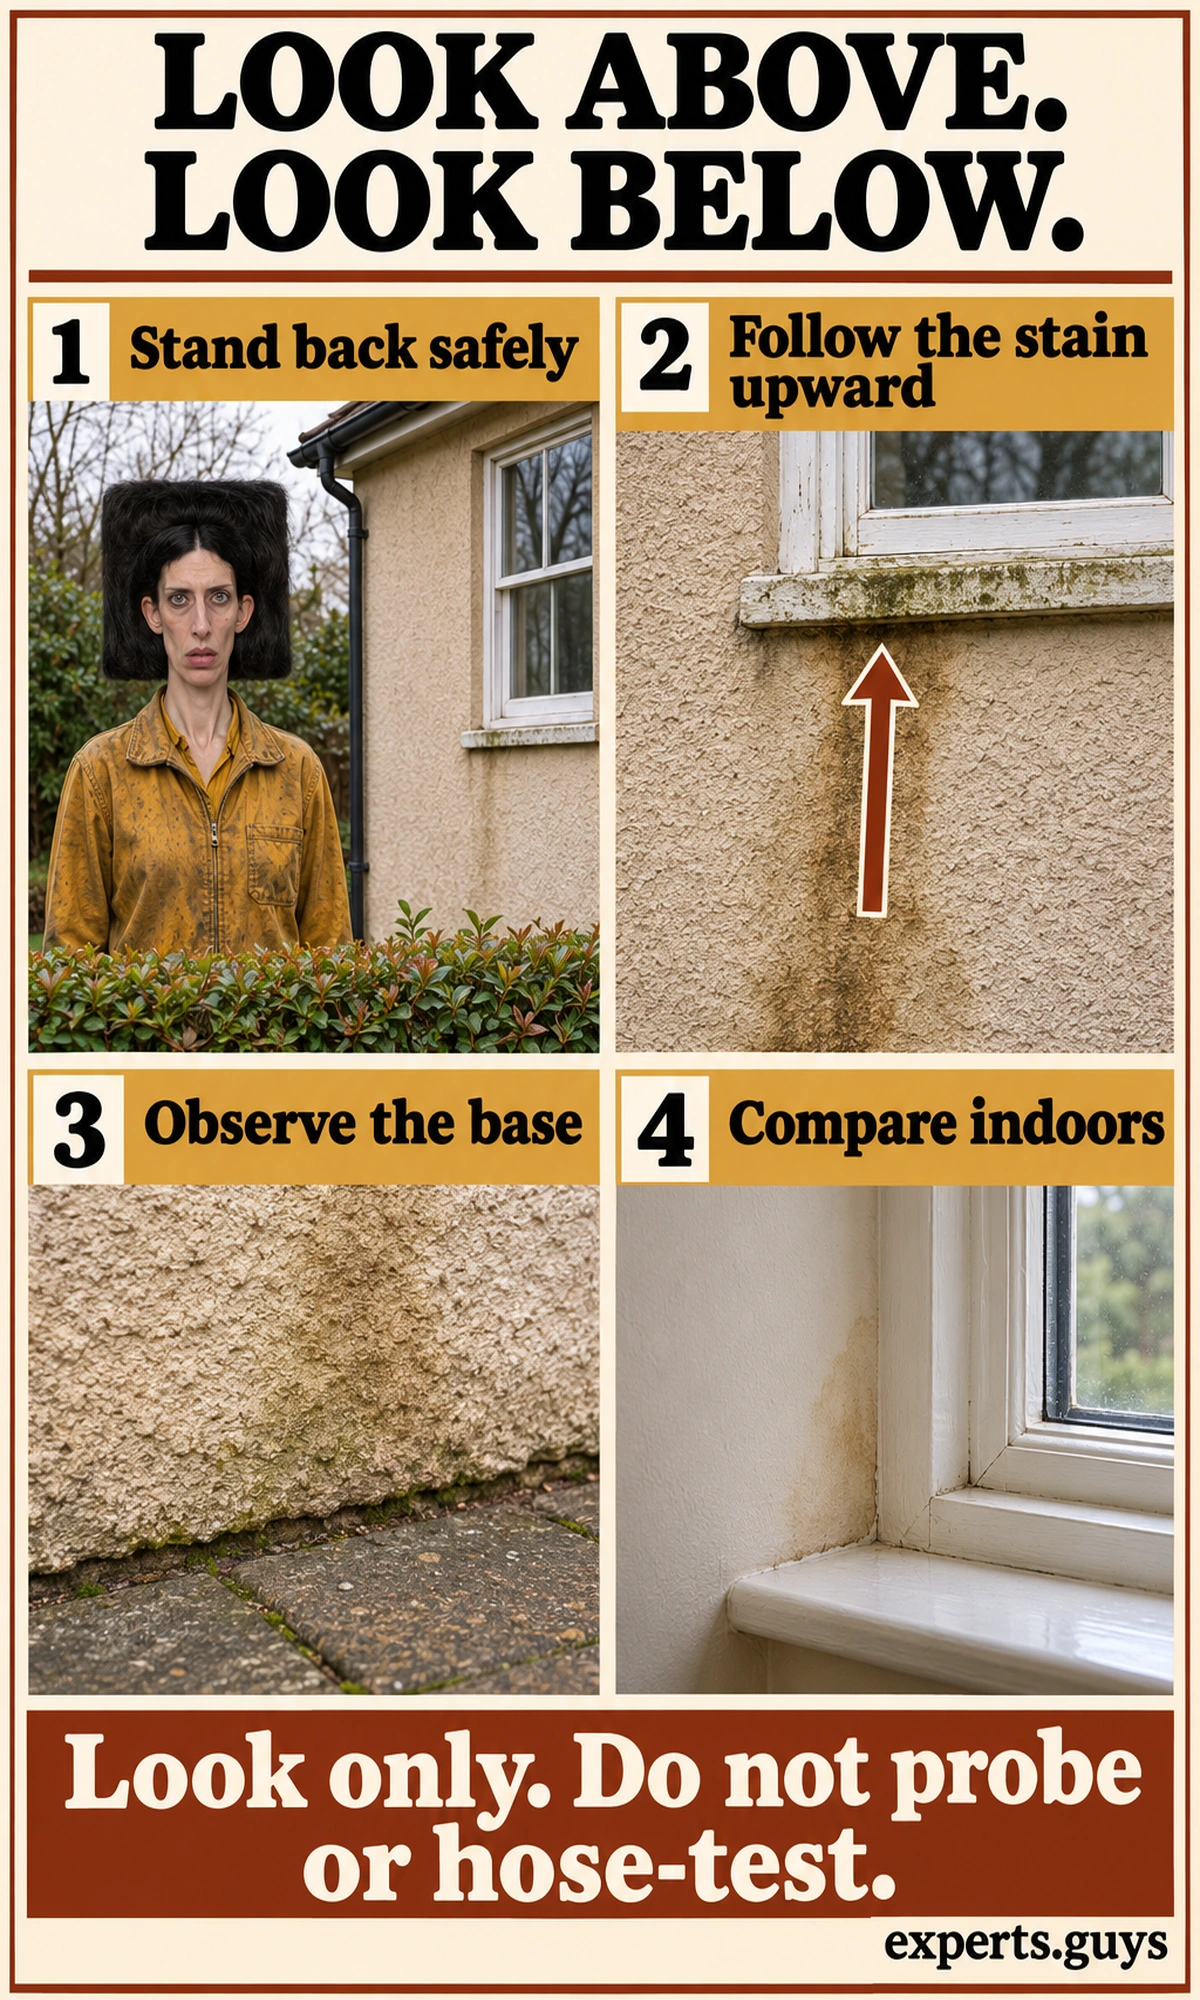
Use this preliminary check when you can see the affected elevation from sound, level ground. Choose daylight and a dry, safe access route. Stand back first so the roof edge, window, stain and wall base are visible together. Avoid the area below loose material. This check helps frame an investigation; it does not certify a wall as dry or structurally sound.
- Look above the mark. Follow its alignment upward to a sill, roof-wall intersection, downpipe, projecting trim or service penetration. Compare the shape of the mark with the detail that sheds water.
- Look across the junction. From the safe viewing position, see whether water appears to be directed away from the face or concentrated against it. Do not scrape sealant or lift trim to look behind it.
- Look at the wall base. Identify the visible termination and any apparent drainage outlet. Observe soil, paving or landscaping touching the finish without digging, probing or modifying the detail.
- Compare the room side. Where safe and accessible, inspect the corresponding interior area for staining, lifting finishes or dampness. Treat a mismatch between outside and inside as a reason to investigate, not a reason to dismiss either view.
The common mistake is starting with the most visible crack and ignoring everything above it. Correct that by widening your view before moving closer. If mobility or access makes a full circuit difficult, use one safe viewpoint that includes the affected window and wall base, then have the inaccessible areas assessed. Completion means you can identify the unresolved junction or condition to show the investigator; no written log or deliberate wetting test is needed.
An indoor mark may deserve a separate investigation even when the exterior looks tidy. Our explanation of hidden water damage inside walls covers why finishes can conceal affected layers. The distinction here is narrower: use both views to decide whether a stucco repair quote has addressed the water route, rather than asking one view to prove the whole wall is sound.
Why can a small stucco defect need a larger repair?
The visible patch is only one part of an exterior wall. Traditional cement stucco may be applied over lath and a water-management layer on a framed wall, or directly over a suitable masonry backing. An exterior insulation and finish system, usually called EIFS, has a different build-up and repair specification. Similar textures can hide different assemblies, so the surface alone is a poor basis for specifying materials.
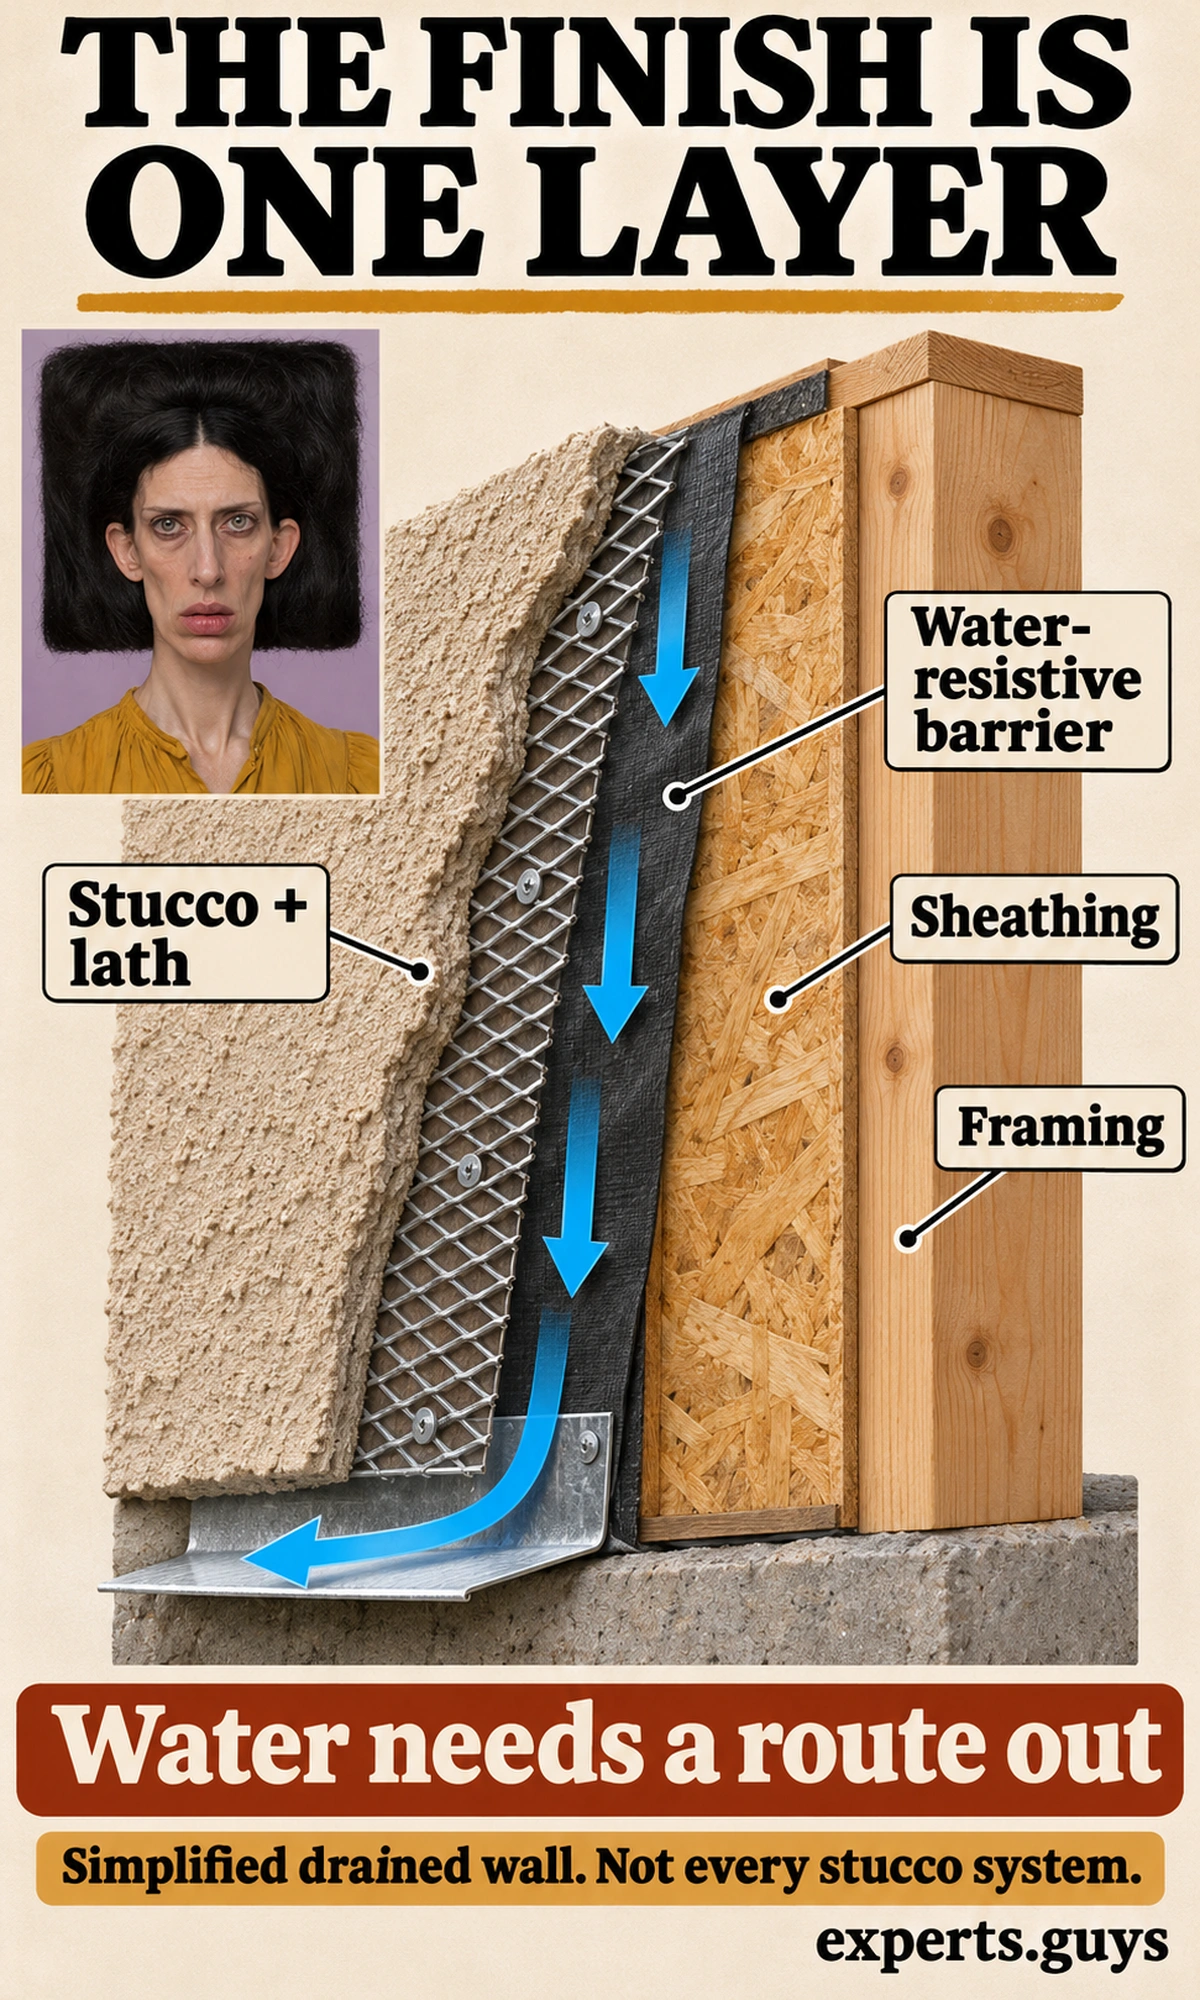
For a framed stucco wall designed to drain, the relevant question is whether water can be directed outward before it damages vulnerable backing. The cladding, water-resistive barrier, flashings and outlets need to work together. This is why filling the visible opening may leave a defect behind it untouched. It is also why a finish contractor may need room around a small mark to expose a junction and tie a repair into sound material.
Identify the assembly before applying a repair rule
Use existing construction documents, product records or a competent assessment to establish what is installed. Do not drill the wall, break off an edge or press the finish to guess whether foam is underneath. A repair that is suitable for one cement-plaster wall can be unsuitable for a proprietary EIFS assembly, and historic lime-rich finishes can require a different material approach again.
A drainage sketch for framed stucco is not a universal cross-section of every rendered building. Direct-applied stucco on masonry manages moisture differently from a lath-backed assembly, and some older construction details differ from modern drained systems. The practical consequence is to ask how this specific wall is supposed to manage rain. A quote that simply says “seal stucco” has not answered that question.
For background on the drained-wall principle, the Building America Solution Center’s base-flashing guidance shows the relationship between the water-control layer and an outward discharge. Use it to understand the repair objective, not as a dimensioned retrofit specification for an unidentified wall. Clearances and installation details depend on the assembly and applicable local requirements.
Water entry and water exit are different defects
At a roof-wall intersection, runoff can be concentrated into a narrow area. A missing or ineffective kick-out detail can send that flow against the wall instead of into the gutter. Even where a diverter is visible, its relationship with the roof flashing and wall layers matters. A surface-applied piece that looks plausible from below may not provide a continuous water-management path.
At windows, the vulnerable area can include the head, jambs, sill and their connections to surrounding layers. Sealant has a job at specified joints, but it cannot reconstruct a missing concealed flashing connection. Smearing material around every edge can also close an intended outlet. The repair question is which interface failed and how the proposed detail will manage water after the work.

At the base, paving, soil, planting or accumulated material may interfere with the intended termination. Do not assume an open-looking edge is a crack to fill. The contractor should identify the detail before altering it. Keep the distinction clear: preventing rain entry at an opening and preserving an outward discharge lower down are complementary jobs; replacing one with the other can leave the wall vulnerable.
General gutter and roof-water management belongs in our guide to controlling roof runoff. Here, the key issue is the last connection between roof discharge and the stucco wall. Ask specifically about that junction if the stain sits below it, rather than accepting a general statement that the gutters were cleaned.
The repair footprint follows sound connections
A competent proposal should explain the intended boundary of removal and what happens if the opening reveals more deterioration. The first boundary is often provisional because concealed condition cannot be measured from the face alone. That does not justify an unlimited repair allowance. It does justify an agreed investigation stage, clear reporting of exposed findings and a decision before additional work proceeds.
There are two boundaries to discuss. The technical boundary is the area required to remove unsound material and reconnect the water-management layers properly. The appearance boundary is the area needed to blend texture, colour and sheen. A small technical repair may still have a wider finishing area; a broad stain may have a limited technical defect. Keeping those boundaries separate makes competing proposals easier to understand.
For example, replacing a damaged window-corner patch may require access beyond its visible crack to integrate the junction. The final coating may then extend to a natural break for appearance. Neither enlargement should be described vaguely as “more damage”. Ask which part restores a functioning assembly and which part improves the visible match. Those reasons can both be valid, but they should be priced and explained clearly.
What should an investigation establish before patching?
The investigation should reduce the uncertainty that changes the repair choice: the assembly type, the likely water route, the condition of vulnerable layers and the extent of access needed. A quick moisture scan can be useful screening, but the instrument and material matter. A meter on the surface is not automatically measuring the water content of framing behind stucco, and concealed metal can complicate interpretation.
Likewise, a thermal image shows a surface-temperature pattern. That pattern can help direct attention when conditions are suitable, but it does not directly display water, rot or a complete leak path. Ask what observation would confirm the interpretation. A professional conclusion should connect the screening result with other evidence rather than treating a coloured image as a self-explanatory diagnosis.

Ask for a question-led assessment
- What is being tested? The question may be whether water is entering at a window, whether backing is affected or whether a proposed patch area is sound.
- What does the method reach? Clarify whether it examines only the surface, accessible interior material or concealed layers through authorised access.
- What remains unknown? A limitation should identify the inaccessible area or uncertainty, and explain whether it changes the proposed repair.
- What finding changes the scope? Agree how additional deterioration, a different assembly or an unresolved entry point will be handled before the finish is reinstated.
Intrusive inspection and controlled water testing need planning. Opening a wall can encounter services, hazardous materials or a detail that must be weather-protected immediately. Spraying a wall casually with a hose can introduce water through more than one route and make the findings difficult to interpret. Leave those methods to people qualified for the assembly and investigation, with permission and a plan for reinstatement.
You do not need a purchased meter to begin the earlier visual check. If readings become part of the repair decision, ask for their scale, material context and comparison basis. The specialist explanation of interpreting moisture readings after water damage covers that separate measurement problem. This article does not prescribe a universal percentage for closing a stucco wall.
Three different meanings of “the wall is dry”
A surface can feel dry while deeper material remains affected. A previously wet backing can dry but still have lost useful integrity. A repaired wall can also be dry today while its water-entry defect remains unresolved. These are different findings, so “dry now” cannot stand alone as the completion test for a moisture-related stucco repair.
| Decision | Useful evidence | Unresolved issue to avoid |
|---|---|---|
| The water source has been addressed | An identified defect and a repair detail suited to the actual assembly | A dry-weather visit used as proof the leak is solved |
| The backing can remain | Appropriate assessment of affected accessible or exposed material | Surface appearance treated as a structural assessment |
| The assembly is ready to close | Material-appropriate drying and condition checks | An unexplained meter number or fixed waiting period |
| The new finish is suitable | Compatible system, preparation, curing and coating requirements | One generic filler or paint specified for every wall type |
The right repair sequence therefore has several gates rather than one promise to “waterproof” the face. Each gate answers a different question. An independent building-envelope assessment can be useful when the source remains disputed or when a large replacement proposal depends on concealed damage that has not been demonstrated. For an already established, localised defect, an appropriately experienced stucco repair contractor may be able to complete the scoped work directly.
When does the interior damage become a separate job?
If water has reached indoor trim or flooring, do not assume the exterior repair includes those materials. The indoor work may need its own drying, support and finish decisions. Resolve the water route and assess the affected assembly before choosing a cosmetic floor treatment. A new exterior finish cannot establish that the floor beneath the window is ready to refinish.
For a dry, stable wood floor, use our guide to choosing a spot repair, board replacement or hardwood refinish. That is a separate finishing decision. Keeping it separate prevents a broad “water damage repair” allowance from concealing which contractor is responsible for the wall, the indoor substrate and the final appearance.
How do you choose a repair scope that will last?
Choose the smallest scope that resolves the demonstrated defect and restores sound connections, with a clear process for unexpected findings. The cheapest visible patch can leave concealed problems untouched, while replacing an entire elevation can be excessive when the defect and sound boundaries are established. The recommendation changes with evidence about the backing and the continuity of the surrounding system, not with the stain’s colour.
The work order matters more than the new texture
- Establish the cause and assembly. Confirm what failed and which wall system the repair must join.
- Provide controlled access. Remove only as appropriately specified, expanding when exposed condition requires it and documenting changes through the contractor’s normal process.
- Restore vulnerable layers. Address damaged backing and reconnect water-management details with suitable materials. Structural repairs require an appropriate design or assessment.
- Meet closure requirements. Confirm the necessary condition and drying checks before concealing the affected area.
- Rebuild the finish. Follow the relevant system’s preparation, reinforcement, layer, curing and coating requirements.
- Verify and hand over. Explain what was checked, what warranty covers and which maintenance or follow-up conditions remain.
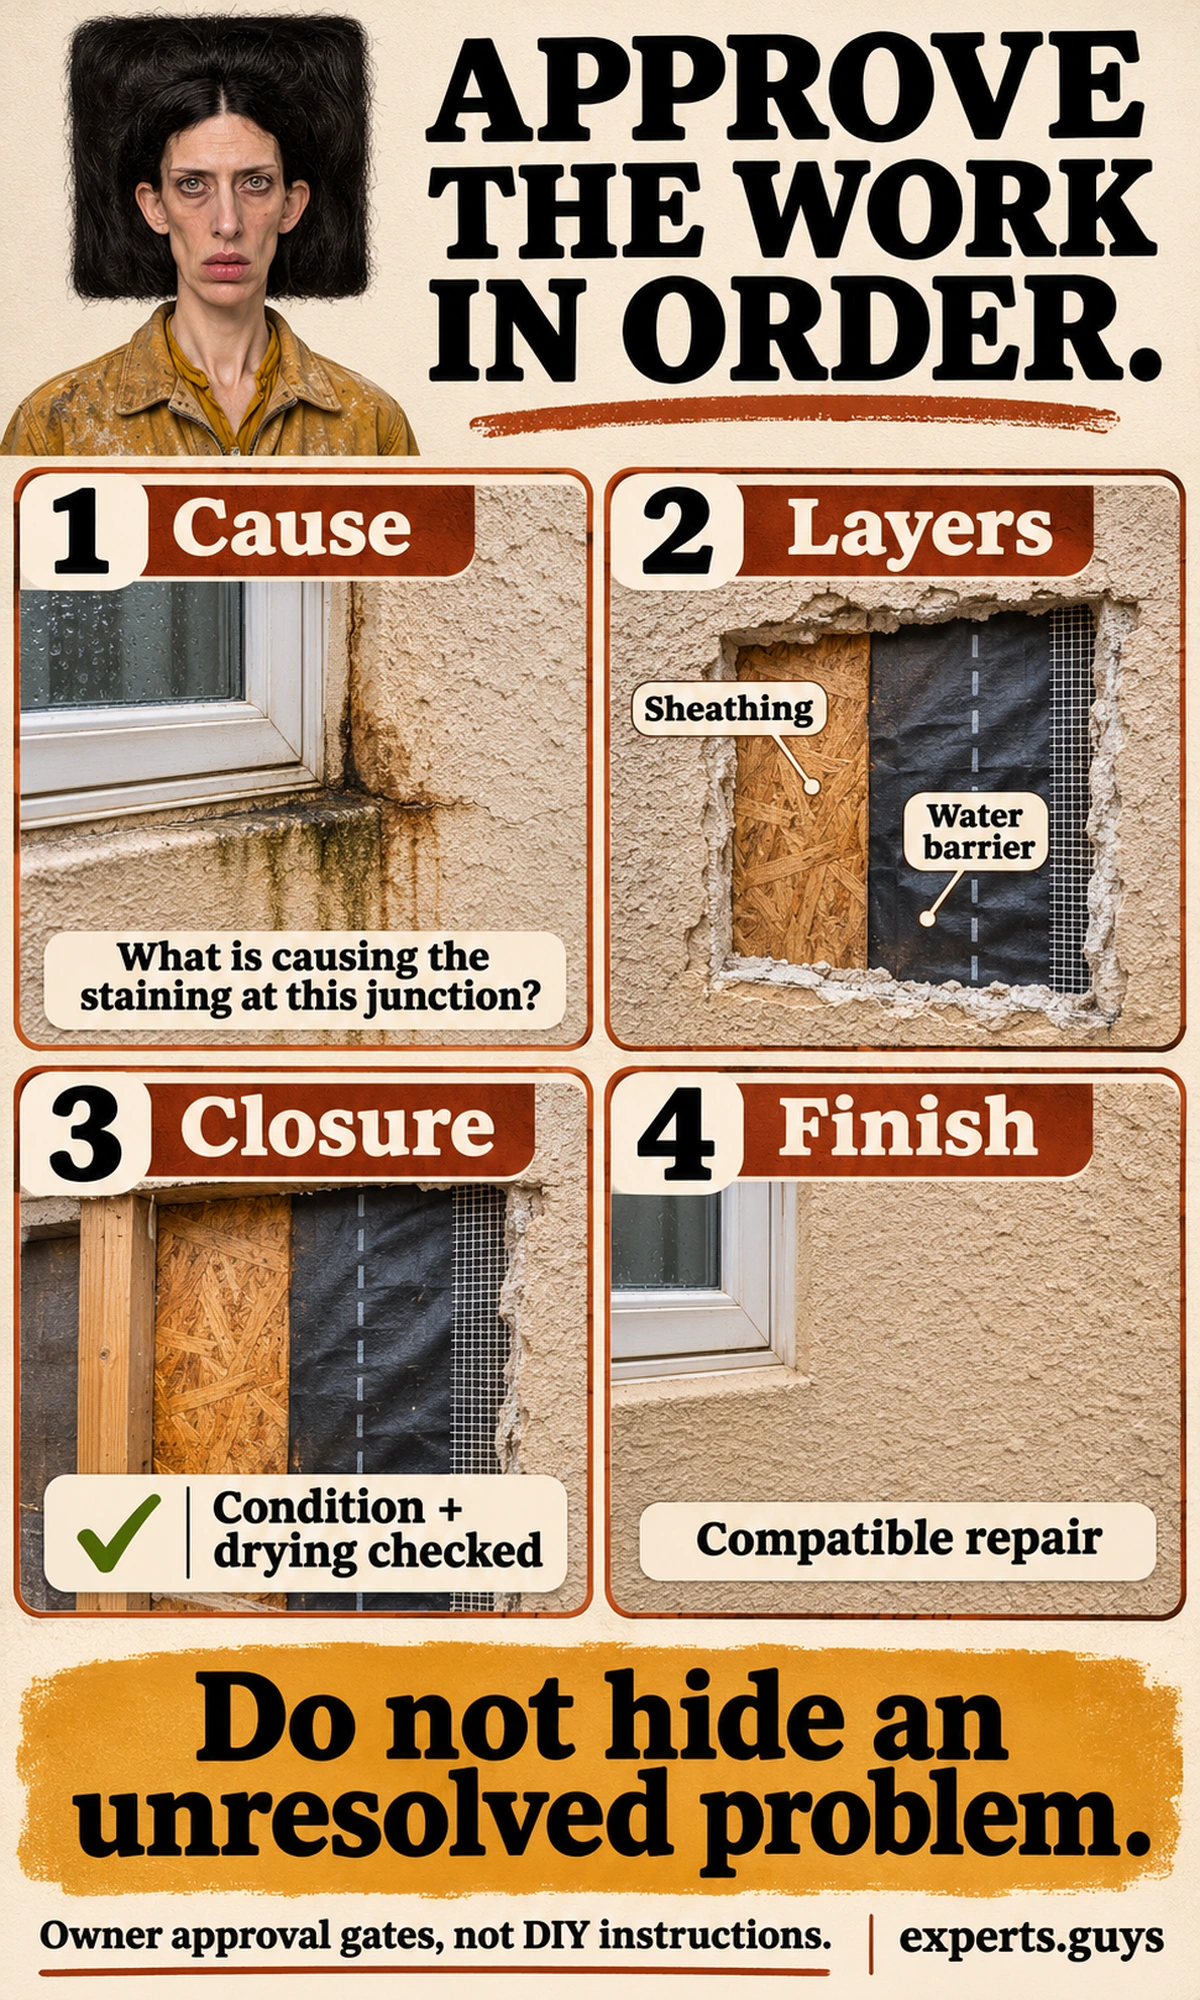
These are approval gates for the homeowner, not instructions for cutting open or rebuilding a wall. The actual construction method needs a system-specific specification. Product thickness, drying time, movement accommodation and weather limits cannot be inferred from a generic online diagram. A patch that looks complete can still be premature if the underlying acceptance checks were skipped.
Painting also belongs near the end of the decision, after the substrate and water problem are understood. Coatings vary in compatibility and moisture behaviour. A product advertised as waterproof is not a substitute for defective flashing, and a very resistant coating can be unsuitable in some assemblies. Ask how the proposed coating works with the existing system and how future maintenance will be handled.
Worked example: two quotes for one stained window
Consider an illustrative framed stucco wall with a recurring stain below a window corner. The owner has no verified information about the backing. Quote A offers preparation, filling and repainting of the visible rectangle. Quote B offers a defined investigation stage, then a repair proposal based on what the window junction and backing show. No damage extent, price or successful outcome is assumed in this example.
The better first purchase is the work that answers the unresolved question. Quote A can become reasonable if a suitable assessment establishes that the defect is limited to the finish and the source is resolved. Before that, it asks the owner to buy appearance work without knowing whether the assembly needs repair. Quote B is more useful only if the investigation has a clear question, access boundary, deliverable and reinstatement arrangement; vague exploratory work is not automatically better.

Now suppose access shows sound backing and a local junction defect that can be correctly repaired. A limited repair may be justified, with a broader colour blend offered separately. If access instead shows deterioration extending beyond the first opening, the proposal needs to change before closure. The original stain has not changed, but the appropriate repair boundary has. That is the reason to separate investigation from an unsupported fixed promise.
Compare proposals by deliverable
| Part of the proposal | Question it should answer |
|---|---|
| Assembly identification | Which existing system and compatible repair specification are being used? |
| Cause and scope | What defect is addressed, and what evidence supports the removal boundary? |
| Concealed-condition allowance | Who approves added work, on what findings, and at what agreed pricing basis? |
| Water-management connection | How are repaired layers joined to retained sound details? |
| Drying and closure | Which conditions must be satisfied before covering the work? |
| Appearance and warranty | Where does the blend stop, what variation may remain, and what is actually covered? |
A general renovation contractor may coordinate several trades, but coordination does not replace the specialist work at the envelope. Ask who owns the window flashing, roof junction, stucco reinstatement and any indoor repairs. Where the source is disputed, clarify who will assess it before another contractor closes the area. Responsibility should follow the detail being repaired rather than the broad label on the quotation.
Use warranties as one part of that comparison. A coating warranty can have a different scope from a workmanship warranty, and either can exclude a pre-existing water-management defect. Ask what happens if the original symptom returns and what evidence the contractor will provide about completed work. A long warranty period tells you little until its covered failure and remedy are clear.
Questions that often remain
Can new stucco look different even when the repair is sound?
Yes. Texture, weathering, colour and viewing light can make a local repair visible. Agree the appearance boundary and, where appropriate, a representative sample. A wider blend can improve appearance, but it should be distinguished from the area that needs technical repair.
Should every opening at the bottom edge be sealed?
No. Some openings or terminations are part of the intended drainage detail. Have the existing system identified before adding sealant, mortar, paving or landscaping against it. An outlet must be understood before anyone decides it is a defect.
Will an indoor dehumidifier dry a wet exterior wall?
It may assist an appropriate interior drying plan, but it cannot be assumed to dry concealed exterior layers or correct rain entry. The effect depends on access, materials and the assembly. Do not use a dry room or a fixed rental period as evidence that the whole wall is ready to close.
Does a stain that appears only during windy rain rule out a leak?
No. Wind direction and rain exposure can change which junctions are loaded. Intermittent symptoms can still be meaningful. Explain that condition to the investigator rather than deliberately recreating it with an uncontrolled hose test.
Is a whole-wall replacement always safer than a local repair?
No. Replacement still needs correct design, connections and execution. Its value depends on the demonstrated extent of defects and the feasibility of reliable local repairs. Ask what finding justifies the proposed boundary rather than treating a larger area as an automatic guarantee.
Before you approve the patch
First decide whether the unresolved problem is appearance, water entry or concealed condition. Ask the proposed contractor to explain that specific issue, the repair boundary and the condition required before closing the work. Once those answers agree with the evidence, texture and colour matching become a finishing choice instead of a guess about what is happening behind the wall.
Compare Local Home Specialists Near You
Tell us what kind of help you need, then compare nearby businesses by location, Google rating, review volume and contact options.
HomeFix Local Match
Turn a home problem into a practical local hiring decision. Check the clues, see the specialist types that fit, open focused surrounding-location searches, then compare the strongest three before you call.
 YOUR PROBLEM
YOUR AREA
COMPARE 3
✓ Ready to compare
What is happening?
Choose the closest problem type, then check every clue that applies. Your selections change the specialist order.
Where should the search focus?
Use Google’s “near me” context or enter the area you actually want a specialist to serve.
Simple local search: open nearby Google results, choose the businesses that look suitable, then compare your best three here before you call.
Problem snapshot
Who should you call first?
These are the specialist types most likely to fit the clues you selected.
Search around your location
Compare your top three
Use the same factors for each option so a high star rating does not hide a weak scope, poor diagnosis, missing credentials or unclear aftercare.
Comparison result
Your result combines the Google signals you entered with the practical hiring checks you completed.
Questions to ask every finalist
Use the same questions with each shortlisted business so the comparison stays consistent.