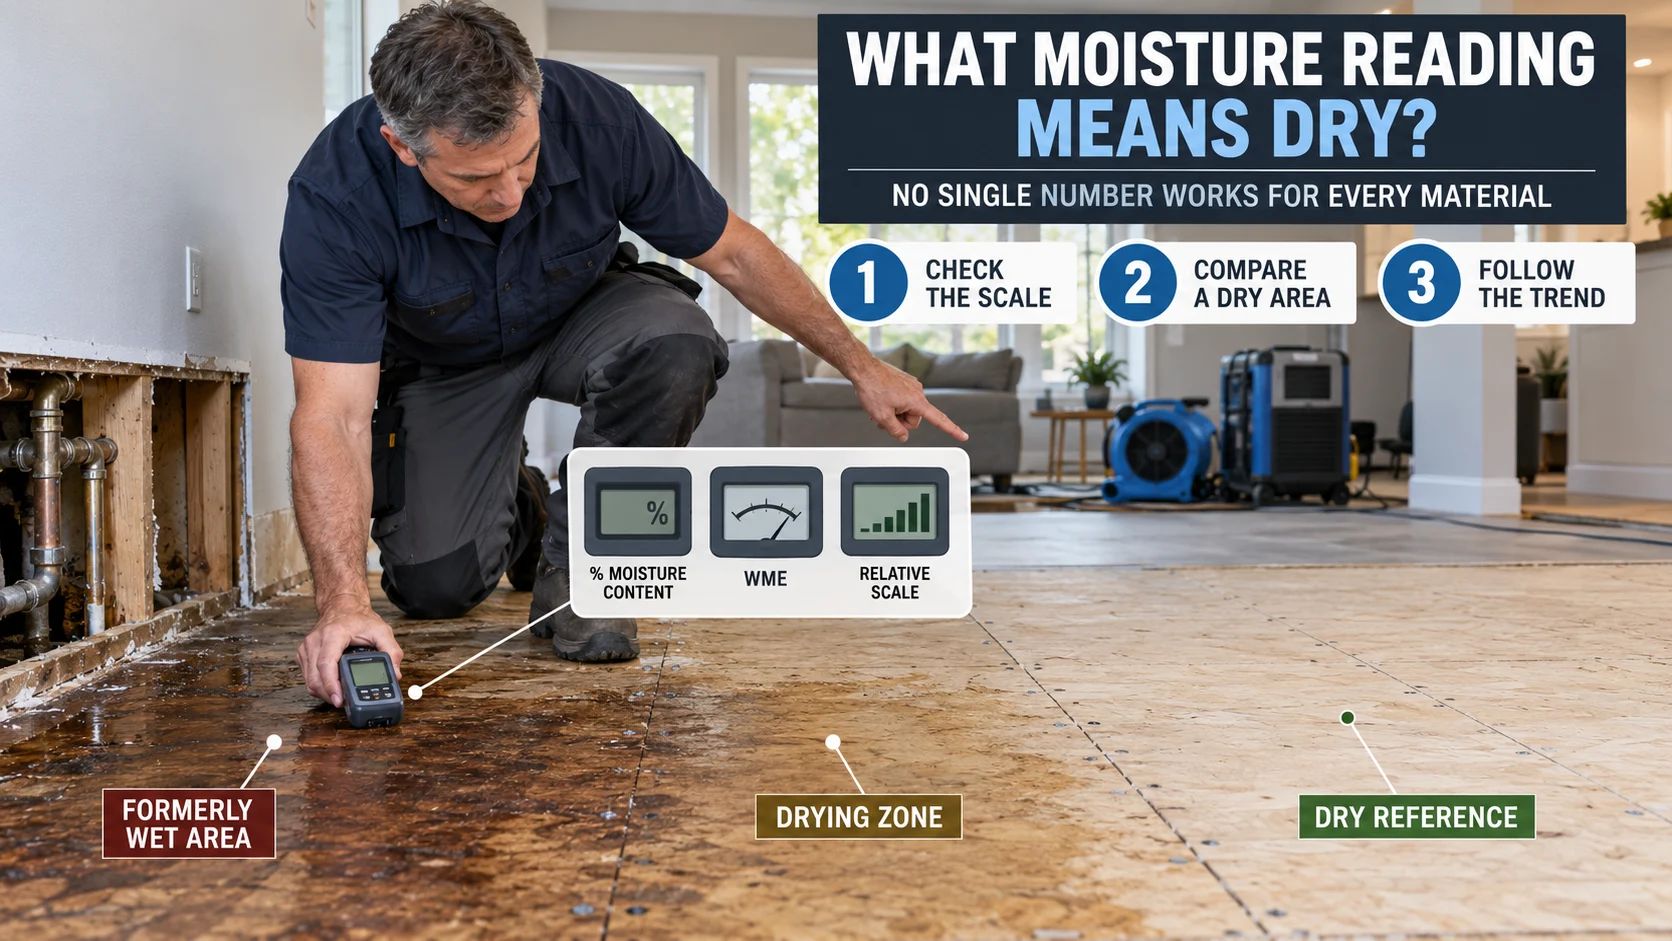

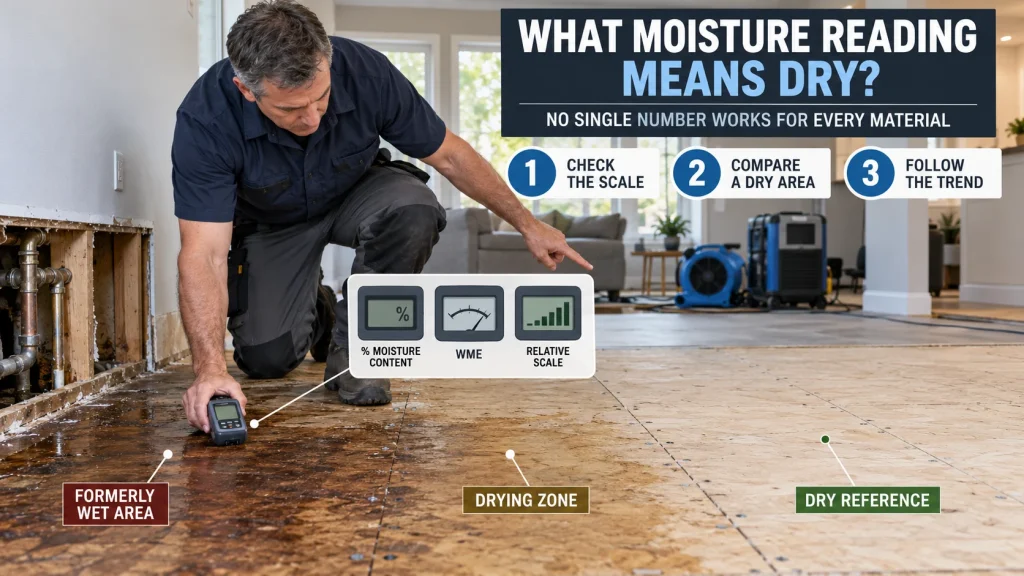
A moisture meter does not have one universal number that means every water-damaged material is dry. The correct endpoint depends on the material, the meter mode, whether the display represents actual moisture content or only a relative reading, and what comparable dry material in the same building reads. The safest practical approach is to identify the scale first, establish an unaffected dry reference, and confirm that previously wet areas are returning toward that baseline before closing walls, reinstalling flooring, or refinishing surfaces.
The EPA’s current flood-cleanup guidance gives homeowners a useful broad benchmark: materials should generally measure 15% moisture or less before refinishing after flooding. That figure needs context, however, because some meters do not display true moisture-content percentages at all. A “15” on a 0-100 reference scale can mean something completely different from 15% moisture content on a meter calibrated for wood.
If you are checking a plywood or OSB subfloor after a leak, this measurement stage comes after finding and drying the damaged area. Our guide to water damage to a subfloor explains the damage and repair side; this article focuses specifically on deciding whether your moisture readings actually show that the material has dried.
Quick Answer: What Reading Means the Material Is Dry?
Start with the meter, not the number. Before treating any reading as a pass or fail result, confirm these four things:
- Actual % moisture content: Common on wood-specific modes. The number can represent moisture content when the meter is correctly calibrated for that material.
- Relative or reference reading: A value such as 18, 40, or 70 may only show relative wetness. It is not necessarily a percentage.
- WME reading: Wood Moisture Equivalent expresses how another building material behaves relative to wood and should not automatically be interpreted as that material’s true percentage of water.
- Material-specific mode: Some professional meters include dedicated scales for wood, gypsum/drywall, or other materials. Use the correct mode and the manufacturer’s instructions.
The Massachusetts Department of Public Health guidance on moisture-measuring devices recommends checking both the suspect location and the same material in an unaffected control location. That comparison is particularly useful after water damage because a single isolated number may look precise while giving little information about what is normal for that house, material, meter, and current humidity.
Moisture-Meter Reading Guide After Water Damage
| What you are testing | How to interpret the reading | Better drying endpoint | Common mistake |
|---|---|---|---|
| Wood, plywood or OSB on a wood %MC scale | The meter may be reporting actual wood moisture content, subject to its calibration and material corrections. | Compare with dry wood of the same type in an unaffected nearby area and confirm readings have stabilized appropriately. | Assuming every piece of wood in every climate must reach one universal percentage. |
| Drywall on a dedicated gypsum scale | Use the manufacturer’s gypsum calibration and compare suspect areas with unaffected drywall. | The previously wet area should return close to an appropriate dry comparison reading with no continuing moisture source. | Reading drywall in wood mode and treating the displayed number as true drywall %MC. |
| Drywall, plaster or masonry on a reference scale | The result is normally relative rather than a true percentage. | Compare several suspect readings with several known-dry control readings using the same meter and settings. | Reading “20” and assuming the material contains 20% water. |
| Any material with unexpectedly high readings | Treat the result as a reason to investigate rather than immediate proof that the material must be replaced. | Repeat measurements, compare control areas, confirm the meter mode and inspect for hidden moisture or measurement interference. | Making a demolition decision from one reading at one location. |
There Is No Universal “Dry” Number
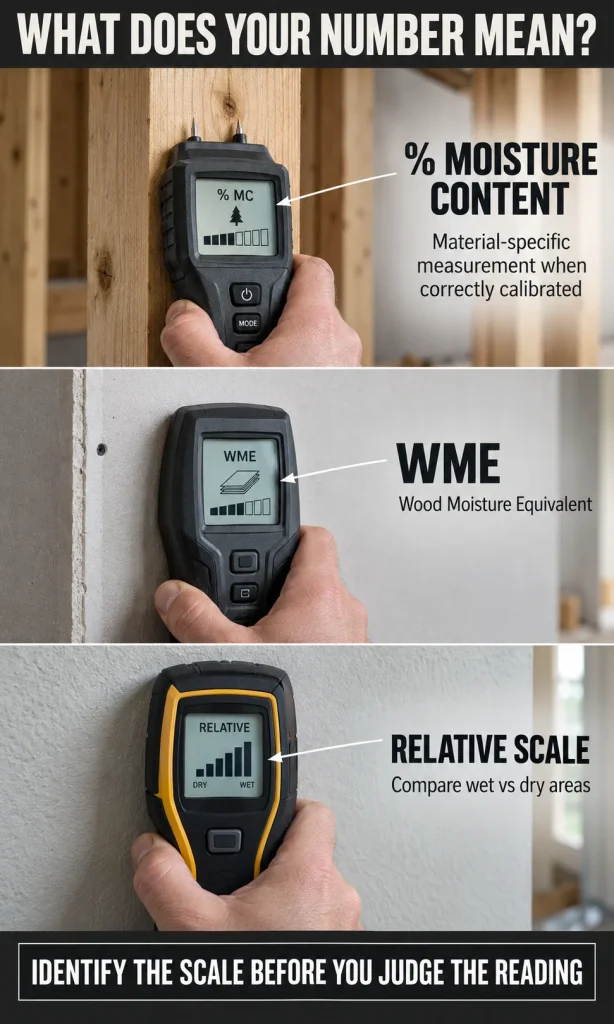
The most important distinction is between a true material moisture-content reading and a relative moisture indication. On a wood scale, a properly calibrated meter may report moisture content as a percentage. On many building-material or reference scales, however, the number is simply a position on that particular meter’s relative range.
This is why a homeowner can place two different meters on the same wall and see numbers that appear dramatically different without either meter necessarily being defective. Delmhorst’s explanation of moisture-meter reference scales notes that one meter may use a 0-100 reference scale while another may use 0-300, and those numbers are qualitative rather than percentages of moisture content. A reading of 12 on a 0-100 reference scale therefore does not automatically mean 12% moisture.
That distinction also explains why the EPA’s 15% guideline should not be blindly transferred onto every device display. If your meter is displaying actual wood moisture content, a percentage-based guideline can be evaluated as a percentage. If the device is operating on a relative, reference or non-invasive scale, you need the meter’s interpretation system and dry comparison readings instead of treating its display as %MC.
First Identify What Your Meter Is Actually Measuring
Before deciding that a wall or floor is dry, look at the meter screen, selected mode and manual. A meter may offer several measurement systems inside the same device, and switching from one mode to another can completely change the meaning of the displayed number even though you are touching the same material.
Wood moisture content is the easiest example. Wood meters are calibrated around the electrical or dielectric behavior of wood, although species, temperature, meter design and measurement depth can affect interpretation. This is why professional meters may provide species corrections or different wood settings rather than treating every board identically.
Reference scales solve a different problem. They let the meter find changes in moisture across materials for which it does not provide a true quantitative calibration, making them particularly useful for moisture mapping. Their strength is comparison: a dry section of plaster might establish the local baseline, while progressively higher readings toward a leak reveal the moisture pattern.
WME, or Wood Moisture Equivalent, is another source of confusion. Protimeter’s technical explanation of WME describes it as a representative measurement expressing another building material’s moisture condition as though it were wood. That makes WME useful for diagnosis, but it does not mean a plaster wall showing 18 WME literally consists of 18% moisture by weight.
Use a Dry Control Area Before You Trust the Number
A control reading is one of the most useful checks a homeowner can make because it gives the suspect measurement local context. Find the same type of material in an area that was not affected by the leak, use exactly the same meter mode and technique, and take several readings rather than choosing the lowest convenient number.
For example, if a previously wet section of plywood continues to read substantially higher than unaffected plywood nearby, the assembly may still be drying even when its surface feels normal. Conversely, if the affected zone has progressively moved toward the same range as multiple unaffected areas, that trend provides much stronger evidence of drying than a single isolated measurement.
The control area needs to be genuinely comparable. Measuring one damp exterior wall against an interior partition, comparing OSB with solid lumber, or switching meter modes between locations can create a false difference that looks like residual water. The environmental conditions matter as well, which is why the Massachusetts guidance also recommends considering indoor and outdoor temperature and relative humidity when investigating building moisture.
Do Not Rely on One Moisture Reading
One meter reading is a sample, not a moisture map. Water commonly spreads along seams, beneath finishes, through insulation, around fasteners and into adjacent materials, so the wettest location may be several inches or several feet from the place where staining first appeared.
The better method is to test a pattern of points across the affected area and repeat those locations as drying progresses. Professional restoration practice uses moisture measurements as part of the drying process rather than as a single final test; the ANSI/IICRC S500 water-damage restoration framework includes building and material science, drying technology, instruments, inspections and documentation within the restoration process.
This matters most when the next construction step will hide the material again. Installing flooring over a damp subfloor, closing a wet wall cavity or painting over a material that has not finished drying can make later moisture much harder to detect and correct. The EPA guidance for flooded homes specifically warns against sealing flooded wall cavities or applying finishes until materials are dry internally, even when the visible surfaces already appear dry.
Pin vs. Pinless Moisture Meters: They Do Different Jobs
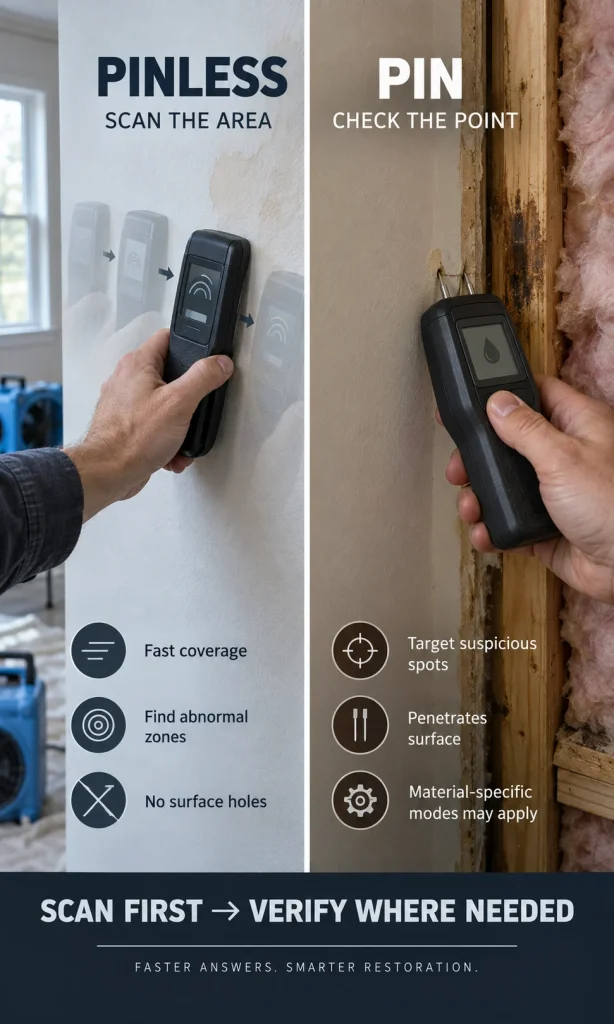
A pin-type moisture meter measures electrical resistance between two metal pins inserted into the material. Because water changes conductivity, the meter can use that resistance to estimate moisture when the selected scale is appropriate for the material. Pins are especially useful when you need to confirm a suspicious location, compare depths, or obtain a material-specific reading rather than simply locating a wetter zone.
A pinless meter uses an electromagnetic field to scan beneath the surface without making holes. Its major advantage after water damage is speed: you can move across a wall, floor, or ceiling and identify where readings begin to rise, allowing you to build a moisture pattern instead of testing isolated points. Protimeter describes this non-invasive mode primarily as a way to locate higher-than-normal moisture, followed by pin testing where greater confirmation is needed.
Neither design automatically makes the other unnecessary. A practical water-damage inspection often uses pinless scanning to locate the abnormal zone and pin measurements to investigate selected points more closely. That combination can be particularly useful when a wet area extends beyond visible staining or when the meter suddenly produces an unusually high reading that needs verification.
Pin vs. Pinless at a Glance
| Question | Pin meter | Pinless meter | Practical implication |
|---|---|---|---|
| Leaves marks? | Yes, small pin holes | No | Pinless scanning is useful across larger finished surfaces. |
| Best initial job | Confirm or compare selected locations | Find abnormal moisture patterns | Use each meter for the question it answers best. |
| Can hidden metal interfere? | Yes | Yes | An isolated high reading is not automatic proof of retained water. |
| Useful for mapping? | Slower point-by-point testing | Very useful for rapid comparison | Scan first, then investigate the abnormal zone. |
Why a Moisture Meter Can Give a False High Reading
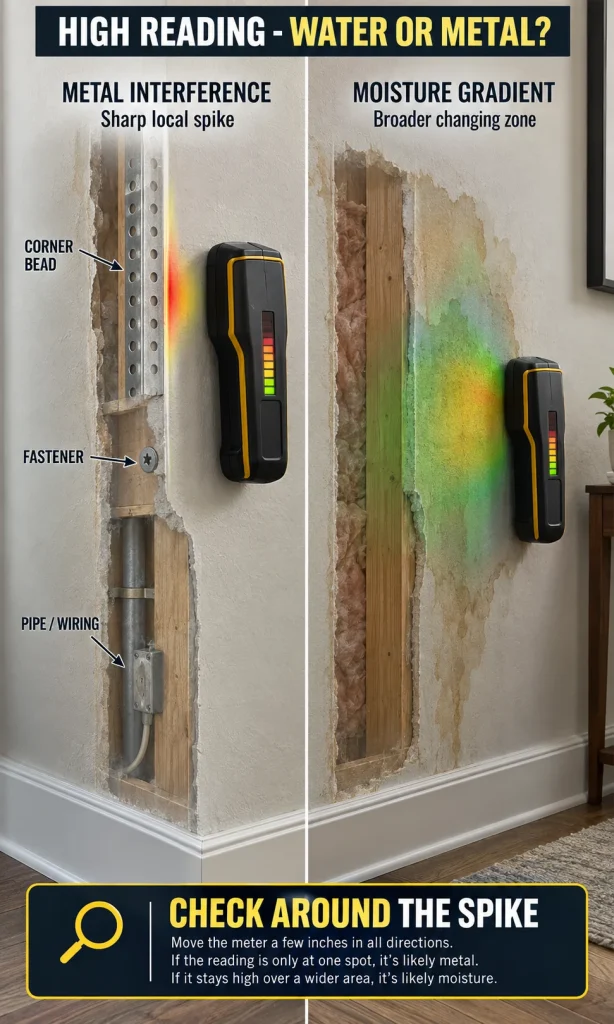
A high number means you should investigate; it does not automatically mean hidden water has been proven. Moisture meters respond to physical or electrical properties in and around the tested material, and other conditions can influence those properties. If one point suddenly jumps while surrounding readings remain consistently low, the pattern itself becomes an important diagnostic clue.
Metal is one of the most important sources of false positives. Screws, nails, pipes, wiring, metal corner bead, ductwork, steel framing and reinforcing components can interfere with both pin and non-invasive readings. Protimeter and Tramex both specifically warn that hidden metal can produce apparently wet readings, including strong spikes around drywall corner bead.
A metal-related spike also tends to behave differently from a moisture gradient. Moisture often produces a region that becomes progressively wetter as the meter approaches the affected area and progressively drier as it moves away, whereas hidden metal can create a sharp local jump followed by an abrupt return to normal. That pattern is not definitive by itself, but it tells you to verify the location before opening a wall or declaring the material saturated.
Other influences can include surface condensation, salts, temperature, material density and incorrect meter settings. A reading taken across different materials can also be misleading because the meter may respond differently even when both materials are dry. The solution is usually comparison and confirmation rather than treating the highest displayed number as an unquestionable measurement.
How to Moisture-Map a Water-Damaged Area
Do not hunt for a single number that gives the entire room a pass or fail. Build a simple moisture map so you can see where the readings change, whether that pattern corresponds with the water source, and whether the formerly wet zone is shrinking as drying continues.
Use the same meter, the same mode and the same testing technique throughout the comparison:
- Start in a known-dry area. Take several measurements on the same material away from the suspected damage.
- Move toward the damaged area. Test at reasonably consistent intervals rather than jumping directly to the visible stain.
- Mark the transition. Note where readings begin to depart meaningfully from the dry reference.
- Locate the higher-reading zone. Continue across it rather than stopping at the first high number.
- Check beyond the visible damage. Water can travel farther beneath finishes than staining suggests.
- Investigate abrupt spikes. Consider fasteners, pipes, wiring, corner bead or other conductive material.
- Repeat the same locations later. A drying trend is more informative than unrelated measurements taken at different places each day.
- Confirm questionable areas. Where practical, use a second measurement method or a pin/deep probe rather than relying entirely on surface scanning.
This approach also makes your readings easier to explain. Instead of saying, “The floor reads 21,” you can document that unaffected plywood reads within one range, the formerly wet zone remains higher, and repeated readings are either moving toward the baseline or failing to change. That creates a much stronger basis for deciding whether drying is progressing.
What Moisture Readings Mean in Wood, Plywood and OSB
Wood-based materials are where percentage readings are most intuitive because many meters are specifically calibrated to estimate wood moisture content. Even here, however, moisture content changes naturally with surrounding temperature and relative humidity, and meter interpretation can be affected by wood species and instrument settings. A board does not need to reach some imaginary universal zero-moisture condition before it can be considered dry.
For water-damage work, the useful question is whether the affected wood has returned to a moisture condition compatible with comparable dry wood in that building and with whatever covering or finish will be installed next. The drying target for an exposed joist being left open may therefore be evaluated differently from a wood subfloor about to receive moisture-sensitive flooring. The installation requirements of the finished flooring can impose another moisture criterion beyond simply determining that the leak itself has dried.
This distinction is especially important with OSB and plywood subfloors. A meter can tell you a great deal about remaining moisture, but it cannot reverse swelling, edge deformation, delamination, loss of fastener holding or permanent structural deterioration. A subfloor can eventually become dry while still being physically damaged enough to require repair or replacement.
What About Drywall Moisture Readings?
Drywall requires greater caution because meter scales vary significantly. If your device has a dedicated gypsum scale, use that scale according to the manufacturer’s instructions; if it provides only a generic reference scale, the result should generally be treated as comparative rather than as an exact drywall moisture percentage. Delmhorst specifically recommends establishing what dry gypsum reads on that meter before interpreting a suspect wall.
For example, a reference-scale display of 20 should not be interpreted as “20% wet drywall” simply because a percentage-looking number appears on the screen. Its value comes from comparison: if several unaffected sections of the same drywall produce similar readings while a localized damaged area reads considerably higher, you have identified an abnormal condition worth investigating. This is one reason a known-dry baseline is more useful than an arbitrary internet threshold when the meter is not providing true material-specific moisture content.
Pinless scanning can be particularly helpful for mapping a wall because large areas can be checked without repeatedly puncturing the finish. A suspicious high zone should then be evaluated in context, especially near corner bead, screws, electrical components or other hidden metal. Tramex recommends using a dry drywall baseline first and then confirming suspect higher-reading locations when appropriate.
Can a Wall Feel Dry but Still Read Wet?
Yes. Touch is a poor measurement of moisture inside many building assemblies because your hand mainly evaluates the surface, while water may remain inside porous material, behind paint, beneath flooring, within insulation or on the opposite side of a panel. A surface can therefore feel completely normal while the assembly is still drying.
The opposite problem can occur as well. Surface condensation can make pin measurements look elevated while a deeper non-invasive measurement shows less of a change because the moisture is concentrated near the surface. Protimeter notes this difference as one reason conflicting pin and pinless results should be interpreted according to what each measurement method is actually sensing.
Visual appearance creates similar uncertainty. Discoloration can remain after the material has dried, while an apparently clean surface can conceal moisture elsewhere in the assembly. The correct decision therefore combines the moisture pattern with knowledge of the leak source, material condition, drying history and any inaccessible layers that still require examination.
Look for a Drying Trend, Not Just a Finish-Line Number
A series of repeat measurements can tell you something a single final measurement cannot: whether the material is moving in the right direction. If a previously wet location measures progressively closer to the unaffected baseline under comparable test conditions, that supports a conclusion that drying is occurring. If the readings flatten at an elevated level or begin increasing again, continued moisture intrusion, trapped moisture or unsuitable drying conditions should be considered.
Consistency matters when tracking that trend. Record the material, test location, meter mode and reading so tomorrow’s result can be compared with today’s rather than with another piece of material several feet away. Restoration standards place instruments, inspections, drying technology and project documentation within the professional water-damage process for this reason.
A simple homeowner record does not need to become a professional restoration report. A sketch of the room with numbered test points, date, meter setting and readings may be enough to show whether the wetter zone is contracting. Photographing the marked locations can also make repeated testing more consistent.
When Is It Safe to Rebuild, Paint or Cover the Material?
A moisture meter should support the rebuild decision rather than make that decision alone. Before closing a wall, reinstalling flooring or applying a finish, check that the source of water has been corrected, the moisture pattern has returned appropriately toward dry comparison areas, and the material itself remains serviceable.
Use this practical decision sequence:
- Water source stopped: The leak, plumbing failure, roof intrusion, appliance discharge or other source has actually been corrected.
- No continuing moisture pattern: Repeated measurements are stable or moving toward the dry baseline rather than rising again.
- Comparable areas agree: The previously affected material no longer shows a meaningful unexplained difference from suitable dry controls.
- Meter mode is correct: You know whether you are reading actual moisture content, WME or a relative scale.
- False positives have been investigated: High readings near metal, wiring, fasteners or material transitions have been checked rather than assumed to be water.
- Hidden layers are considered: A dry surface has not been used as proof that insulation, the back of drywall, the underside of a subfloor or another inaccessible layer is dry.
- The material remains physically sound: Dryness does not excuse swelling, crumbling, delamination, sagging or other permanent damage.
- The next finish allows it: Flooring, coatings and other moisture-sensitive products may have their own substrate requirements that must also be satisfied.
This is the key distinction: “dry enough after the leak” and “ready for the next construction material” can be two separate questions. A plywood subfloor may have returned near its normal building moisture condition yet still need to meet the flooring manufacturer’s installation requirements before hardwood, resilient flooring or another moisture-sensitive finish goes over it.
A High Reading Does Not Automatically Mean “Replace It”
Moisture meters detect or estimate moisture conditions; they do not directly measure structural strength, mold contamination or remaining service life. A high reading tells you that the area deserves further investigation, but it does not by itself prove that drywall, subflooring or framing must be demolished.
Replacement depends on what happened to the material while it was wet. Drywall that has softened, lost integrity, deteriorated or been affected by unsuitable water conditions presents a different decision from structurally sound framing that was wetted and subsequently dried. Similarly, OSB that has swollen badly or broken down at its edges may remain unsuitable even after the meter eventually shows a dry condition.
That is why moisture condition and material condition should be evaluated separately. The first question is whether water remains. The second is whether the material survived the event well enough to keep using.
When a Moisture Meter Is Not Enough
A basic moisture meter is useful for screening and monitoring, but some situations require more investigation than a consumer instrument can provide. Hidden cavities, multilayer floor assemblies, repeated unexplained high readings, large water events and disagreements between meter methods can all make the apparent answer less certain.
Consider professional water-damage assessment when the wet area extends into several rooms, water may remain beneath fixed finishes, moisture repeatedly returns after drying, electrical or HVAC components were affected, or you cannot confidently establish what is actually dry. Professional restoration practice can combine moisture measurements with inspection, psychrometric conditions, specialized probes and documentation rather than relying on a single handheld reading. The current ANSI/IICRC S500 standard specifically addresses instruments, drying technology, inspections, building and material science, structural restoration and project documentation as interconnected parts of water-damage restoration.
The same applies when a meter number conflicts with what the construction tells you. A persistent maximum reading exactly along a drywall corner may be metal bead, while a broad gradient radiating from a plumbing penetration may indicate a very different problem. The purpose of the meter is to reduce uncertainty; when the instrument creates more uncertainty than it resolves, investigate the measurement before making an expensive repair decision.
Troubleshooting Moisture Readings That Do Not Make Sense
A moisture meter becomes most useful when you treat an unexpected reading as a diagnostic clue instead of immediately accepting it as proof of trapped water. When one location behaves differently from the surrounding material, first verify the meter mode, repeat the test from several directions, and compare the result with unaffected material of the same type. If the abnormal reading remains concentrated in one very small location, investigate what is physically behind the surface before assuming the assembly is still wet.
Surface Dry Is Not the Same as Assembly Dry
One of the easiest mistakes after a leak is measuring only the exposed face of a material. A floor assembly can contain finish flooring, underlayment, adhesive, subfloor and framing, while a wall may contain paint, gypsum board, insulation, sheathing and framing. Moisture can remain in one of those layers after the surface nearest you has returned to a normal reading.
That problem is especially important where drying occurs from only one side. A painted wall, impermeable floor covering or vapor-resistant layer can slow evaporation from material behind it, allowing the accessible surface to improve before deeper components have reached the same condition. When the construction is layered, your inspection method needs to reflect the actual assembly rather than treating the visible surface as the whole structure.
This is also why water damage beneath flooring deserves more than a quick scan across the finish. If the leak reached the structural layer, the decisions about drying, swelling and replacement belong with the subfloor itself. The separate guide to water damage to a subfloor covers those material-condition questions in more detail.
Moisture Content and Physical Damage Are Separate Decisions
A previously wet material can return to a normal moisture condition and still be unsuitable for reuse. Moisture meters tell you about moisture-related electrical or dielectric behavior; they do not determine whether OSB has lost strength, drywall has softened, plywood has delaminated, flooring has cupped, or a finish has detached.
For wood-based subfloors, check for swollen panel edges, loosened fasteners, soft areas, separation between layers and changes in flatness after drying. For drywall, look for loss of rigidity, crumbling gypsum, damaged paper facing, sagging and deterioration around fasteners. A normal meter reading cannot restore those properties once physical damage has occurred.
The reverse is also true. A stained board or discolored wall may look damaged while testing indicates that the material has already dried, and the remaining issue may be cosmetic rather than active moisture. Keeping dryness, material integrity and appearance as three separate questions prevents a meter from being asked to answer something it cannot measure.
Do You Need to Reach the Same Reading Everywhere?
Usually, no. Construction materials naturally vary because moisture equilibrium, density, species, thickness, orientation and environmental exposure are not perfectly uniform throughout a building. The goal is therefore not to force every test point to display an identical number.
What matters is whether the formerly wet area has stopped behaving like a distinct moisture anomaly. Several control readings may establish a normal local range rather than one perfect value, and the damaged area should move back toward that range as drying progresses. A small amount of normal variation is different from a clearly defined zone that remains consistently wetter than comparable surrounding material.
This is another reason recording several control points is useful. If your dry plywood readings differ slightly from one another, that variation helps show what “normal” looks like in the real building. You can then judge the previously wet area against that pattern instead of relying on a number copied from an unrelated house or online chart.
How Long Should Moisture Readings Keep Falling?
There is no reliable fixed number of days that applies to every water-damage event. Drying speed changes with material thickness, permeability, temperature, relative humidity, airflow, how much water entered the assembly, how long it remained wet, and whether coverings or cavities restrict evaporation.
A rapid drop during the first part of drying may slow as moisture deeper inside the material moves toward the surface. That does not necessarily mean drying has failed. What matters is whether the overall trend continues toward an appropriate dry condition and whether the environmental setup is actually capable of removing the released moisture.
If readings stop improving while the affected area remains significantly wetter than comparable controls, investigate why. Common explanations include moisture trapped beneath impermeable finishes, wet insulation, inaccessible cavities, insufficient dehumidification, restricted airflow or an ongoing source of water.
Do Not Chase an Unrealistically Low Number
Trying to dry building materials to an arbitrary minimum can be as misleading as stopping too early. Wood in normal service contains moisture and continually exchanges it with the surrounding air, so it does not need to reach zero percent moisture content. The appropriate endpoint is a stable dry condition suitable for the building environment and the next material or finish.
This is particularly important when online advice quotes one percentage without discussing regional humidity or material use. Wood in one indoor climate may normally equilibrate differently from wood in another climate, and a restoration target should recognize the dry standard of the actual structure. A locally appropriate baseline is therefore more informative than an extreme target chosen simply because a lower number appears safer.
For finished flooring, cabinetry or other moisture-sensitive installations, however, the next product may impose a tighter requirement. Always distinguish the restoration drying endpoint from the installation specification for whatever will be placed over the material.
The Practical “Safe to Rebuild?” Check
Before covering a formerly wet wall or floor, work through the following checks rather than relying on one final meter reading:
- The water source is fixed. Repairing the visible damage while the source remains active only resets the problem.
- The meter scale is understood. You know whether the display is actual moisture content, WME or a relative reference value.
- A valid dry comparison exists. Unaffected material of the same type has been tested under the same meter settings.
- The moisture pattern has contracted. The previously wet zone is no longer significantly different without an explanation.
- Repeated readings are stable. Measurements are no longer rebounding or indicating renewed wetting.
- Hidden layers have been considered. Dryness has not been concluded from the surface alone when the assembly contains inaccessible layers.
- False positives have been checked. Metal, fasteners and material transitions have been considered where readings behave unusually.
- The material remains serviceable. There is no unresolved swelling, softening, delamination, sagging or other damage requiring repair.
- The next finish permits installation. Flooring, coatings, adhesives and other products may have their own substrate-moisture requirements.
If several of these questions remain unanswered, the correct next step is usually more investigation rather than simply waiting for the meter number to become lower.
Common Moisture-Meter Mistakes After Water Damage
Treating every display as a percentage. A relative scale, WME value and actual wood moisture-content percentage are different measurement systems. The number only becomes useful after you know which system your meter is displaying.
Testing only the visible stain. Water can travel behind finishes and along structural materials, so the visible mark may not coincide with the wettest location. Scanning beyond the obvious damage gives you a more meaningful moisture boundary.
Using a random internet threshold as the only dry standard. Published numbers can provide useful context, but they do not replace correct meter settings, comparable dry controls and the requirements of the actual material.
Comparing unlike materials. A reading from drywall cannot automatically be judged against plywood, and even wood products may respond differently. Establish the baseline from the same or genuinely comparable material whenever possible.
Ignoring metal interference. High readings around fasteners, pipes, electrical components and metal corner bead can send an inspection in the wrong direction. Look at the shape of the reading pattern before assuming hidden water.
Declaring the material saved because it is dry. Dryness only answers one part of the repair decision. Physical deterioration may still justify replacement.
Compare Local Home Specialists Near You
Tell us what kind of help you need, then compare nearby businesses by location, Google rating, review volume and contact options.
HomeFix Local Match
Turn a home problem into a practical local hiring decision. Check the clues, see the specialist types that fit, open focused surrounding-location searches, then compare the strongest three before you call.
 YOUR PROBLEM
YOUR AREA
COMPARE 3
✓ Ready to compare
YOUR PROBLEM
YOUR AREA
COMPARE 3
✓ Ready to compare
What is happening?
Choose the closest problem type, then check every clue that applies. Your selections change the specialist order.
Where should the search focus?
Use Google’s “near me” context or enter the area you actually want a specialist to serve.
Simple local search: open nearby Google results, choose the businesses that look suitable, then compare your best three here before you call.
Problem snapshot
Who should you call first?
These are the specialist types most likely to fit the clues you selected.
Search around your location
Compare your top three
Use the same factors for each option so a high star rating does not hide a weak scope, poor diagnosis, missing credentials or unclear aftercare.
Comparison result
Your result combines the Google signals you entered with the practical hiring checks you completed.
Questions to ask every finalist
Use the same questions with each shortlisted business so the comparison stays consistent.
FAQ
Is 15% moisture content dry after water damage?
A reading around 15% can be meaningful when the meter is genuinely displaying moisture content on an appropriate material scale, but it is not a universal pass-or-fail threshold for every building material or moisture meter. Compare the reading with unaffected material of the same type in the same building, confirm the selected meter mode, and check any moisture requirements for the finish or flooring that will be installed next.
Is 20% moisture too high in a subfloor?
A wood-scale reading around 20% is usually high enough to justify further investigation before covering the subfloor, especially when comparable dry subflooring nearby reads lower. First confirm that the meter is displaying actual wood moisture content rather than a relative scale, then compare repeated readings with unaffected areas to see whether the material is still drying or remaining unusually wet.
Can I install flooring as soon as the subfloor meter says it is dry?
Not automatically. The subfloor should be dry and physically sound, but the flooring manufacturer may also specify substrate-moisture limits, testing methods, acclimation requirements, adhesive conditions, or acceptable moisture differences between the flooring and subfloor. Meet those installation requirements as well as the water-damage drying endpoint before covering the material.
Why does my moisture meter show 100 on drywall?
A display of 100 does not necessarily mean the drywall contains 100% moisture. Many meters use relative reference scales rather than true moisture-content percentages, so 100 may simply represent the upper end of that scale. Check the meter manual and selected mode, compare the location with known-dry drywall, and investigate hidden metal if the high reading is sharply concentrated in one point or line.
Can metal studs or pipes make a moisture meter read wet?
Yes. Metal fasteners, corner bead, pipes, wiring, ductwork and metal framing can interfere with some pin and pinless moisture readings. If the meter suddenly spikes over a very narrow area while nearby readings remain normal, move around the location and confirm the result before assuming trapped water is present.
Should I use a pin or pinless moisture meter after a leak?
A pinless meter is useful for quickly scanning a larger wall, floor or ceiling and identifying areas that read differently from the surrounding material. A pin meter is useful for checking specific locations more directly and, when properly calibrated, may provide material-specific moisture-content readings. Using a broad pinless scan followed by targeted pin testing can provide a clearer picture than relying on either method alone.
How often should I check moisture while drying a room?
The most useful approach is to repeat measurements at the same marked locations under the same meter settings so you can see whether the readings are moving toward the dry reference area. The exact interval matters less than consistency. A clear downward or stabilizing trend provides more useful information than unrelated readings taken at different locations each time.
Does a low moisture reading mean there is no mold?
No. A moisture meter measures moisture conditions; it does not test for mold. A low reading can indicate that the material is no longer wet at the measured location, but it cannot determine whether microbial growth occurred earlier, exists behind another layer, or is present somewhere outside the meter’s measurement area.
Can moisture remain behind a wall even if the drywall surface reads dry?
Yes. Framing, insulation, sheathing or the back of the drywall can remain damp even when the accessible face has returned to a normal reading. This is especially possible when water entered a wall cavity or when paint, insulation or other layers slow evaporation. Consider the entire wall assembly and the path the water followed rather than relying on one surface reading.
When should I call a water-damage professional?
Professional assessment is sensible when moisture extends into inaccessible cavities, readings repeatedly rise again after drying, several rooms or material layers are involved, the water source cannot be identified, contaminated water may be involved, or you cannot establish a reliable dry baseline. It is also worth obtaining professional confirmation when major flooring, wall or structural work will depend on the moisture assessment.
Bottom Line
There is no single moisture-meter reading that proves every water-damaged wall, subfloor or piece of framing is dry. First identify what the meter is actually reporting, compare the affected material with suitable dry controls, map the moisture pattern, and look for a stable trend toward normal rather than chasing one universal percentage.
Then make a separate decision about the condition of the material itself. A structure can be dry yet physically damaged, or visually stained yet no longer wet. The safest rebuild decision comes when the water source is corrected, the moisture anomaly has resolved, hidden layers have been considered, the material remains serviceable, and the next finish or flooring system is compatible with the measured condition.