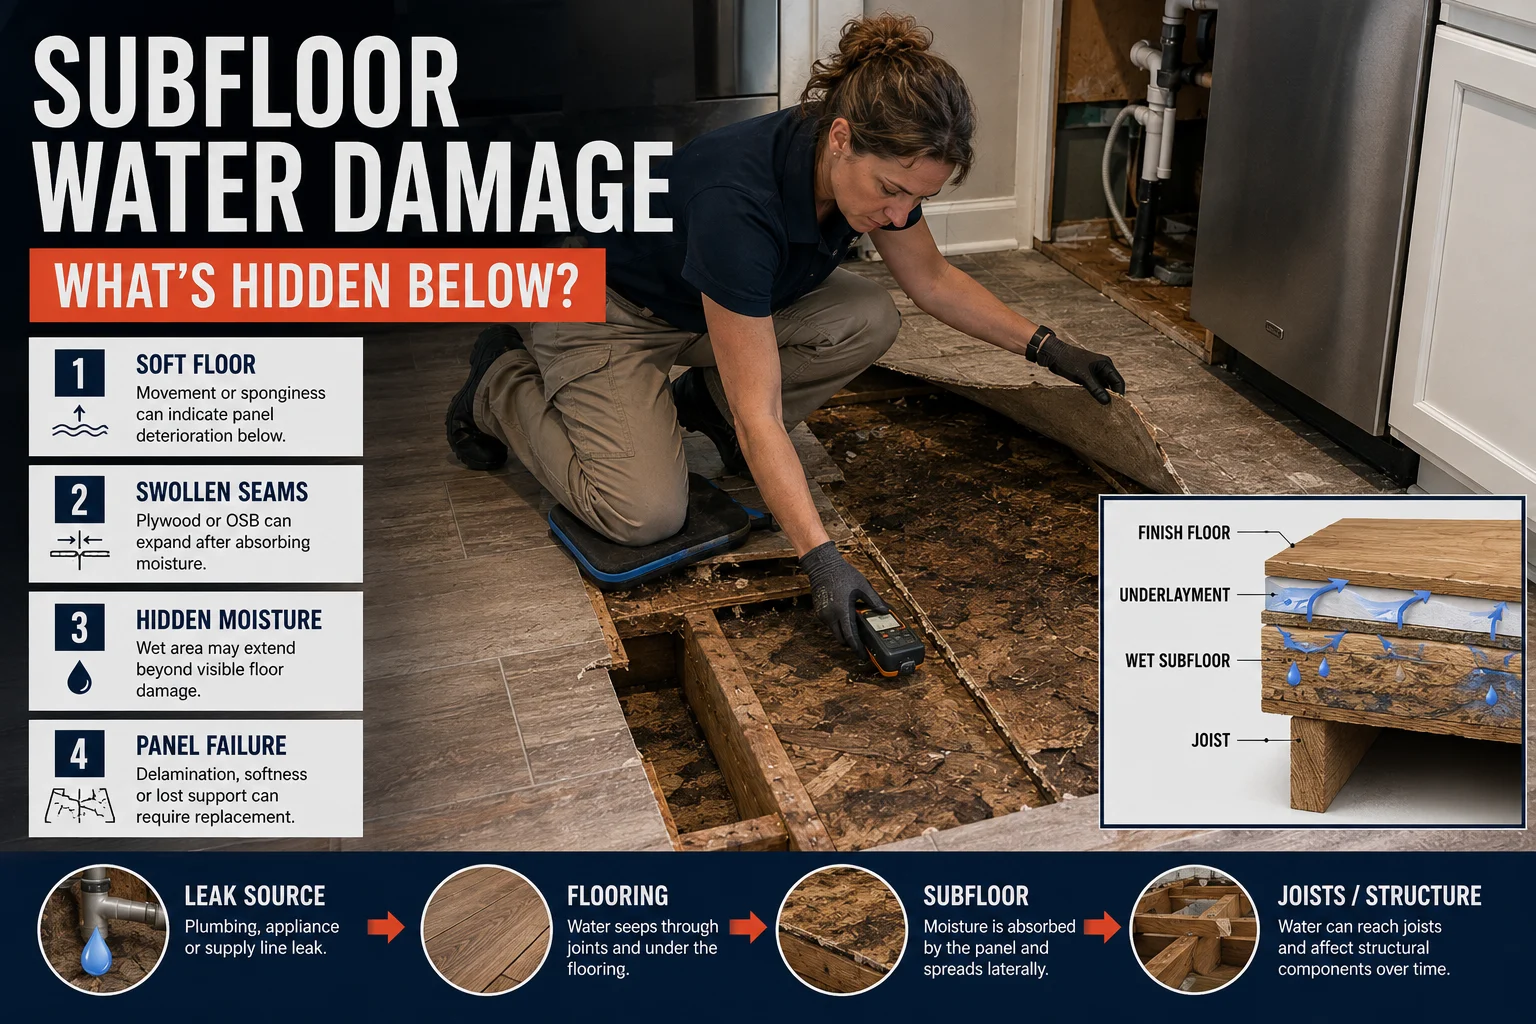

Water damage to a subfloor needs to be evaluated differently from damage to the visible flooring above it. A hardwood board, vinyl plank or carpet may be replaceable as a finish, while the plywood or OSB underneath is part of the structural floor assembly and must continue supporting loads, fasteners and the finished flooring system. The important decision is therefore whether the subfloor is simply wet and capable of drying, permanently distorted, biologically deteriorated, or damaged enough that its structural performance can no longer be trusted.
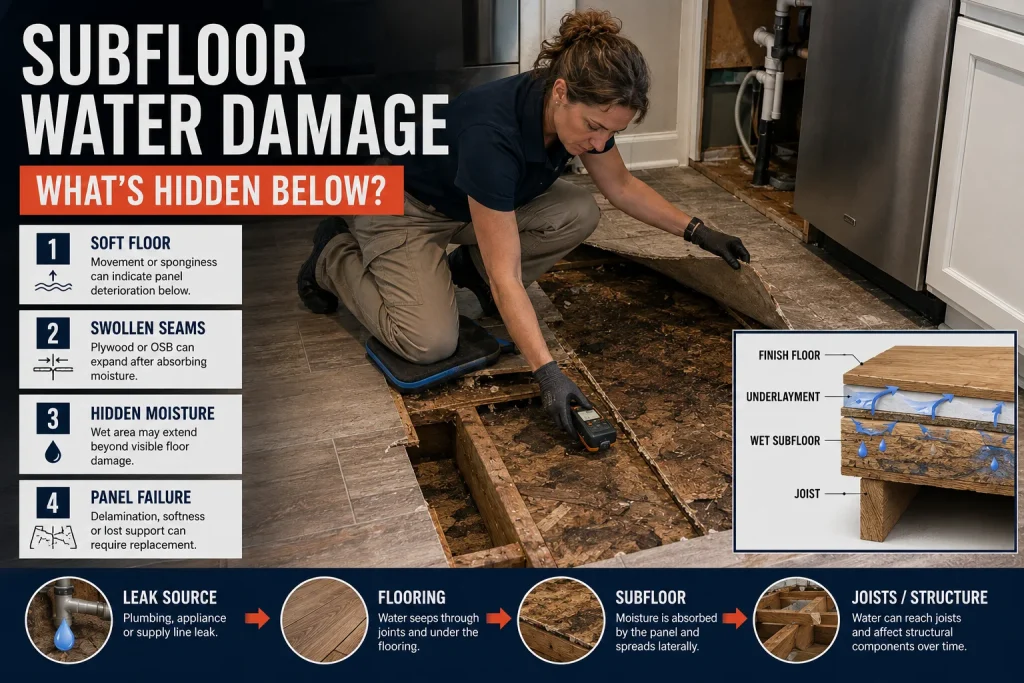
A leaking dishwasher, toilet, shower, pipe, refrigerator line or washing machine can wet the finished floor first and then allow moisture to move through seams and penetrations into the subfloor. Water may also reach the panel from below through a wet crawlspace, basement moisture or another concealed source. By the time the floor feels soft or begins moving underfoot, the area that needs investigation may extend farther than the visible stain.
Why Water Damage to a Subfloor Matters
The subfloor forms the continuous structural layer over the floor joists and creates the base for underlayment and finished flooring. Plywood and OSB are engineered wood products that can tolerate normal changes in environmental moisture, but prolonged or severe wetting can cause swelling, edge deformation, weakened bonds and changes in stiffness. Damage becomes more significant when the panel no longer lies flat, loses its ability to hold fasteners or begins separating internally.
A damaged subfloor can also affect materials that appear unrelated to the leak. Tile may crack because the panel underneath moves, resilient flooring may telegraph swollen seams, hardwood can cup because moisture rises from below, and carpet can conceal a deteriorating panel until the floor begins to feel soft. Repairing only the finished surface can therefore leave the actual failure hidden underneath.
Can This Subfloor Be Saved?
Answer a few focused questions to see whether the evidence supports drying, opening the floor, replacing damaged panels, or escalating to structural assessment.
Start with the water event
The source, duration, contamination and affected area set the initial risk.
Read the panel itself
Physical material failure matters more than staining alone.
Verify what is happening below
Drying trend, access and joist condition can change the recommendation.
Turn the evidence into a repair direction
The result weighs material failure, contamination, framing risk, access and moisture verification rather than treating every wet panel as an automatic replacement.
No account, API key or external assessment service is required. You can change any answer and run the assessment again.
What Should You Do First After the Subfloor Gets Wet?
Stop the source before evaluating the floor. A supply-line failure, appliance leak, toilet seal, shower waterproofing defect or drainage problem should be corrected so new water is no longer entering the assembly. If the floor is visibly sagging, unusually soft, collapsing, contaminated by sewage or unsafe to walk on, restrict access rather than repeatedly testing the area with body weight.
The finished flooring then needs to be considered because it can slow inspection and drying. Carpet and padding, floating flooring, sheet products, tile assemblies and adhered finishes all interact differently with moisture underneath them. Removing a finish without understanding how it is attached can cause unnecessary damage, while leaving an impermeable layer in place can make it difficult to determine whether the panel below is drying.
Documentation is useful before significant removal begins. Photograph the affected room, leakage source, floor transitions, swelling, staining and any visible damage from the crawlspace or basement below. Those images can help establish how water travelled and make it easier to compare the condition as drying and repair progress.
The next step is to establish the actual wet boundary rather than assuming that it ends where the flooring looks damaged. Water can move along panel joints, beneath underlayment, around fasteners and toward lower sections of the structure. An inspection should therefore compare the obvious problem area with surrounding material and suitable unaffected reference areas.
| What you find | What it may indicate | Next inspection priority |
|---|---|---|
| Panel is wet but flat and firm | Potentially recoverable wetting | Correct source, expose sufficiently and monitor drying |
| Raised or swollen panel edges | Dimensional change from absorbed moisture | Check extent, remaining thickness and flatness after drying |
| Soft or spongy area | Possible panel deterioration or loss of structural integrity | Restrict loading and inspect panel and joist support |
| Layers separating or surface flaking | Bond deterioration or delamination | Assess replacement rather than cosmetic repair |
| Floor remains uneven after drying | Permanent panel deformation or damage below | Check panel, fasteners, joists and finish-floor requirements |
What Are the Signs of Water Damage Under the Floor?
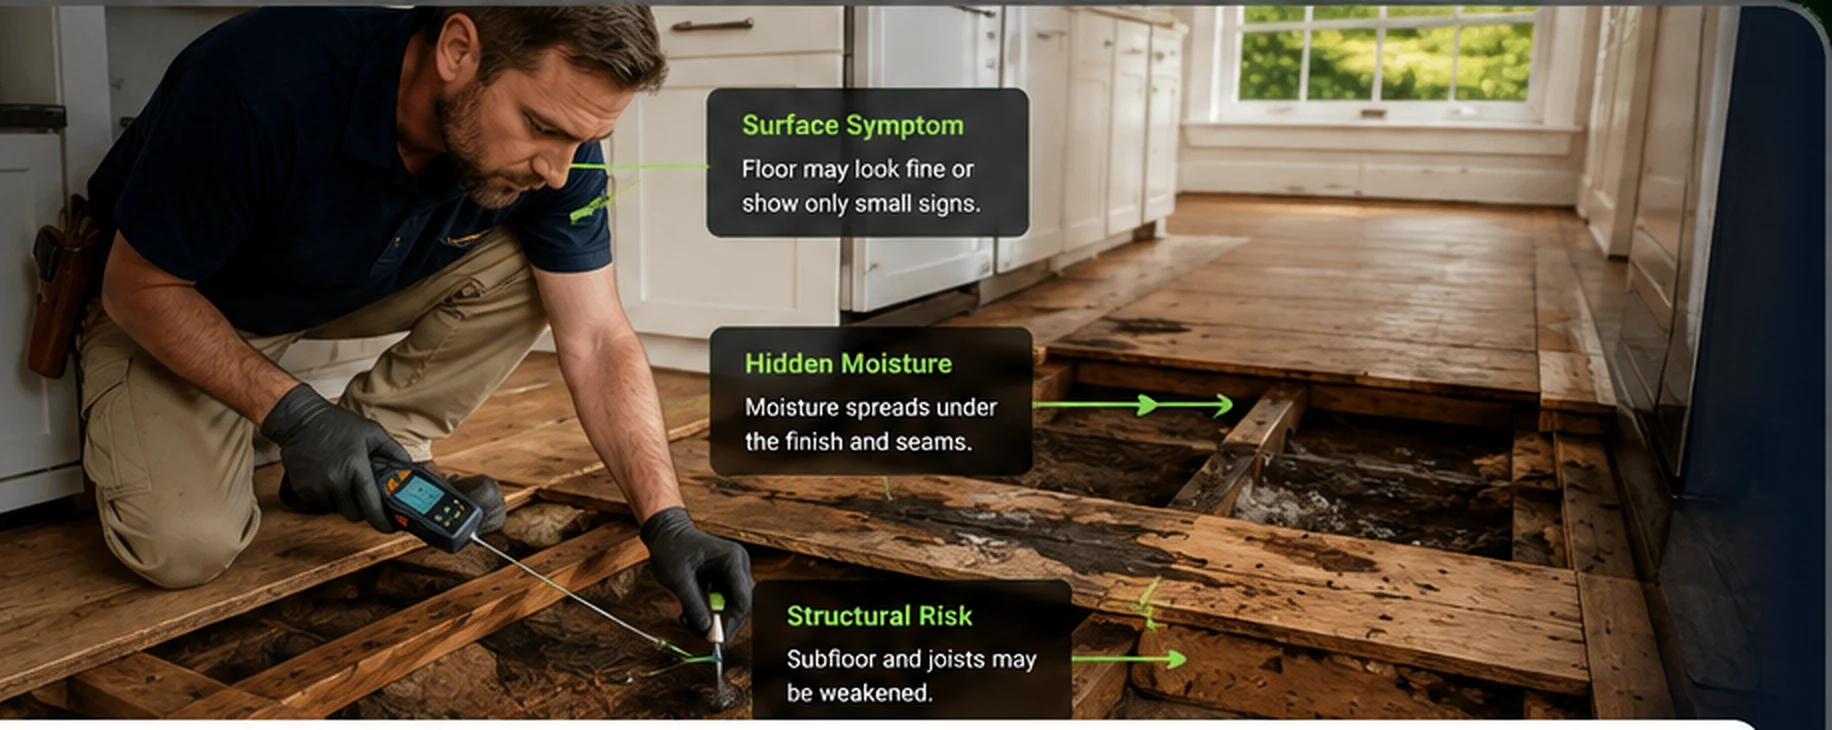
A soft or springy feeling is one of the more important warning signs because it can indicate that the panel beneath the finished floor has changed physically. The sensation should be interpreted carefully, since movement can also come from loose fasteners, inadequate support, damaged joists or an installation problem unrelated to water. When softness follows a known leak or appears beside staining and swelling, water damage becomes a much stronger possibility.
Raised seams and localized humps can occur when a wood-based panel absorbs moisture and expands. OSB edges can become particularly noticeable because water often reaches exposed panel edges and joints before the center of the sheet shows obvious dimensional change. A finished floor installed over those swollen areas may later reproduce the unevenness even after the original leak has stopped.
Odor can provide another clue, although it does not identify the condition by itself. Persistent mustiness beneath carpet, cabinets or a floor transition can indicate that moisture remains in a concealed layer or that organic material stayed damp long enough for microbial growth to develop. If moisture has also migrated into walls, hidden water damage inside walls may need to be investigated as part of the same loss.
Changes to the finish floor can sometimes reveal what is happening below. Hardwood may cup, laminate joints can swell, resilient flooring may discolor or release, tile can become loose, and carpet can remain damp at its backing even when the fibers feel dry. None of these signs proves the subfloor is structurally damaged, but each provides a reason to inspect underneath rather than treating the visible finish alone.
How Can You Confirm That the Subfloor Is Wet?
Access from below is often the least destructive inspection route when the floor sits over an unfinished basement or crawlspace. The underside may reveal staining around plumbing, darkened panel joints, swollen material, corrosion on fasteners, visible fungal growth or water tracking along joists. Looking from below also helps distinguish a small surface spill from moisture that has penetrated the full floor assembly.
When underside access is unavailable, inspection may require selective removal of flooring, trim, an appliance toe-kick or another component that provides a view of the structural layer. The objective is to expose enough of the assembly to answer the diagnosis without automatically demolishing the entire room. Destructive investigation should become more targeted as the moisture pattern becomes clearer.
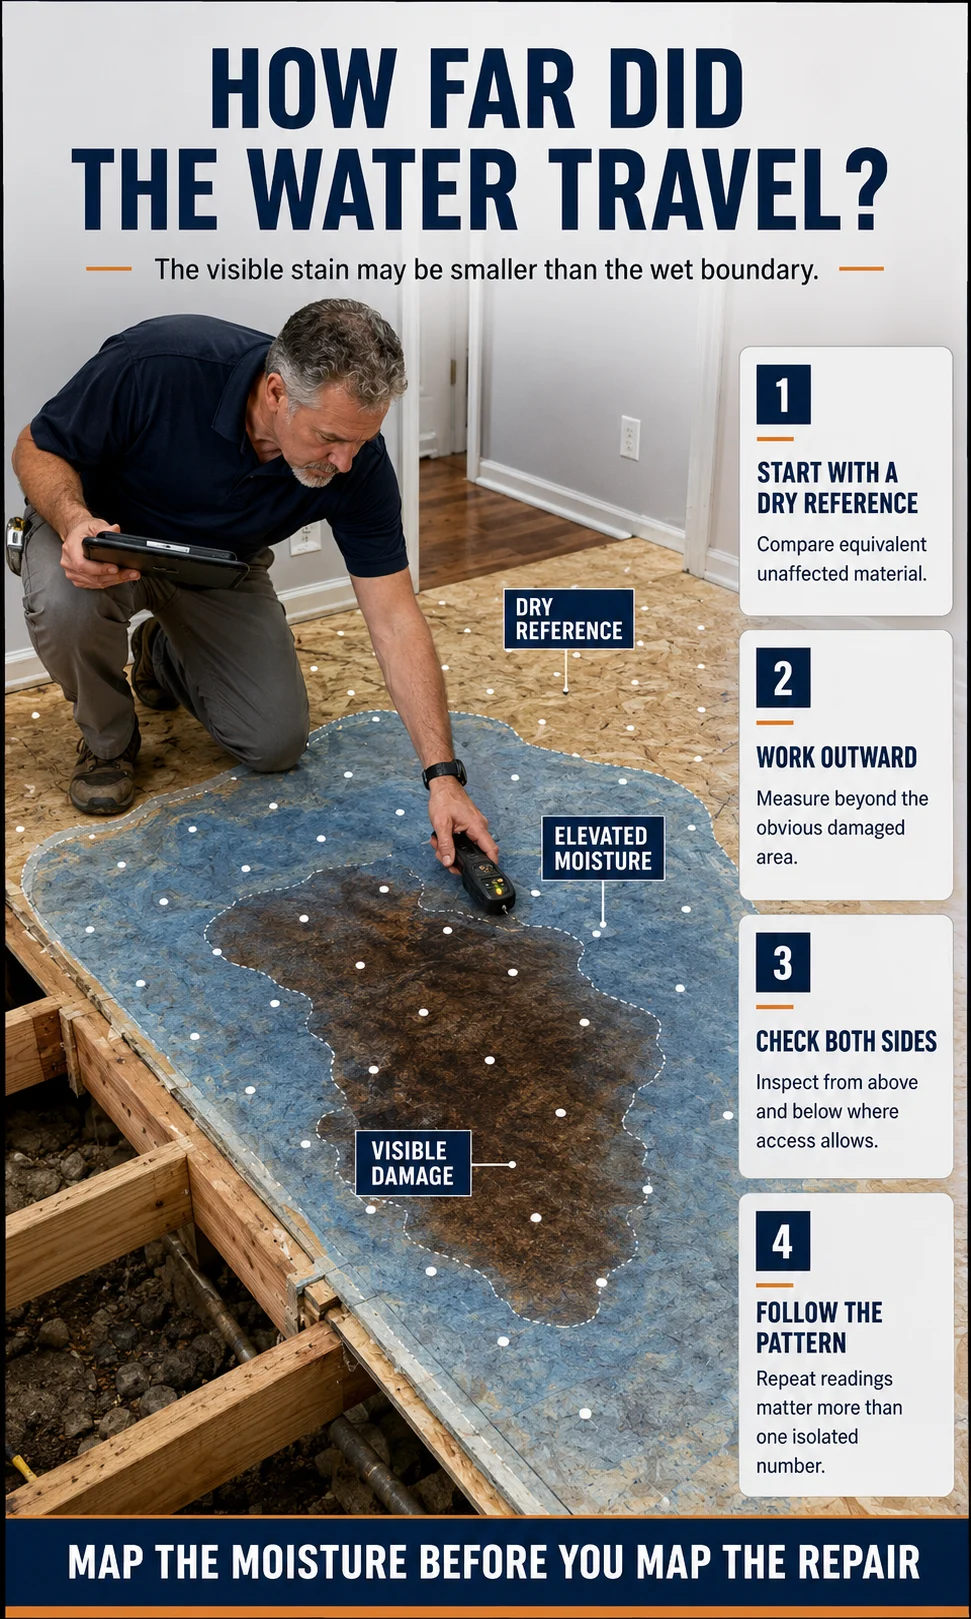
Moisture meters can help compare affected material with equivalent dry material elsewhere in the building. Meter readings should be interpreted as part of a pattern because density, wood species, panel composition, temperature and meter settings can influence the number displayed. A drying decision is stronger when measurements are repeated at the same locations and show a consistent downward trend.
Infrared imaging can sometimes identify temperature differences that help direct inspection toward suspicious sections of flooring. It cannot determine whether a panel is structurally sound and does not directly measure moisture. Any thermal anomaly that matters to the repair decision should be checked with appropriate direct inspection or moisture measurement.
Find the Moisture Source Before Blaming the Floor
A subfloor rarely becomes wet without a pathway supplying water. Bathrooms commonly involve toilets, tubs, showers, supply connections or waterproofing defects, while kitchens and laundry areas introduce appliances, valves, drains and supply hoses. The repair should follow the actual source because a replacement panel installed beneath an unresolved leak will eventually be damaged in the same location.
Under-sink leakage can spread beneath cabinets before reaching an open area of flooring. Cabinet bases sometimes conceal the earliest staining, and water can travel through penetrations around pipework before reaching the subfloor below. Inspecting the leak source and the panel independently helps determine whether the visible cabinet damage represents the entire loss.
Water can also enter from underneath. High crawlspace humidity, plumbing beneath the floor, groundwater, poor drainage or a persistently wet basement can expose the underside of the panel to moisture for long periods. In that situation, replacing one piece of subfloor without correcting the environment beneath it solves only the damaged symptom.
The direction of moisture matters because it affects which layers need to be opened. Water from above may encounter flooring, adhesive and underlayment before reaching the structural panel, whereas moisture rising from below reaches the subfloor first and may then affect the finish. Mapping the direction helps identify which layer is retaining moisture and which materials are obstructing drying.
Source clues worth checking
- Toilet area: Inspect the toilet connection, flange area, surrounding fasteners and the underside of the panel where accessible.
- Tub or shower: Investigate plumbing connections, drain and overflow components, perimeter waterproofing and nearby wall-floor transitions.
- Sink or vanity: Follow supply lines, shutoff valves, drains and cabinet-base staining before assuming the wettest open floor area is the source.
- Dishwasher: Check supply, drain and appliance cavity because water can remain hidden beneath cabinets and finished flooring.
- Refrigerator: Inspect water-supply tubing and connections where ice makers or dispensers are installed.
- Washing machine: Check valves, hoses, drains and overflow history, particularly where large releases could travel into adjoining rooms.
- Crawlspace or basement: Look for plumbing leakage, bulk water, condensation, elevated humidity and wet framing below the floor.
- Exterior door or wall: Consider flashing, door thresholds or exterior water intrusion when wetting follows weather instead of fixture use.

Plywood and OSB Do Not Fail in Exactly the Same Way
Plywood is made from layers of wood veneer arranged in alternating directions. Wetting can produce swelling, surface checking and separation between veneers when exposure is severe enough, although a panel that remains flat, bonded and structurally sound may be capable of drying. The condition after drying matters more than the presence of a historical water stain.
OSB is made from oriented wood strands bonded into a structural panel. It can absorb water at cut edges and panel joints, and edge swelling may remain even after moisture content falls. Some swelling can be cosmetic or correctable within the requirements of the eventual floor system, while severe thickness change, flaking, loss of bond or persistent softness points toward more significant damage.
The label “wood subfloor” therefore does not describe one uniform material. Panel thickness, span rating, joist spacing, installation orientation, fastener pattern, finish-floor requirements and previous exposure all affect whether an area remains suitable. A repair decision should be based on the actual panel and floor assembly rather than a universal rule that all wet plywood can stay or all wet OSB must be removed.
Particleboard and similar non-structural wood composites may behave less favorably after substantial wetting. They can swell dramatically, lose internal cohesion and remain permanently distorted even after drying. Where such products are used as underlayment rather than the structural subfloor, the underlayment may require replacement even when the plywood or OSB beneath it remains serviceable.
Can a Water-Damaged Subfloor Be Dried Instead of Replaced?
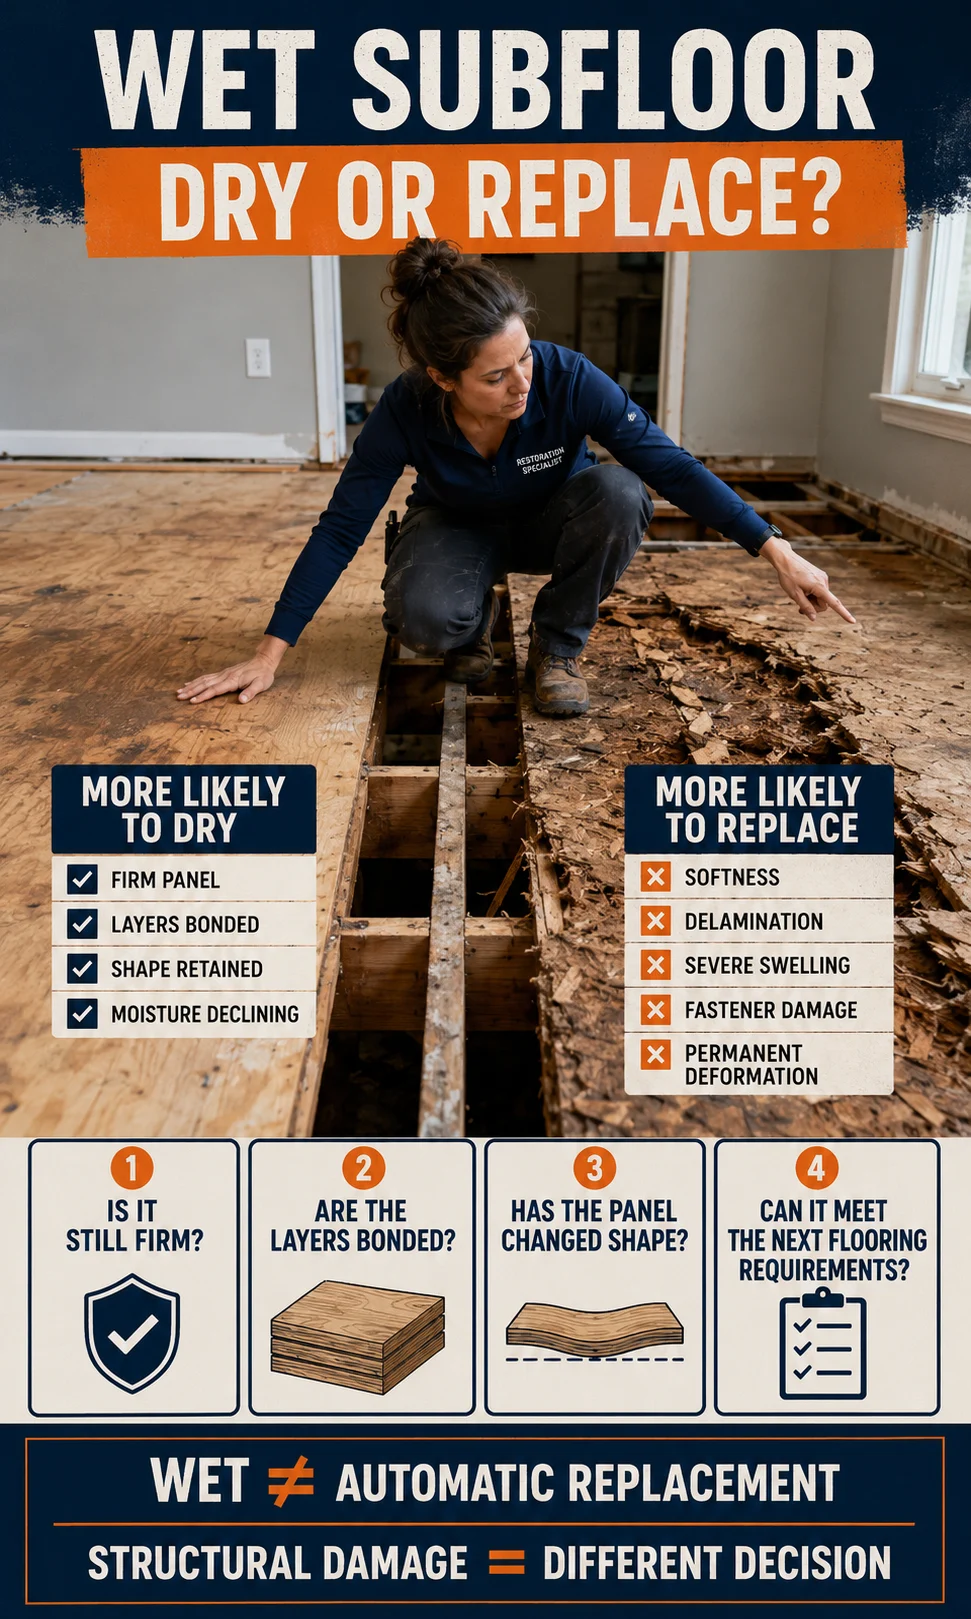
Yes, a wet subfloor can sometimes be dried and retained when the water source has been corrected, contamination is limited, the panel remains structurally sound and drying can be verified. Wet does not automatically mean ruined. The important distinction is whether the panel has undergone permanent physical deterioration that affects its function.
A firm panel that remains bonded and reasonably flat deserves a different response from one that crumbles, delaminates or flexes excessively. Surface discoloration by itself is not a structural diagnosis, while severe softness should never be dismissed simply because a moisture meter eventually shows a lower reading. Drying removes moisture but cannot rebuild wood fibers or adhesive bonds that have already failed.
The intended finish floor also affects the acceptable condition. Tile assemblies usually require a stable, adequately stiff and sufficiently flat substrate, while floating products and resilient flooring have their own substrate requirements. A panel that appears usable as a structural platform may still require surface correction or approved underlayment before a specific finish can be installed.
| Condition after source control | Retention becomes more plausible | Replacement becomes more plausible |
|---|---|---|
| Panel strength | Firm with no unusual flexing or material loss | Soft, crumbling, fractured or visibly weakened |
| Panel bonding | Layers or strands remain securely bonded | Delamination, flaking or internal separation |
| Panel shape | Flat enough for intended flooring requirements | Severe permanent swelling, sagging or deformation |
| Fastener zones | Edges and fastening areas remain intact | Material around fasteners is enlarged, fractured or deteriorated |
| Moisture condition | Readings trend toward suitable unaffected reference material | Panel remains persistently wet or source cannot be controlled |
| Contamination | Limited clean-water exposure and material can be restored appropriately | Sewage, flood contamination or difficult-to-clean deterioration changes the restoration decision |
How Do You Dry a Wet Subfloor?
Drying starts with liquid-water removal and source correction. Standing water, wet carpet padding and other materials holding substantial free water should be addressed before relying on evaporation. The floor assembly then needs enough exposure for moisture to leave the panel rather than remaining trapped beneath impermeable finishes.
Air movement can support evaporation across an exposed surface, while dehumidification removes water vapor from the surrounding air. Access from both sides of the panel can improve drying when the underside is open to a basement or controlled crawlspace, although the correct strategy depends on the building. Forcing large amounts of air into contaminated cavities or across suspected mold growth can create additional problems, so the loss conditions should be understood first.
Heat can alter the rate of evaporation, but simply making the room hotter does not guarantee that the structural layer will become adequately dry. If the air surrounding the panel becomes increasingly humid, evaporation slows and moisture can redistribute to neighboring materials. Effective structural drying therefore depends on the relationship between exposed wet material, air movement, humidity control and time.
Finished flooring can become the main drying obstacle. Sheet vinyl, some tile systems, waterproof underlayments and other low-permeance layers can reduce upward evaporation, while insulation below a floor can slow drying from beneath. Selective removal may be necessary when those layers prevent meaningful inspection or keep the subfloor isolated from the drying environment.
Drying progress should be documented rather than judged by touch. The top surface may feel dry while the panel core or underside remains wetter, especially around joints and penetrations. Repeat measurements at established locations help show whether moisture is actually moving toward the intended condition.
There is no universal subfloor moisture number that means every panel in every building is ready for reconstruction. The drying target should consider appropriate dry reference material, environmental conditions and the moisture limitations of whatever flooring system will be installed next. Manufacturer installation requirements become particularly important before wood flooring, adhesives or moisture-sensitive finishes return to the area.
How Is a Damaged Section of Subfloor Repaired?
Replacement should extend far enough to remove structurally unsound material and create sound support for the new panel. Cutting only the visibly stained center of a damaged area can leave swollen or weakened edges beneath walls, cabinets or finish transitions. The repair boundary should be established from structural condition and framing support rather than stain shape alone.
Before cutting, the location of pipes, electrical cables, ducts and structural components below the panel needs to be understood. A floor assembly can contain utilities immediately beneath the subfloor, especially around bathrooms, kitchens and mechanical areas. Setting cutting depth and planning the opening are important parts of avoiding additional damage.
New panel edges must be adequately supported according to the floor assembly and repair design. Existing joists may provide part of that support, while additional blocking or other framing may be needed around repair boundaries. Simply placing a patch into an unsupported opening creates a new weak point even if the replacement material itself is sound.
Panel thickness and structural suitability also matter. Replacing a damaged structural panel with a thinner sheet merely because it finishes flush at the surface can reduce floor performance. The replacement should match the structural requirements of the assembly while still allowing the underlayment and finish-floor system to achieve the required final elevation.
Fastening should restore the panel’s connection to the supporting framing without creating unnecessary movement or damaged edges. Existing framing also needs to be evaluated before fastening new material to it because prolonged leakage can affect joists, blocking and other structural wood below the subfloor. New plywood attached to deteriorated framing does not restore the floor as a system.
After structural repair, the finished flooring should be reinstalled according to its own substrate requirements. Tile, hardwood, resilient flooring and carpet do not use the subfloor in exactly the same way, and some require an additional underlayment or preparation layer. The repair is complete when both the structural panel and the final flooring system have an appropriate substrate.
Before installing flooring over the repaired subfloor
- Confirm the original leak or moisture source is corrected.
- Verify surrounding subfloor is dry enough for the intended flooring system.
- Check repaired and retained panels for softness or delamination.
- Confirm repair edges have proper framing support.
- Make sure panel thickness is appropriate for the existing assembly.
- Correct protruding or damaged fasteners.
- Check flatness requirements for the selected finish floor.
- Replace damaged underlayment separately from structural subfloor where appropriate.
- Follow the flooring manufacturer’s moisture and substrate requirements.
- Photograph the completed structural repair before it becomes concealed.
Bathroom Subfloor Damage Often Starts Around Penetrations
Bathrooms concentrate several water sources within a small floor area. Toilet connections, tub and shower drains, supply piping and waterproofed wet areas all penetrate or terminate near the floor assembly. Repeated small leaks can therefore damage a limited section of subfloor for a long time before the finished floor shows an obvious failure.
Damage around a toilet often deserves particular attention because the fixture can hide staining and movement. If the panel surrounding the connection has lost integrity, replacing the seal alone does not restore the damaged structural material. The repair must establish a sound substrate around the fixture as well as correct the source.
Shower and tub losses can be more difficult to trace because water can originate at plumbing, drainage or waterproofing layers and then travel along framing. A wet area beside the fixture does not prove the nearest visible joint is the source. The investigation should follow the moisture pattern through the surrounding assembly before the bathroom is rebuilt.
Kitchen and Appliance Leaks Can Spread Under Cabinets
Dishwashers, refrigerator water connections and sink plumbing can release relatively small amounts of water repeatedly without producing an obvious room-wide flood. Water can remain beneath cabinets or appliances where airflow is poor and then migrate into panel seams. The subfloor may therefore sustain greater exposure than the visible finished floor suggests.
Cabinet toe-kicks and appliance cavities can provide useful access points during diagnosis. Inspecting those areas can reveal the earliest staining and help determine whether water originated inside the cabinet zone or migrated there from somewhere else. Unnecessary cabinet removal may be avoided when the source and wet boundary can be established through more targeted openings.
A repaired appliance should be tested under realistic operating conditions before the floor is closed. A dishwasher that leaks only during a drain cycle or a refrigerator connection that seeps only while the ice maker operates may appear dry during a brief static inspection. Source verification reduces the chance of rebuilding over a problem that was never actually reproduced.
What If the Floor Joists Are Also Water Damaged?
The joists below the subfloor should be evaluated separately because their structural role is different from the panel spanning across them. Surface staining on a joist does not automatically establish structural failure, but softness, decay, cracking, deformation or damage around bearings and connections deserves closer review. Long-running leaks can affect both the panel and the framing that supports it.
Do not assume a replacement subfloor panel will compensate for weakened framing. If a joist has been substantially deteriorated, the load path beneath the floor needs to be addressed before the structural surface above is restored. This becomes especially important beneath bathrooms, heavy fixtures, walls or other areas where concentrated loads may occur.
Structural repair strategies depend on the actual framing arrangement and extent of damage. Sistering, reinforcement, replacement or engineered repair may be appropriate in different circumstances, but those decisions should be based on the building and the damaged member rather than a generic internet dimension. Significant framing deterioration is a strong reason to involve an appropriate building professional or experienced structural repair contractor.
Can Water-Damaged Subfloor Develop Mold?
A persistently damp wood-based panel can support mold growth when moisture and other environmental conditions remain favorable. Mold may develop on the panel surface, dust, flooring backing or adjacent framing, particularly where layers stay concealed and airflow is limited. If visible growth or persistent musty odor appears, the moisture source remains the first problem that needs to be resolved.
The presence of surface mold does not by itself reveal whether the subfloor has lost structural strength. Mold assessment and structural assessment answer different questions, although prolonged wetting can contribute to both biological growth and wood deterioration. Readers who are also seeing broader moisture-related symptoms can review the early signs of mold damage separately from the structural floor decision.
Heavy contamination, sewage exposure or widespread biological deterioration makes DIY handling less appropriate. Porous materials can be difficult to restore after contaminated water exposure, and opening a floor may disturb material concealed for a long period. The restoration plan should account for contamination before aggressive demolition, sanding or airflow is introduced.
How Can You Prevent Subfloor Water Damage From Returning?
Prevention begins with the source that caused the original loss. Replace or repair failing supply connections, maintain appliance hoses and valves, correct bathroom waterproofing defects, repair drainage problems and investigate recurring crawlspace or basement moisture. A generic waterproof coating applied to the subfloor is rarely a substitute for correcting the mechanism that repeatedly wets it.
Areas beneath water-using appliances benefit from early detection because small leaks can remain concealed for weeks or longer. Accessible shutoff valves, correctly installed drain pans where appropriate and leak sensors can shorten the time between failure and discovery. The best preventive system is one that makes hidden water visible before the panel absorbs enough moisture to change physically.
Bathrooms and kitchens should also be inspected after plumbing work or renovation. A newly installed fixture can introduce a slow connection leak, while replacement flooring can cover evidence from a pre-existing problem. Checking beneath accessible areas after normal use can expose small failures before cabinets and finishes conceal them again.
Crawlspaces and basements require environmental control rather than a purely upstairs response. Bulk water, plumbing leakage, persistent high humidity and condensation beneath the floor can keep structural wood damp even when the room above looks completely dry. The underside of the subfloor should therefore remain part of the investigation whenever the moisture source is uncertain.
A useful post-repair check
- Reinspect the source after normal fixture or appliance use.
- Look underneath the repaired area where access exists.
- Compare retained subfloor with nearby dry reference areas.
- Check whether swelling or movement is returning.
- Watch finished flooring for renewed cupping, lifted seams or discoloration.
- Confirm crawlspace or basement moisture has not returned.
- Recheck repaired areas after the building experiences the condition that originally caused the leak.
When Should You Call a Professional?
Professional assessment is appropriate when the floor feels unstable, joists may be affected, a large area is wet or the source cannot be identified. It is also valuable when cabinets, tile, multiple flooring layers or other assemblies prevent meaningful inspection without controlled removal. The cost of opening the correct area is usually lower than repeatedly repairing finishes above an unresolved structural problem.
A water-restoration professional can help establish the wet boundary and drying conditions, while a flooring contractor may be more relevant once the structural layer is dry and the finish needs replacement. Plumbing, appliance, waterproofing or exterior specialists may still be required to repair the original source. Large losses frequently involve more than one trade because source correction, structural drying and reconstruction are separate jobs.
Structural expertise becomes more important when joists or other framing members show deterioration, the floor sags significantly or a wall or heavy fixture bears near the affected area. Avoid relying on the new subfloor patch itself to solve uncertainty about damaged framing underneath. The finished surface should return only after the underlying floor system has been shown to provide dependable support.
Compare Local Home Specialists Near You
Tell us what kind of help you need, then compare nearby businesses by location, Google rating, review volume and contact options.
HomeFix Local Match
Turn a home problem into a practical local hiring decision. Check the clues, see the specialist types that fit, open focused surrounding-location searches, then compare the strongest three before you call.
 YOUR PROBLEM
YOUR AREA
COMPARE 3
✓ Ready to compare
YOUR PROBLEM
YOUR AREA
COMPARE 3
✓ Ready to compare
What is happening?
Choose the closest problem type, then check every clue that applies. Your selections change the specialist order.
Where should the search focus?
Use Google’s “near me” context or enter the area you actually want a specialist to serve.
Simple local search: open nearby Google results, choose the businesses that look suitable, then compare your best three here before you call.
Problem snapshot
Who should you call first?
These are the specialist types most likely to fit the clues you selected.
Search around your location
Compare your top three
Use the same factors for each option so a high star rating does not hide a weak scope, poor diagnosis, missing credentials or unclear aftercare.
Comparison result
Your result combines the Google signals you entered with the practical hiring checks you completed.
Questions to ask every finalist
Use the same questions with each shortlisted business so the comparison stays consistent.
Frequently Asked Questions
Does wet subfloor always need to be replaced?
No. A subfloor that became wet may sometimes be dried and retained when the source is corrected, the panel remains firm and bonded, contamination is limited and drying can be verified. Replacement becomes more appropriate when the panel is soft, delaminated, severely swollen, structurally deteriorated or unable to provide the substrate required by the finished flooring.
How do you know if a subfloor is rotten?
Advanced deterioration can produce softness, crumbling material, loss of stiffness, surface breakdown or excessive movement when the area is loaded. Staining by itself does not prove that wood has lost structural capacity. Suspected deterioration should be evaluated together with moisture history, panel condition and the framing underneath.
Can you dry a subfloor without removing the flooring?
Sometimes, particularly where the underside is accessible and the finish does not prevent the panel from releasing moisture. Impermeable flooring, wet padding, underlayment or adhesive layers can substantially restrict drying and inspection. Selective removal may be needed when the structural panel cannot otherwise be monitored or exposed effectively.
How long does a wet subfloor take to dry?
There is no reliable universal drying time because panel type, thickness, wetting depth, flooring layers, temperature, humidity and access all affect moisture movement. Surface appearance can improve before the center or underside of the panel reaches an appropriate condition. Repeat measurements and suitable dry reference material provide better guidance than waiting a predetermined number of days.
Can swollen OSB subfloor return to normal after drying?
Some dimensional change may reduce as OSB dries, but significant edge swelling can remain permanently. The important question is whether the panel remains sound, properly bonded, adequately flat and suitable for the flooring system that will be installed above it. Severe swelling accompanied by softness, flaking or loss of structural integrity supports a replacement decision.
Can I install new flooring over a previously wet subfloor?
Yes, when the moisture source has been corrected, the panel has dried appropriately and the remaining subfloor satisfies the structural, moisture and flatness requirements of the new flooring. A historical stain alone does not automatically prevent reuse. Installing a moisture-sensitive floor before the substrate is ready can create another failure even when the original leak is gone.
Should moldy subfloor always be replaced?
Visible mold does not automatically establish whether a structural wood panel must be replaced, because contamination and structural deterioration are separate assessments. The moisture source first needs to be corrected, then the extent, material condition and contamination should be evaluated. Widespread growth, contaminated water exposure, inaccessible assemblies or deteriorated panels make professional assessment more appropriate.
Subfloor Water Damage Action Checklist
A successful repair starts below the finished surface. Stop the source, establish how far moisture travelled, inspect the structural panel and framing, then decide whether the subfloor can return to dependable service after drying. A stain can remain on structurally sound material, while a clean-looking panel can still be soft or delaminated, so appearance should never be the only repair criterion.
Before flooring goes back down, confirm that retained material is dry enough for the intended flooring system, structurally sound, properly supported and sufficiently flat. Correct deteriorated framing before covering it, document concealed repairs and retest the original moisture source under realistic conditions whenever possible. That sequence prevents a cosmetic floor replacement from hiding the same structural problem underneath.