
Make hot fries by cutting potatoes into even sticks, drying them thoroughly and cooking until the center is tender and the outside is crisp. For a first batch, use an oven or air fryer if you want to avoid a pot of hot oil; choose double-frying when you have a thermometer and want a more pronounced crust. Add the spicy seasoning after cooking so you can judge the potato before the red coating hides its color.
Here, “hot fries” means freshly cooked potato fries with an adjustable chili seasoning, rather than a packaged corn-and-potato snack. The recipe starts with 500 g of potatoes, enough for about two generous side portions, and gives three cooking routes that share the same preparation. Pick one route; you do not need to combine them.
Swipe horizontally to compare if the table extends beyond your screen.
| Route | Starting settings | Choose it when |
|---|---|---|
| Oven | 425°F / 220°C conventional; start checking at 25 minutes, often 30-40 minutes total. | You have a large metal sheet and prefer to avoid deep-frying. Turn midway. |
| Air fryer | About 350°F / 180°C; check from 18 minutes, often 20-30 minutes total. | You are making a small batch with room for air movement. Shake 2-3 times. |
| Double-fry | First about 300°F / 150°C until tender and pale; rest, then about 350°F / 175°C until crisp. | You have an oil thermometer and can attend the pot continuously. |
| Every route | These are checking ranges, not guaranteed finish times. | Check the center and the plain potato color before seasoning. |
The useful distinction is between cooking the middle and drying the surface. A fry can look browned while its center is still firm, or feel cooked through while its exterior remains soft. Build the texture first, then add heat from spices: that order makes a disappointing batch easier to diagnose and keeps seasoning from becoming a substitute for correct cooking.
What should you prepare before making hot fries?
Ingredients for one 500 g batch
Start with firm russet potatoes, or a floury potato sold as suitable for frying. Their relatively dry, starchy flesh suits a soft interior with a crisp outside; yellow potatoes can work but may give a creamier center. Choose similar-sized potatoes to make cutting easier. Leave the skin on if you enjoy it and can scrub it clean, or peel it for a smoother surface.
- Potatoes: 500 g, weighed before trimming; cut into sticks about 8-10 mm thick.
- Oil for the oven: 2 tablespoons of a neutral oil suitable for the cooking temperature.
- Oil for the air fryer: 1 tablespoon of the same type of oil, coating the potatoes rather than filling the drawer.
- Oil for deep-frying: enough to submerge a small batch while keeping a deep, heavy pot no more than one-third full before food is added; follow a countertop fryer’s own fill marks instead.
- Dry seasoning: 1 teaspoon paprika, ½ teaspoon garlic powder, ¼ teaspoon fine salt and ⅛ teaspoon cayenne pepper. This makes a modest starting blend; chili strength varies.
- Optional at the table: extra salt or cayenne in small amounts, and a dip served separately.
Cut sticks that cook at the same rate
Scrub the potatoes under running water, remove any damaged areas and peel if desired. Cut a thin slice from one side so each potato sits flat on the board. Cut lengthwise into 8-10 mm planks, then cut those planks into sticks of roughly the same width. Keep your supporting fingertips tucked into a claw grip and work slowly enough to control the blade.
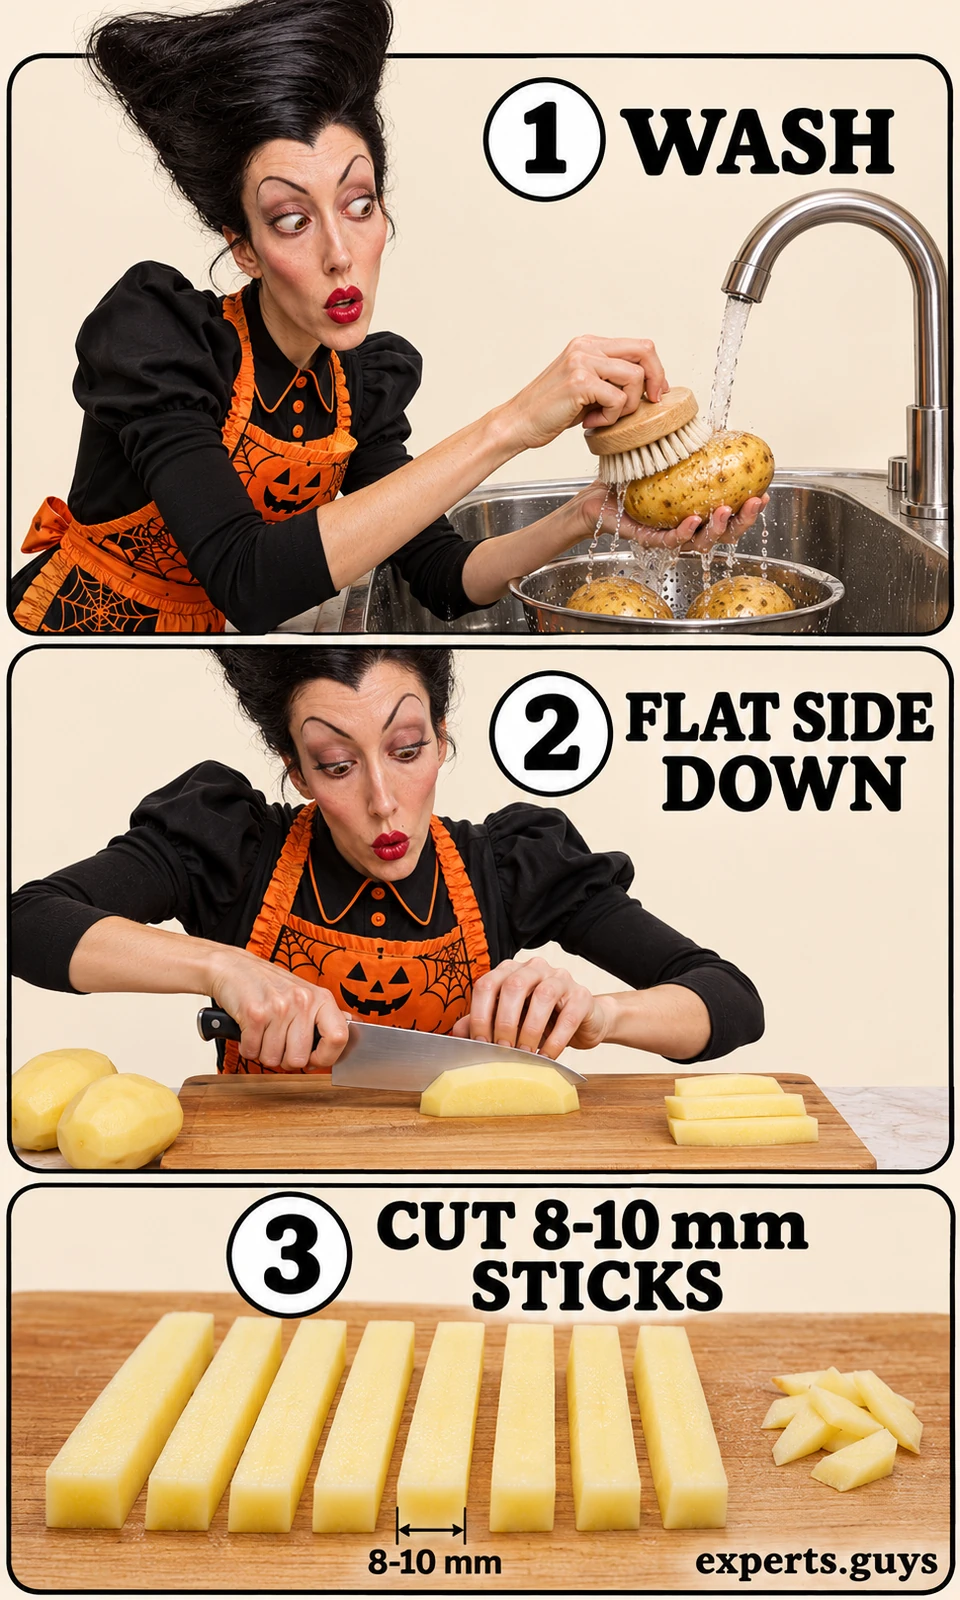
An 8 mm stick and a 10 mm stick are both reasonable, but a tray mixing tiny matchsticks with thick wedges is difficult to finish evenly. Put very thin offcuts aside for another use rather than asking them to survive the same cooking time. You do not need to square off every potato into a perfect block; a little variation in length matters less than a large difference in thickness.
For a concrete comparison, imagine two sticks that are equally long but one is twice as thick. Their surfaces may color at similar times while heat still has farther to travel into the thicker one’s center. Turning the heat up to finish that center can burn the thinner pieces. Correcting the cut before cooking is more effective than trying to rescue the mixed batch with extra seasoning.
Soak, drain and dry the cut potatoes
Cover the sticks with cold water for 15-30 minutes, then drain them in a colander. Spread them on a clean towel, cover with a second dry towel and blot all sides, separating pieces that cling together. Move them to a dry part of the towel if it becomes saturated. The checkpoint is a surface without visible droplets or a wet sheen; a quick shake in the colander is not enough.
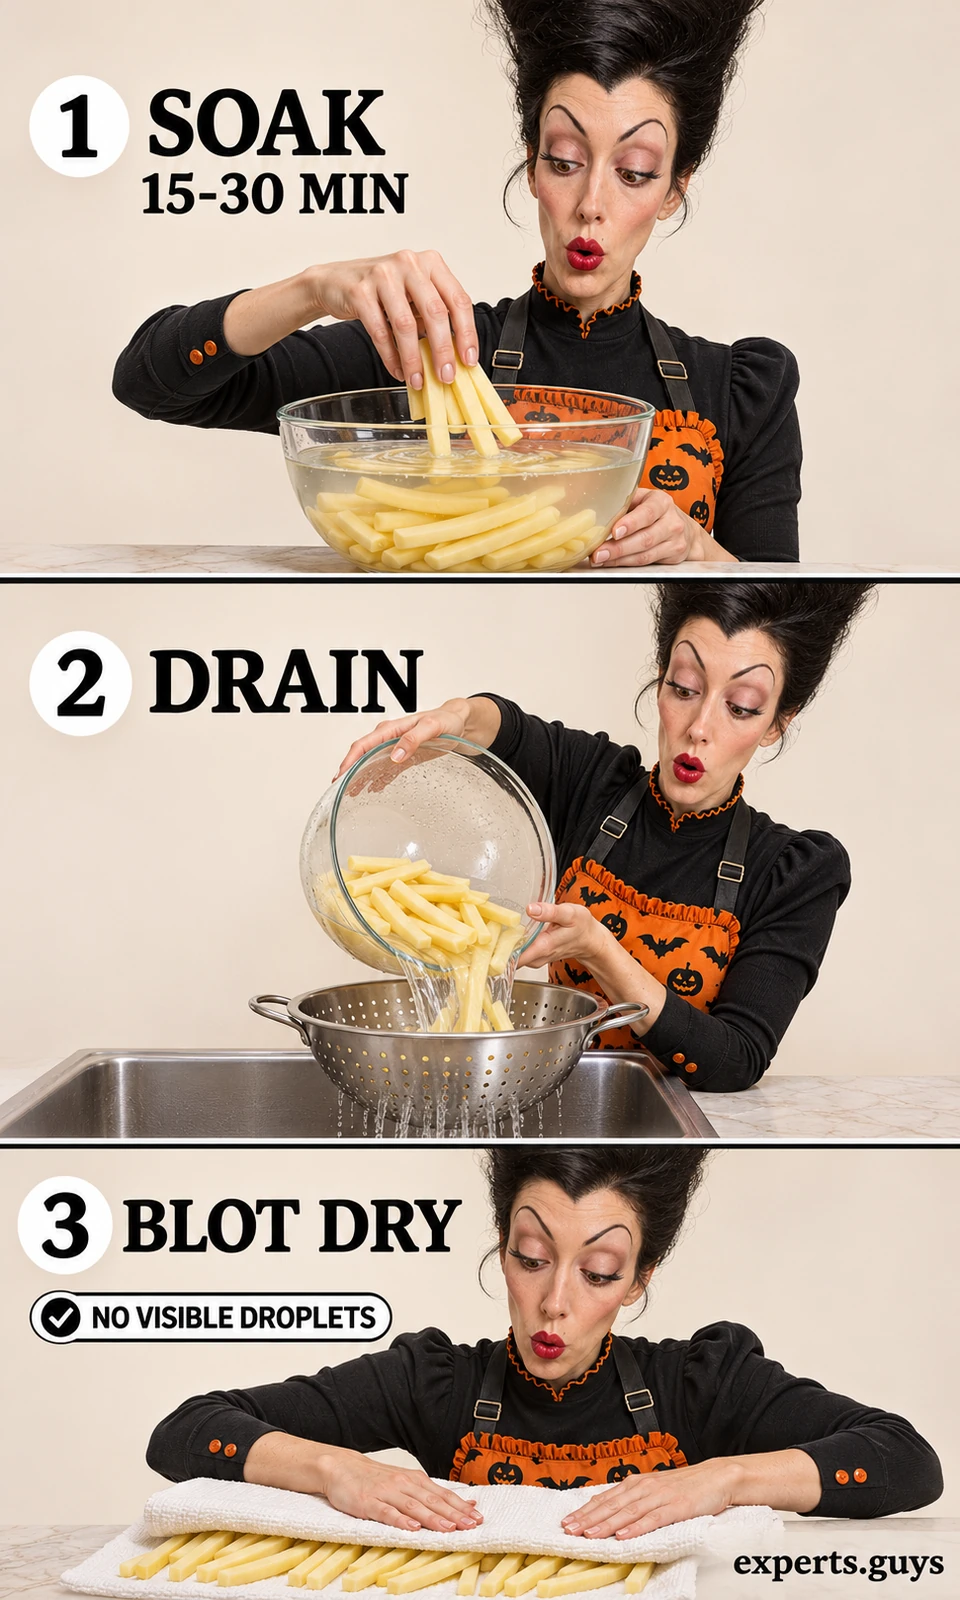
Soaking loosens surface starch, while drying removes the water you just added. Those steps do different jobs. For deep-frying, residual water is also a splatter hazard; never put wet potatoes directly into hot oil. FDA potato-preparation guidance also supports a 15-30-minute soak before frying or roasting and cooking cut potatoes to golden yellow rather than dark brown to help reduce acrylamide formation. That is a useful cooking practice, not a claim that these fries are risk-free.
There is no need for an overnight soak in this beginner method. Keep the preparation manageable and cook after drying. If knife work and soaking are the obstacle, plain frozen potato fries offer a simpler route, but they are a different starting ingredient: follow their package instructions and skip this raw-potato soak. Do not apply a fresh-potato timetable to a coated frozen product.
Which cooking method should a beginner use?
Set up the equipment before the heat
Have a stable chopping board, a sharp knife, a bowl for soaking, a colander and clean absorbent towels ready. You also need a large dry bowl for seasoning and a wide serving dish. For oven cooking, use a sturdy rimmed metal sheet and a turner; for air frying, use the appliance basket as intended by its manual. Deep-frying additionally needs an oil-rated thermometer, a long-handled spider or slotted utensil, a rack over a tray and a lid that fits the pot.
Do not improvise deep-frying around missing equipment. A timer, a floating bread cube or the amount of bubbling cannot replace an oil thermometer, and a food probe is suitable only if its manufacturer permits the temperature and immersion involved. If you cannot measure and manage the oil, use one of the hot-air routes. The choice changes the texture and workflow, rather than making one method universally best.
Start with the constraint that matters
Choose the oven when you have a suitable sheet pan and want to cook a side dish without managing hot oil. Choose the air fryer for a smaller batch when you can leave room around the sticks. Double-fry when the crust matters enough to justify temperature control, two cooking stages and attentive handling. These are practical choices based on capacity and process; none guarantees an identical result across every potato and appliance.
The broader explanation of how cooking methods change food texture covers heat transfer across many foods. Here, the job is narrower: get these cut potato sticks tender before their surfaces become too dark. All times below are checking windows. The dimensions of the sticks, amount of food, starting temperature and actual appliance heat determine when the batch is done.
Double-fry: cook the center, then crisp the surface
Use a refined neutral oil labeled as suitable for frying, such as canola or sunflower oil. The oil must tolerate the intended temperature, but a high smoke point does not make overheating harmless. Keep the pot stable on a suitable burner, turn its handle away from the edge, keep children and pets clear and stay beside it throughout cooking. Loose sleeves, hanging fabric and hair must be secured away from heat.
- Heat the first bath: With the oil thermometer correctly positioned away from the pot base, bring the oil to about 300°F / 150°C. Keep a clear working area and the draining rack ready.
- Lower a small, dry batch: Use the long-handled utensil to lower the sticks gently, close to the oil surface. Start with roughly 100-125 g from the 500 g batch, reducing that amount if the pot is small or the oil temperature falls sharply. Never drop in the entire batch at once.
- Cook until tender and pale: Begin checking around 3 minutes; 8-10 mm sticks may need roughly 3-6 minutes or longer. Remove a stick, let it cool enough to handle and split it. The center should yield without a hard raw core; the outside is not expected to be crisp yet.
- Drain and rest: Lift the potatoes onto the rack in a shallow layer. Let the surface stop steaming vigorously, usually several minutes, while you finish the first pass for the remaining potatoes. Keep this as one continuous cooking session.
- Make the second pass: Bring the oil to about 350°F / 175°C. Fry the rested sticks in small batches, beginning checks around 2 minutes, until the surfaces are crisp and golden yellow, often about 2-4 minutes. Let the oil recover between batches.
- Remove and drain: Lift out the fries, let excess oil drip back into the pot and place them on the rack briefly. Move them to the seasoning bowl while still hot.
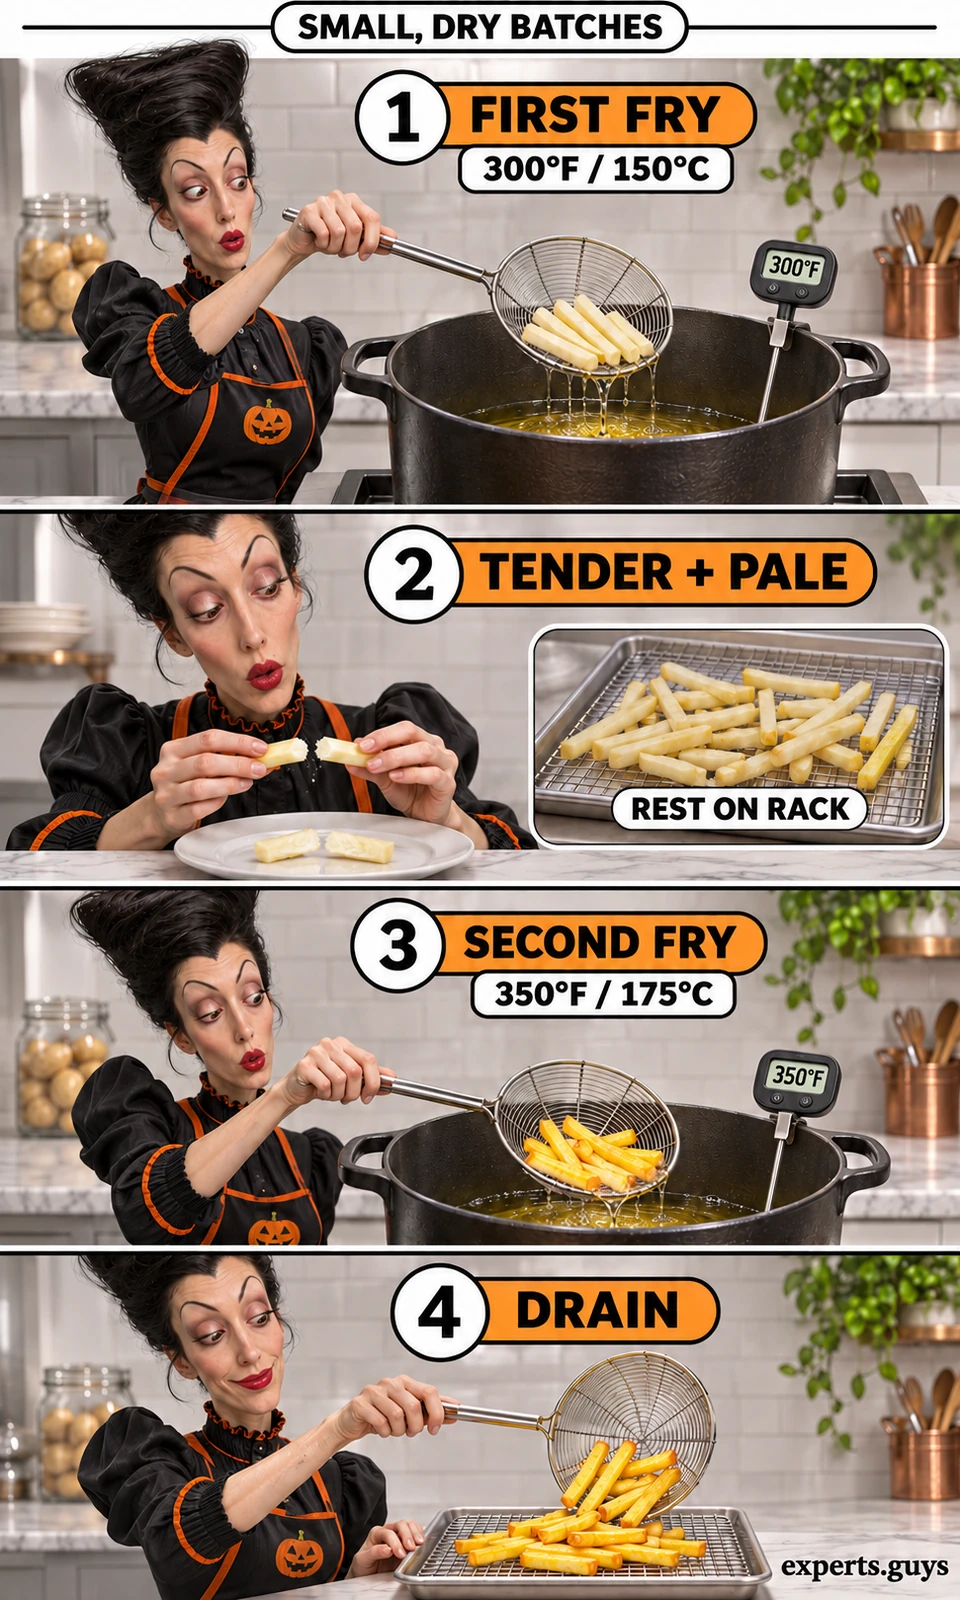
The two temperatures separate two tasks: the first pass softens the potato without demanding a finished crust; the hotter second pass dries and crisps its exterior. Potatoes USA’s two-stage fry method uses the same lower-then-higher temperature approach. The timing here is a checking range for the stated stick size; actual cooking depends on the potato and heat recovery. If the first pass leaves a hard center, finish that stage before moving on rather than relying on a darker second fry to conceal it.
If the oil smokes, turn off the heat and let it cool; do not add more food to cool it down. If a small contained pan fire starts and you can act safely, turn off the heat and slide the fitting lid over it. Never use water, move a burning pot or reach through flames. Leave and call local emergency services if the fire is spreading or you cannot cover it safely. Keep the cooking-fire safety guidance in mind before starting, not after the oil is hot.
Oven fries: expose the surfaces to dry heat
Preheat a conventional oven to 425°F / 220°C with a rack near the middle. Toss the dried 500 g of sticks with 2 tablespoons of oil in a dry bowl, then spread them on a lightly oiled rimmed metal sheet. Leave visible gaps between the fries. If the pan is too small, use two batches rather than a deep pile; a crowded pan changes the method into steaming and roasting unevenly.
Bake for about 15-20 minutes, then turn the fries with a turner and separate any pieces that have stuck together. Continue cooking, checking from about 25 minutes total; many batches take roughly 30-40 minutes, but remove individual thin pieces sooner if they finish first. Check a cooled sample for a tender center and dry, crisp edges. The useful endpoint is golden yellow potato, not uniformly dark-brown sticks.
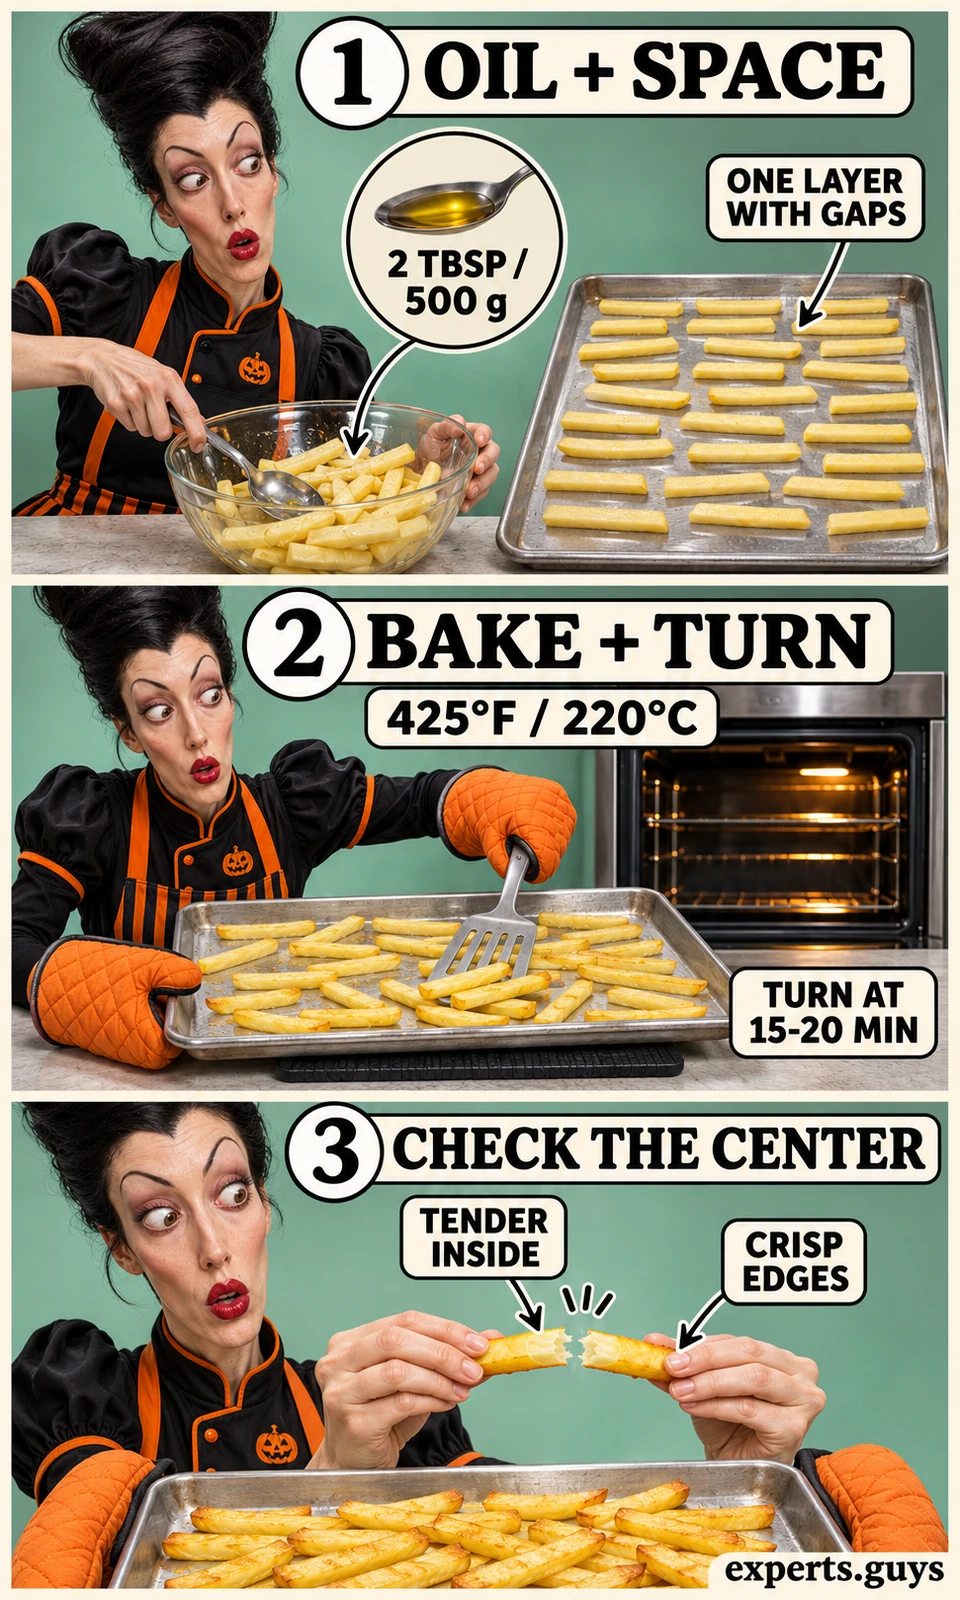
A metal sheet gives the underside contact heat while hot air dries the upper surfaces. Turning exposes another face and helps you spot pale, crowded areas. If fries resist the turner, ease them loose carefully rather than scraping aggressively or tearing every piece; a little more cooking can help a surface release. Use dry oven mitts and keep your face away from the hot-air plume when opening the oven.
The temperature is a practical starting point, not permission to ignore your pan’s limits. Follow the cookware manufacturer’s guidance, especially for nonstick coatings or any liner. If your oven has a strong fan, use its recommended conversion or start around 400°F / 200°C and check earlier. Do not set a grill or broiler to maximum to compensate for a full tray: direct radiant heat can darken the exposed edges before the centers soften.
Air-fryer fries: use the basket space you have
Coat the dried potatoes with 1 tablespoon of oil, then transfer only enough to make a loose, shallow layer with room for air movement. For a small basket, divide the 500 g batch in two. Follow the manual for preheating and maximum load, and keep ventilation openings clear. Do not pour oil into the drawer or add water as a preparation step for this recipe.
Cook around 350°F / 180°C, shaking or turning the fries two or three times during cooking so hidden surfaces become exposed. Begin checking around 18 minutes; roughly 20-30 minutes is a useful planning range for fresh sticks of this thickness, with some models or loads needing longer. Use mitts as required, keep clear of escaping steam and place the hot drawer only on a heat-safe surface. Stop when the center is tender and the outside is crisp and golden yellow.
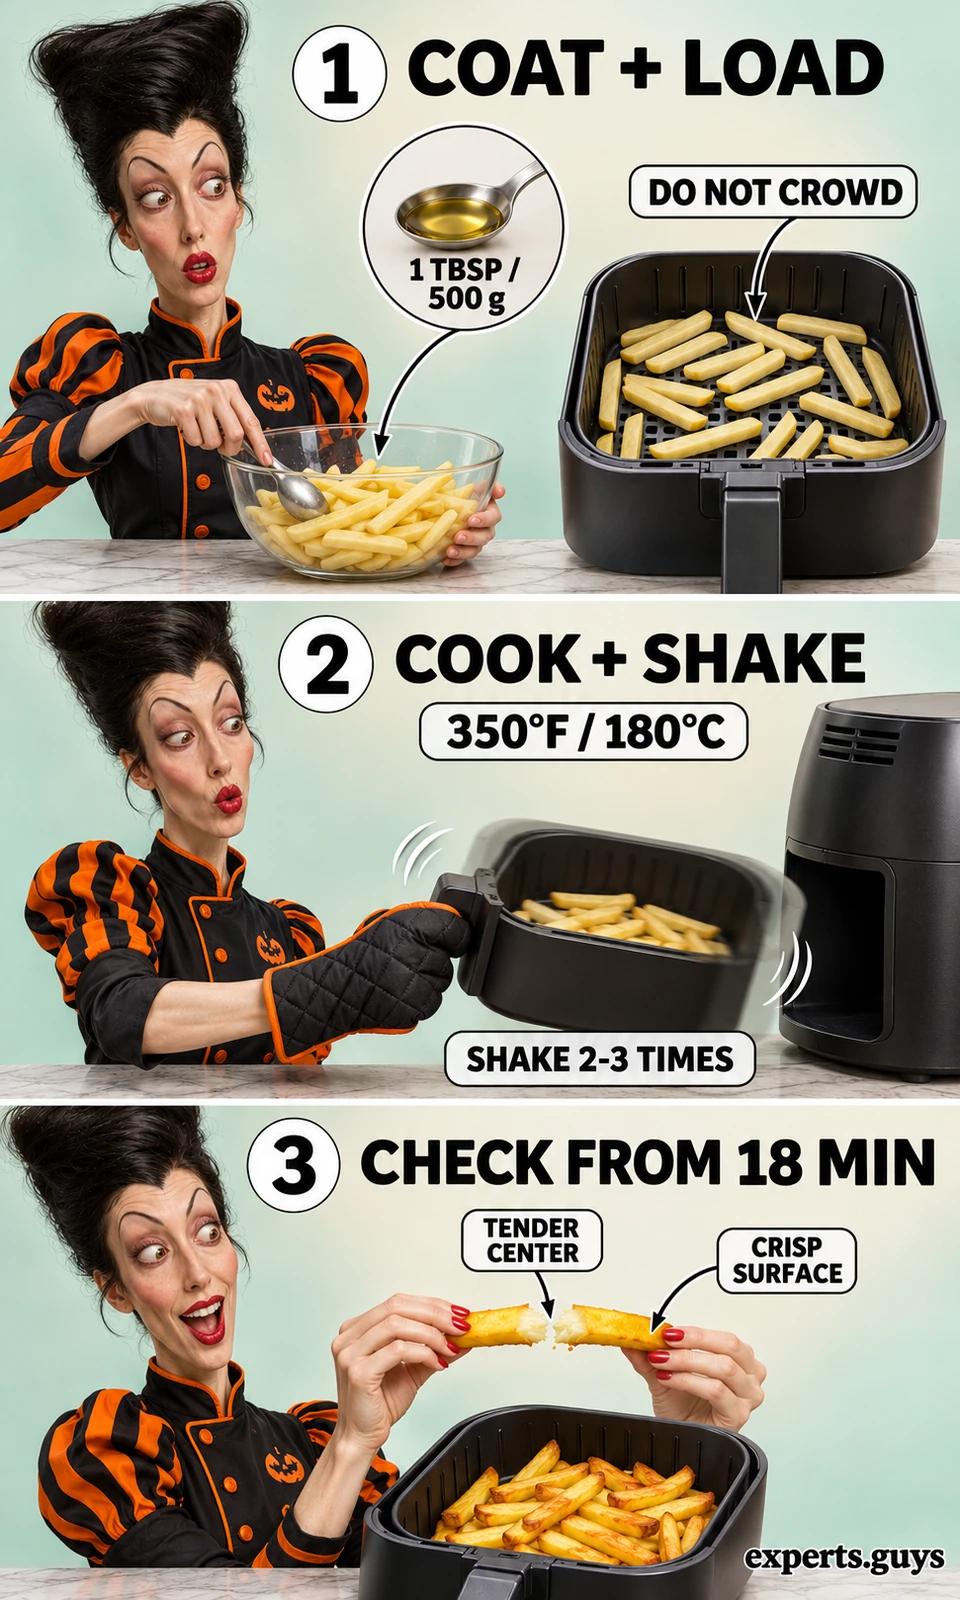
Manufacturer guidance illustrates why a universal “15-minute fries” promise is unreliable. Philips’ homemade-fries advice specifies a controlled load, oil coating and repeated shaking; your own model’s instructions take priority over another model’s time. A preset is a starting program, not a sensor that knows whether every stick has cooked through.
For example, suppose your basket only holds about 250 g in a loose layer. Divide the 500 g of dried sticks into two portions and coat each with ½ tablespoon of oil, keeping the total recipe amount at 1 tablespoon. Cook the first portion through its own checks, then cook the second the same way. Do not double the timer for a double quantity or push both portions into the basket to preserve the original schedule.
If you want both portions on the table at their best, serve them as two small batches. Keeping the first batch covered while the second cooks solves a scheduling problem by creating a moisture problem. For a meal that needs everything ready together, the oven may be the more convenient choice if its sheet has room for all the sticks in one spaced layer.
Do not borrow the timing from a whole air-fryer baked potato. A whole potato has a different distance from surface to center and a different moisture barrier. Likewise, sweet-potato fries need their own recipe because their browning and texture are different. Keeping these jobs separate prevents a familiar appliance setting from becoming an unreliable rule for unrelated ingredients.
How do you make fries spicy without making them soggy?
Mix a dry blend before the fries finish
Use ordinary paprika for a straightforward pepper flavor, or smoked paprika if you want smoke as well as heat. Neither is interchangeable with cayenne by volume: paprika contributes most of the blend’s color, while the small cayenne portion controls much of its sharpness. A commercial “chili powder” may contain cumin, salt or other ingredients, so check the label before treating it as pure ground chili.
The seasoning quantities are a starting formulation, not a calibrated heat level or a claim that everyone will find them mild. For someone who avoids chili, leave the cayenne out completely and season their portion first with paprika, garlic and salt. You can add cayenne to the remaining fries afterward without changing how either portion is cooked.
Combine the paprika, garlic powder, fine salt and cayenne in a small dry bowl while the potatoes cook, away from the hot pot or open oven. Break up any clumps with a spoon. Fine powders coat more evenly than coarse salt crystals or large chili flakes, so the first mouthful is less likely to be bland while the next has a concentrated pocket of chili.
Keep the blend separate from raw potatoes in this method. Paprika and garlic can darken during prolonged high heat, making it harder to tell whether the potato itself is overcooking. Adding the red blend afterward preserves a clearer golden-yellow cooking checkpoint and gives you a chance to divide mild and spicy portions. It also avoids trying to measure spices while the finished fries sit steaming in a heap.
Drain briefly, sprinkle gradually and serve openly
For deep-fried fries, let excess oil drip off before the short rack drain; for oven and air-fryer fries, transfer them directly from the cooking surface. Put the hot fries into a large dry bowl, sprinkle over about half the seasoning and turn them gently with a spoon or a few controlled bowl tosses. Add more only after a cooled sample shows what the first coating tastes like. Use the bowl away from the heat source.
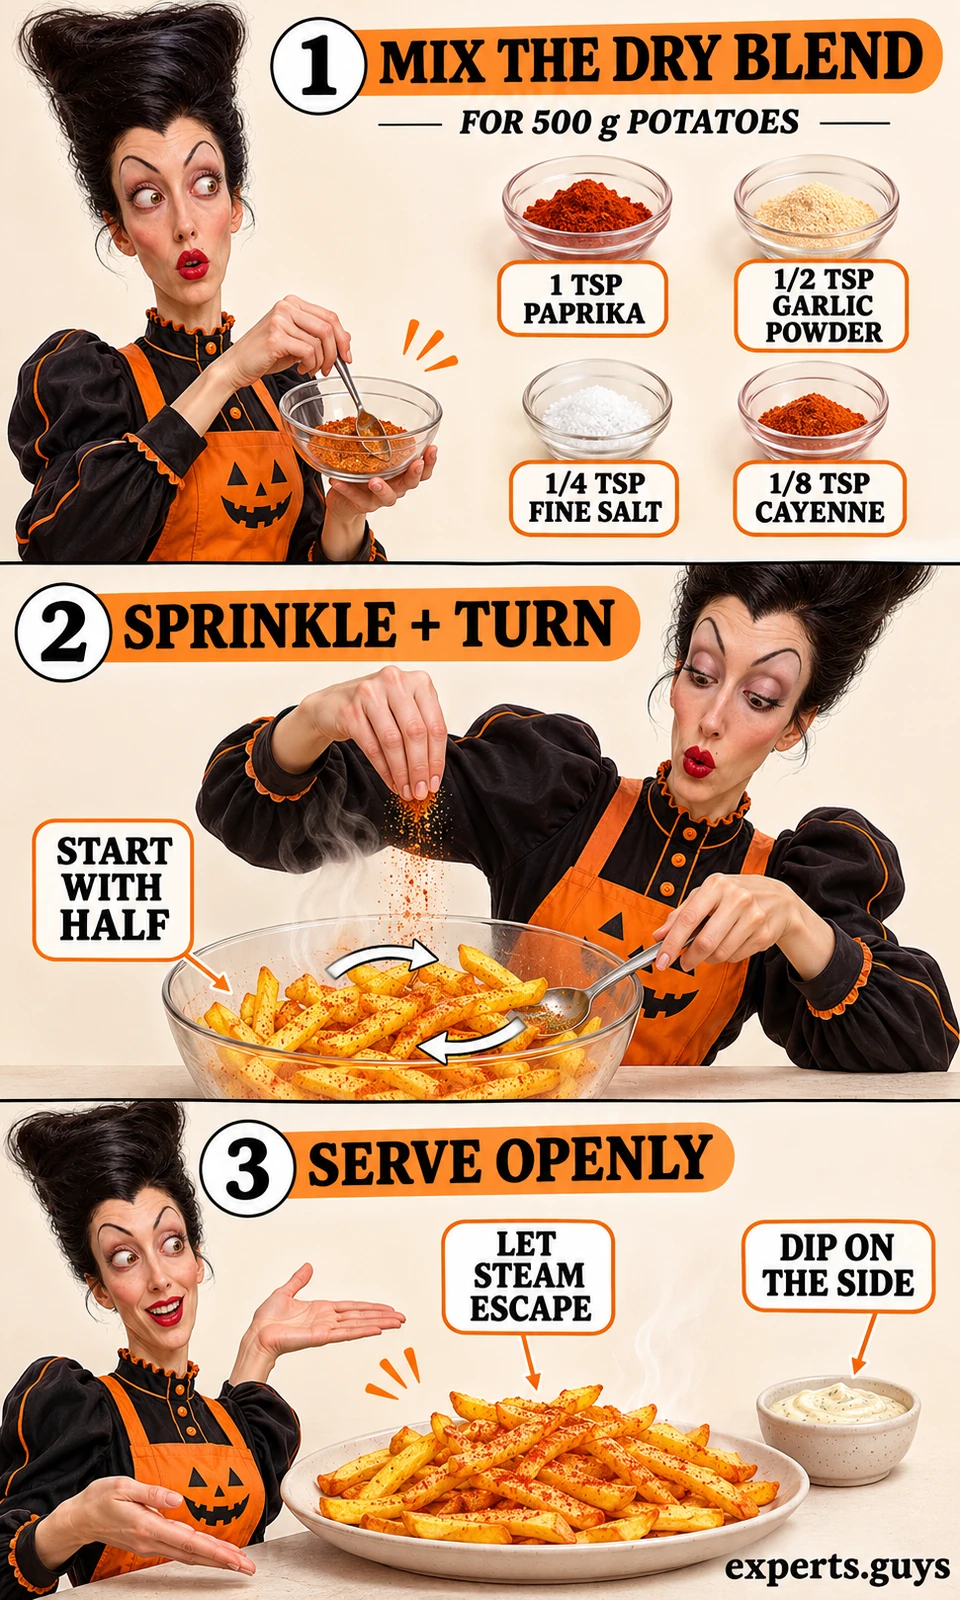
The thin oil film already on the fries helps dry seasoning adhere. You are not trying to soak the potatoes in another layer of oil or melted butter. If some seasoning collects at the bottom, turn the fries once more rather than pouring the entire residue over one serving. Keep hot sauce and dips in a separate dish when retaining the crust matters; a wet coating changes the surface you just worked to dry.
Serve in a broad dish with room for steam to escape. A deep bowl, tight lid or foil tent traps moisture around the fries and softens the crust. For a group, bring out smaller finished batches instead of building one large covered mound. This is a serving decision with a texture trade-off: cooking everything early is convenient, but the last fries can lose crunch while waiting for the first batch to be served.
The explanation of why crispy food feels satisfying covers the wider sensory appeal of crunch. For this recipe, the practical checkpoint is simpler: compare a freshly exposed fry with one buried under a steaming pile. Preserving the cooked surface at serving time matters as much as adding the right amount of chili.
Why did the fries turn out soft, dark or uneven?
Check the plain potato before changing the seasoning
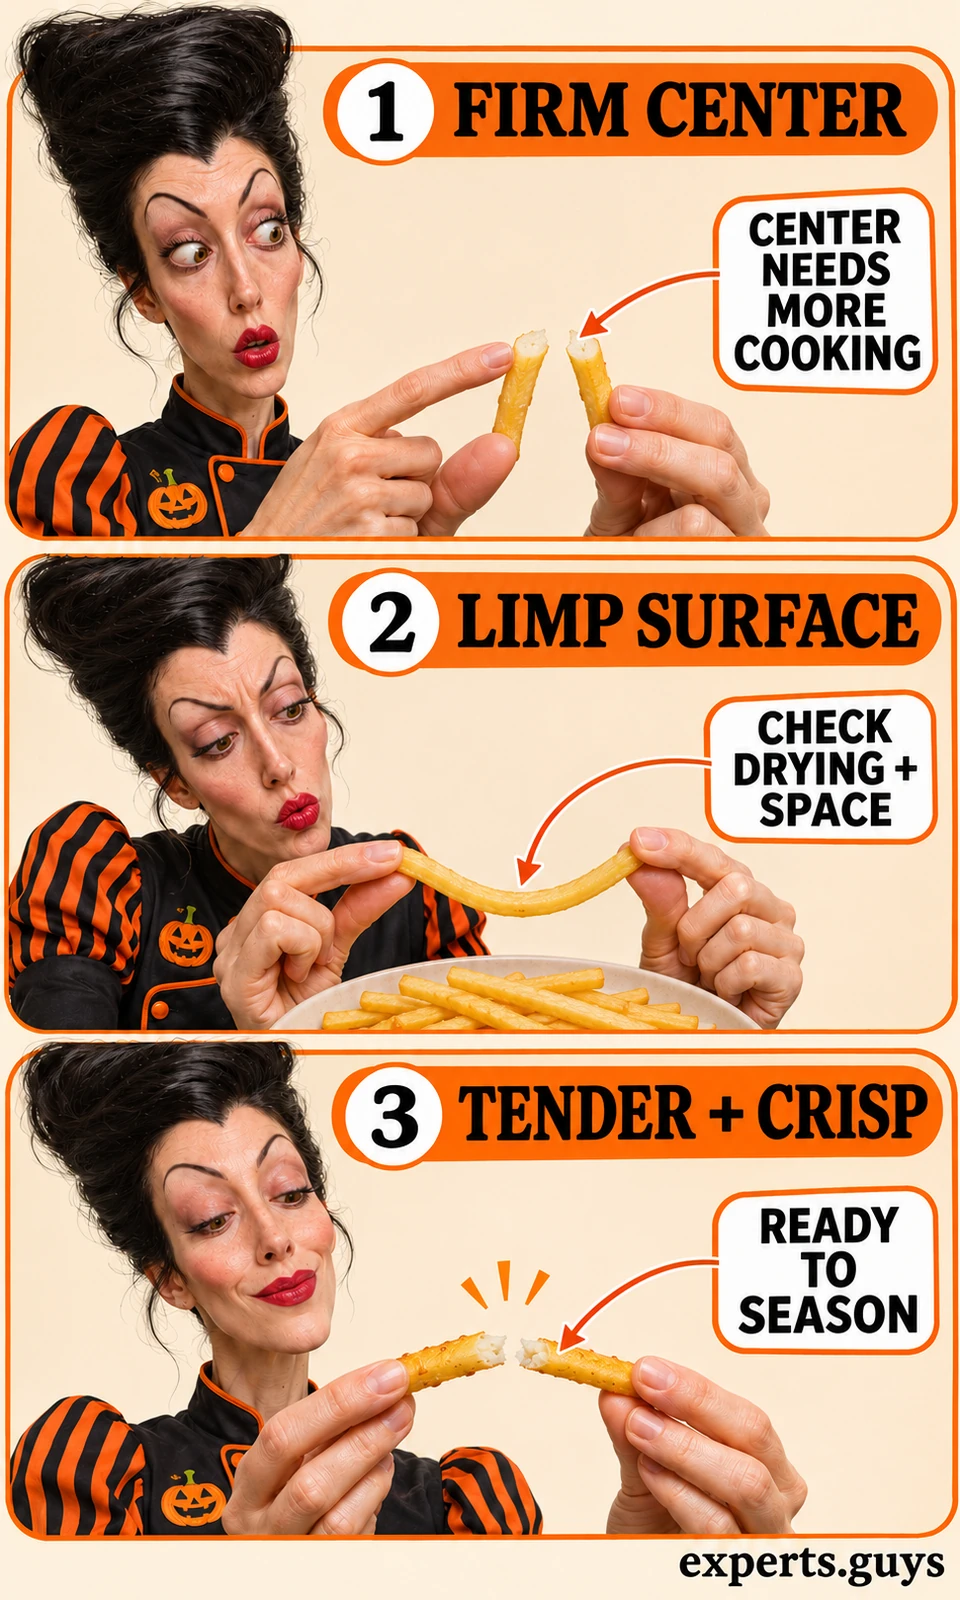
Remove one representative fry from a thicker part of the batch, let it cool enough to handle and break it open. Look at the unseasoned surface and the center separately. A firm, chalky core points to incomplete cooking; a soft center with a limp exterior points toward a surface-drying or holding problem. These are kitchen clues, not laboratory measurements, so compare more than one piece if the cuts vary.
Swipe horizontally to compare if the table extends beyond your screen.
| What you notice | Likely issue | What to change |
|---|---|---|
| Brown outside, firm center | Sticks are too thick, mixed in size or cooking too hot. | Remove dark pieces. For the next batch, cut evenly and complete the center-cooking stage before chasing a crust. |
| Tender but pale and floppy | Surface water, crowding or too little effective heat. | Dry more thoroughly; reduce the load and expose more surfaces. Check actual heat rather than adding oil blindly. |
| Good at first, soft on the plate | Steam trapped in a pile or under a cover. | Serve a shallower layer promptly with dips separate. |
| Later fried batches greasy or pale | Oil did not recover between additions. | Wait for the measured temperature to recover; lower a smaller dry batch. |
| Uneven chili coating | Clumped seasoning or too much added in one spot. | Break up the blend first and sprinkle gradually while turning the fries. |
| Bitter or scorched flavor | Burnt potato or overheated seasoning. | Discard burnt pieces. Check potato color before adding the dry blend after cooking. |
When several things went wrong, change the variable closest to the failure. For example, if the first few fries are good but the next portion is pale and greasy, the potato variety did not change between those batches; oil recovery and batch size deserve attention first. If every thick piece has a firm core while thin pieces are done, correct the cut and the center-cooking stage rather than adding salt or more cayenne.
Do not keep cooking already dark fries in pursuit of a louder crunch. Set aside burnt pieces, reduce the heat if needed and revise the next batch’s thickness, load or checking point. The FDA color guidance applies to the plain potato; paprika can make a finished batch look red without indicating the same browning. That is another reason to inspect texture and color before seasoning.
Cool, store and reheat leftovers safely
Fries are best for texture soon after cooking, but leftovers still need proper handling. Put them into a shallow container and refrigerate promptly rather than waiting for them to become completely cold on the counter. Use a refrigerator at 40°F / 4°C or colder. Refrigerate within 2 hours, or within 1 hour when the surroundings are above 90°F / 32°C; use refrigerated leftovers within 3-4 days. These handling limits follow USDA leftover-storage guidance.
For reheating, take the portion you will eat, spread it loosely on a tray or in the air-fryer basket and begin around 350°F / 180°C. Check early and turn as needed. Heat the leftovers throughout to 165°F / 74°C, following USDA reheating guidance; use a suitable thin-tip food thermometer in the thickest pieces where possible, without touching the hot tray. Time alone is unreliable for different quantities and starting temperatures.
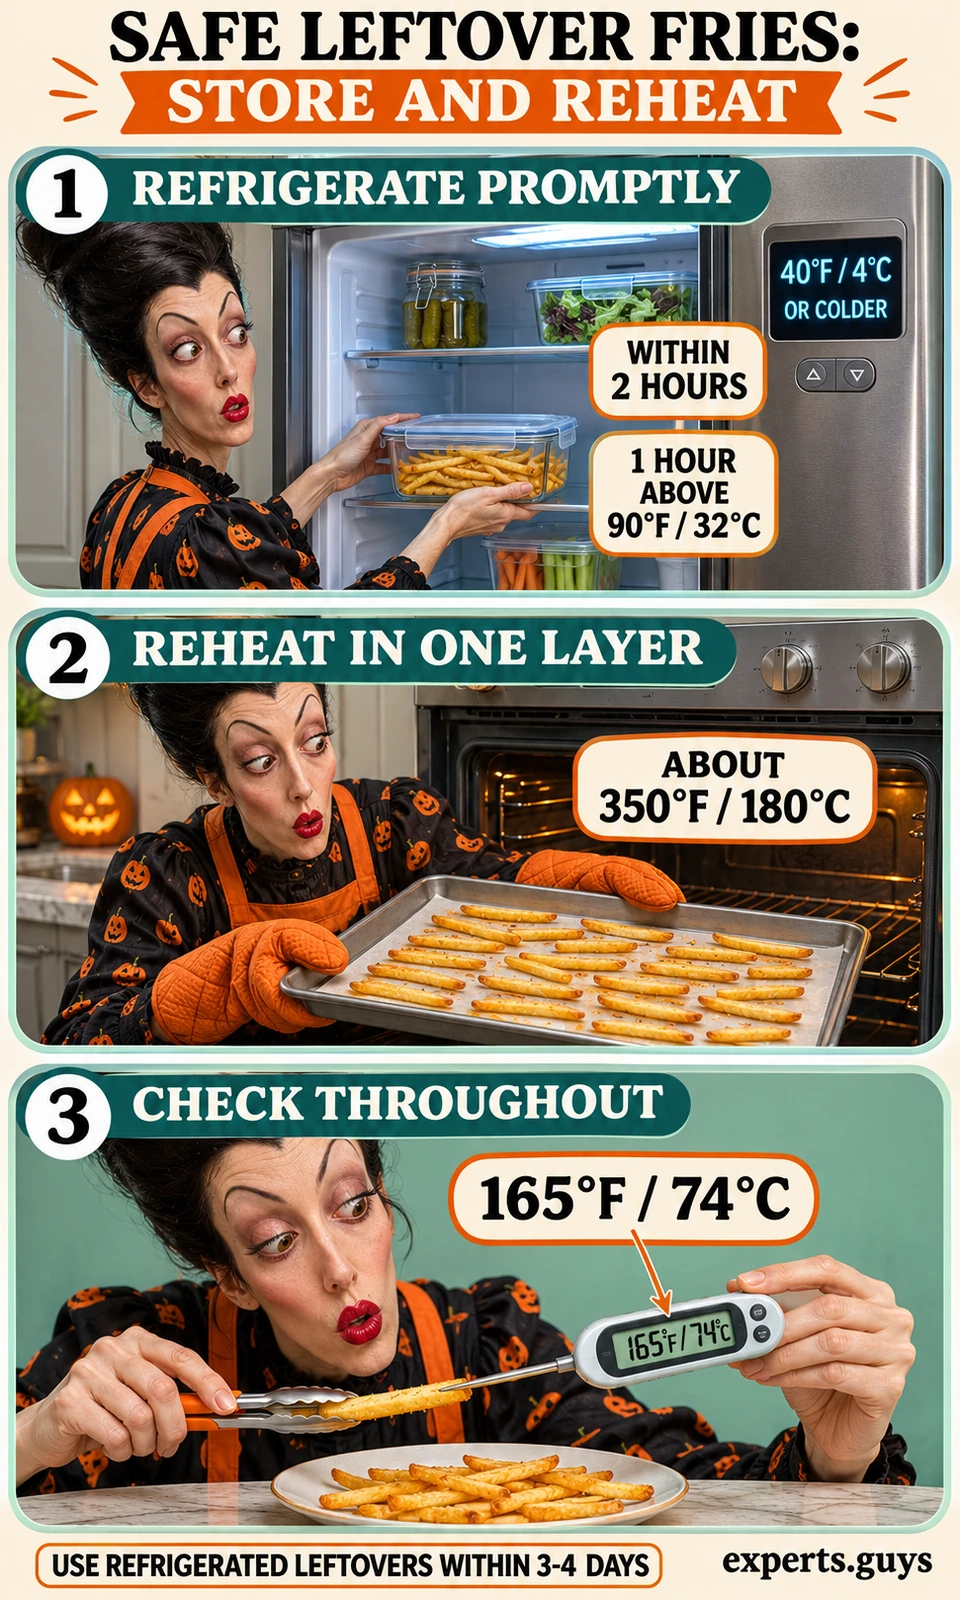
Reheating can improve the surface, but it does not guarantee the original crunch or make poorly stored food safe. Discard fries that exceeded the room-temperature limits instead of trying to rescue them with stronger heat. Reheat only the portion you need and keep wet dips separate until serving. Freshly added cayenne can change flavor, but it cannot repair a burnt surface or an underheated leftover.
Frequently asked questions
Are these the same as packaged hot-fries snacks?
No. This recipe uses cut potatoes. Packaged hot-fries snacks may use cornmeal, potato ingredients, oils and flavorings in a manufactured shape. Their texture and ingredient list are different, so this is not a copycat formula or a claim to match a particular brand.
Can I use frozen fries instead of cutting potatoes?
Yes, if you use the cooking directions for that specific product. Do not soak or thaw frozen fries for this fresh-potato procedure; many already contain oil, salt or a coating. Cook first, check how salty they are, then add a reduced amount of the dry seasoning. Package times take priority over the fresh-potato ranges here.
Do I have to add cornstarch or flour?
No. Neither is part of this recipe. A coating creates another variable and can obscure whether drying, cut size and loading are correct. Start without it so you can assess the potato itself; use a dedicated coated-fries recipe if you later want that different crust.
Are air-fryer hot fries automatically low-calorie?
No. The appliance does not determine the whole serving. Potato quantity, added oil, dips and toppings all affect what you eat. This recipe does not provide a calculated calorie figure, and its oil quantities cannot be used to estimate deep-fried oil absorption.
What should I do with the deep-frying oil afterward?
Turn off the heat and leave the pot undisturbed until the oil is completely cool, out of reach of children and pets. Keep oil out of sinks and drains; use your local waste guidance for disposal. Do not try to pour, strain or carry hot oil. This beginner guide does not prescribe a reuse schedule because oil condition and previous heating vary.
Next steps
For your first attempt, make the 500 g batch using one cooking route and the measured dry seasoning. Before adding the spices, check one thicker fry for a tender center and a golden-yellow, crisp surface. If that checkpoint is right, season and serve; if it is wrong, use the relevant correction above so the next batch improves for a clear reason.