
A black accent wall works best when it gives the room one clear focal point, keeps furniture edges visible and looks convincing under the lights you actually use. Choose the wall before choosing the black, then test the color and sheen together. Start with the wall behind your main furniture rather than automatically painting the brightest or largest surface.
Black changes the relationship between surfaces: pale upholstery stands forward, a dark television becomes less conspicuous and uneven reflections can become more noticeable. That is why the same paint can look composed in one room and patchy in another. Treat the project as a sequence of layout, surface and lighting decisions.
- If you are still choosing: compare two possible walls from the doorway and your usual seat.
- If you already bought paint: test the exact finish before coating the whole wall.
- If the wall is already black: diagnose whether the problem is lighting, sheen, coverage or disappearing furniture before repainting.
| Your room or problem | Start here | What to avoid |
|---|---|---|
| A bedroom needs a focal point | The headboard wall, with enough visible wall around the bed | A dark patch chosen without considering the bed position |
| A living room has a dominant sofa | The continuous wall behind it | Splitting black around several unrelated openings |
| A TV dominates the view | A low-sheen black backdrop; check screen reflections | Assuming dark paint will remove glare |
| A small room feels cramped | One defined plane with visible light boundaries | Automatically extending black onto every adjacent surface |
| The wall shows shiny stripes | Check wet-edge technique and sheen after drying | Adding random touch-up patches while paint is tacky |
| A rental needs a reversible choice | Get written finish approval before painting | Assuming removable wallpaper cannot lift paint |
Which wall should be black, and which black should you choose?
1. Choose the wall using the room’s main sightlines
Use this check when several walls seem possible, especially in an open-plan room. The most useful accent wall usually supports the room’s main activity rather than competing with circulation routes. A continuous background behind the sofa or bed is a stronger starting point than a wall broken into narrow strips by doors.
- Stand at the main entrance and take a level phone photo of each candidate wall from the same position. Include the floor, ceiling and main furniture.
- Look again from your usual seat or from the bed. Favor the wall that connects to the furniture in both views.
- Choose a stopping point at an inside corner, recess or other existing architectural boundary. Do not let the black finish end arbitrarily halfway around a corner.
- Use your phone photo editor to make a rough dark overlay if the choice remains unclear. Judge the shape and proportion only; a screen cannot predict the real paint color.
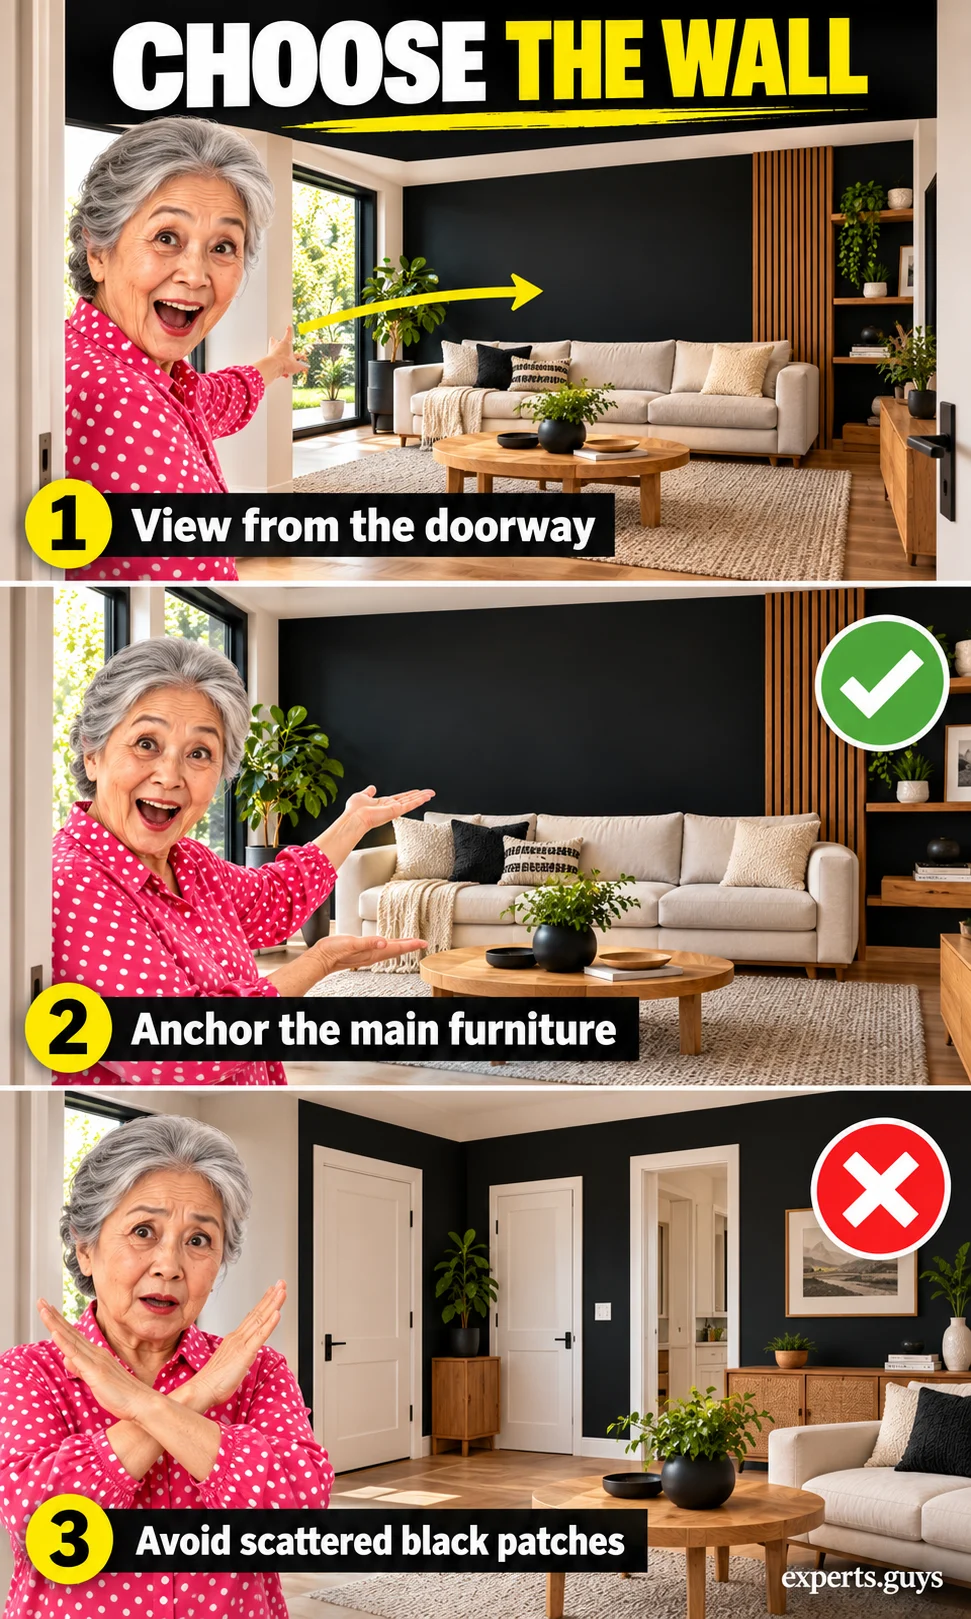
Example: in a narrow living room with three doors along one side, the uninterrupted wall behind the sofa can make the seating area read as one group. Painting around the three doors may instead turn every doorway into a separate high-contrast feature. If no full wall works, test an existing alcove rather than inventing a floating rectangle.
Checkpoint: your eye should find the intended focal area without losing the room’s circulation path. If a doorway or radiator becomes the loudest feature, try the second candidate. Keep the existing layout unless moving furniture has a clear functional benefit; a paint project should not create a blocked route.
2. Compare black samples against the finishes you cannot change
Choose a black in relation to the floor, sofa, stone and cabinetry, not against a shop’s white display board alone. Some blacks read warmer, others cooler, and a charcoal may look distinctly gray beside a black screen. A sample that looks neutral in daylight may appear different under your evening lamps.
- Shortlist a warm black, a more neutral black and a cooler or charcoal option. Use large movable samples rather than relying on a tiny chip.
- Place the boards vertically on the candidate wall, close to the fixed finish that matters most. Keep the same surrounding materials in view.
- Compare them in daylight and with the evening lights you normally use. Check from the doorway and seat, not only at arm’s length.
- Save labeled phone photos in one album for comparison, but make the final color decision in the room. Automatic exposure and white balance can change how black looks on screen.

Example: if an oak floor starts to look unusually orange beside one board, compare that board with a quieter alternative before changing any furnishings. If all three disappear into shadow, improve the viewing light before deciding that the darkest paint is best. Change one variable at a time so you can tell what caused the improvement.
Color samples may not reproduce the finish or durability of the final coating. Once you choose a color family, test the intended product and sheen on a suitable prepared sample surface. This separates the color decision from the reflection decision; paint-sample guidance explains why movable boards help compare changing light.
How do you keep a black accent wall from looking shiny or patchy?
3. Select sheen for wall condition and daily use
Color and sheen are separate choices: the same black can produce a soft background or a conspicuous reflective plane. A lower-sheen finish is usually the easier starting point when there are repaired areas or a television nearby. Cleaning performance still depends on the actual paint formulation, so do not assume every matte is fragile or every eggshell is equally washable.
| Finish | Useful when | What to check |
|---|---|---|
| Matte or low sheen | You want a quiet backdrop with restrained reflections | The product’s cleaning instructions and resistance to marks |
| Eggshell | You want a modest sheen on a frequently used wall | Whether side light reveals repairs or roller differences |
| Satin | You deliberately want more reflected light | The actual sample under evening lamps; more sheen can emphasize unevenness |
| Gloss | A polished surface is part of the design | Very careful preparation and a full-size finish test; it is not a shortcut to a brighter room |

Try this before buying all the paint: hold the finish sample where the strongest side light hits the wall, then view it from your seat. If a repair edge or broad glare stripe dominates, select a less reflective option or improve the preparation. For a wall people brush past daily, compare the manufacturer’s washable low-sheen products before simply increasing gloss.
4. Prepare for even absorption, not just a darker color
Black paint cannot flatten a raised filler edge or fix loose old paint. It can also reveal differences between a porous repair and the surrounding sealed surface. Before preparing older coatings, establish whether hazardous materials may be present; in the United States, EPA guidance flags lead-paint risks in pre-1978 homes, while other countries have different histories and rules.
- Protect floors and move furniture clear. Inspect the wall with light directed across it; stop if the surface is damp, crumbling or actively peeling, and address that cause first.
- Clean using a method compatible with the existing coating. Remove cleaning residue as directed and let the surface dry.
- Fill small, stable defects with a compatible filler. Let it dry, level the repair using the product’s instructions and remove residue; do not sand an unidentified older coating.
- Use a compatible primer where the coating system requires it, including bare or repaired areas. Where porosity varies across the wall, follow the manufacturer’s advice on priming the whole surface.
- Check again with side light before topcoating. A ridge still visible now will not be cured by applying thicker black paint.

Example: a filled screw hole may look smooth head-on yet show a raised perimeter from the window side. Correcting that small edge before topcoating is easier than chasing a shiny halo afterward. If the whole surface is sound and uniformly painted, do not add unnecessary sanding or primer stages merely because the new color is black.
Use the primer specified for the substrate and finish coat; “any primer” is not a reliable rule. A manufacturer-approved tint may help coverage, but gray primer is not compulsory for every black paint. Keep ventilation and protective measures consistent with the product label, and keep children and pets out of the work area.
How much paint do you need, and how should you apply it?
5. Calculate the wall area before buying paint
Measure width and height in the same unit and use the coverage printed on your chosen paint. Do not buy by color alone: textured surfaces, porosity and the required number of coats affect consumption. A phone calculator is enough for one wall; save a photo of the product label with the result.
- Multiply wall width by height, then subtract large areas you will not paint, such as a doorway.
- Multiply the paintable area by the planned coat count. Treat two coats as a budgeting example, not a guarantee for every product.
- Divide by label coverage per coat. Add a practical reserve for application loss and future touch-ups, then round up to an available pack size.
| Worked example | Calculation | Result |
|---|---|---|
| Wall | 4 m × 2.5 m | 10 m² |
| Door opening | Subtract 2 m² | 8 m² paintable |
| Two planned coats | 8 m² × 2 | 16 m² of coverage |
| Illustrative label rate | 16 m² ÷ 10 m²/L | 1.6 L before reserve |
| Illustrative 10% reserve | 1.6 L × 1.10 | 1.76 L; round up to an available pack |
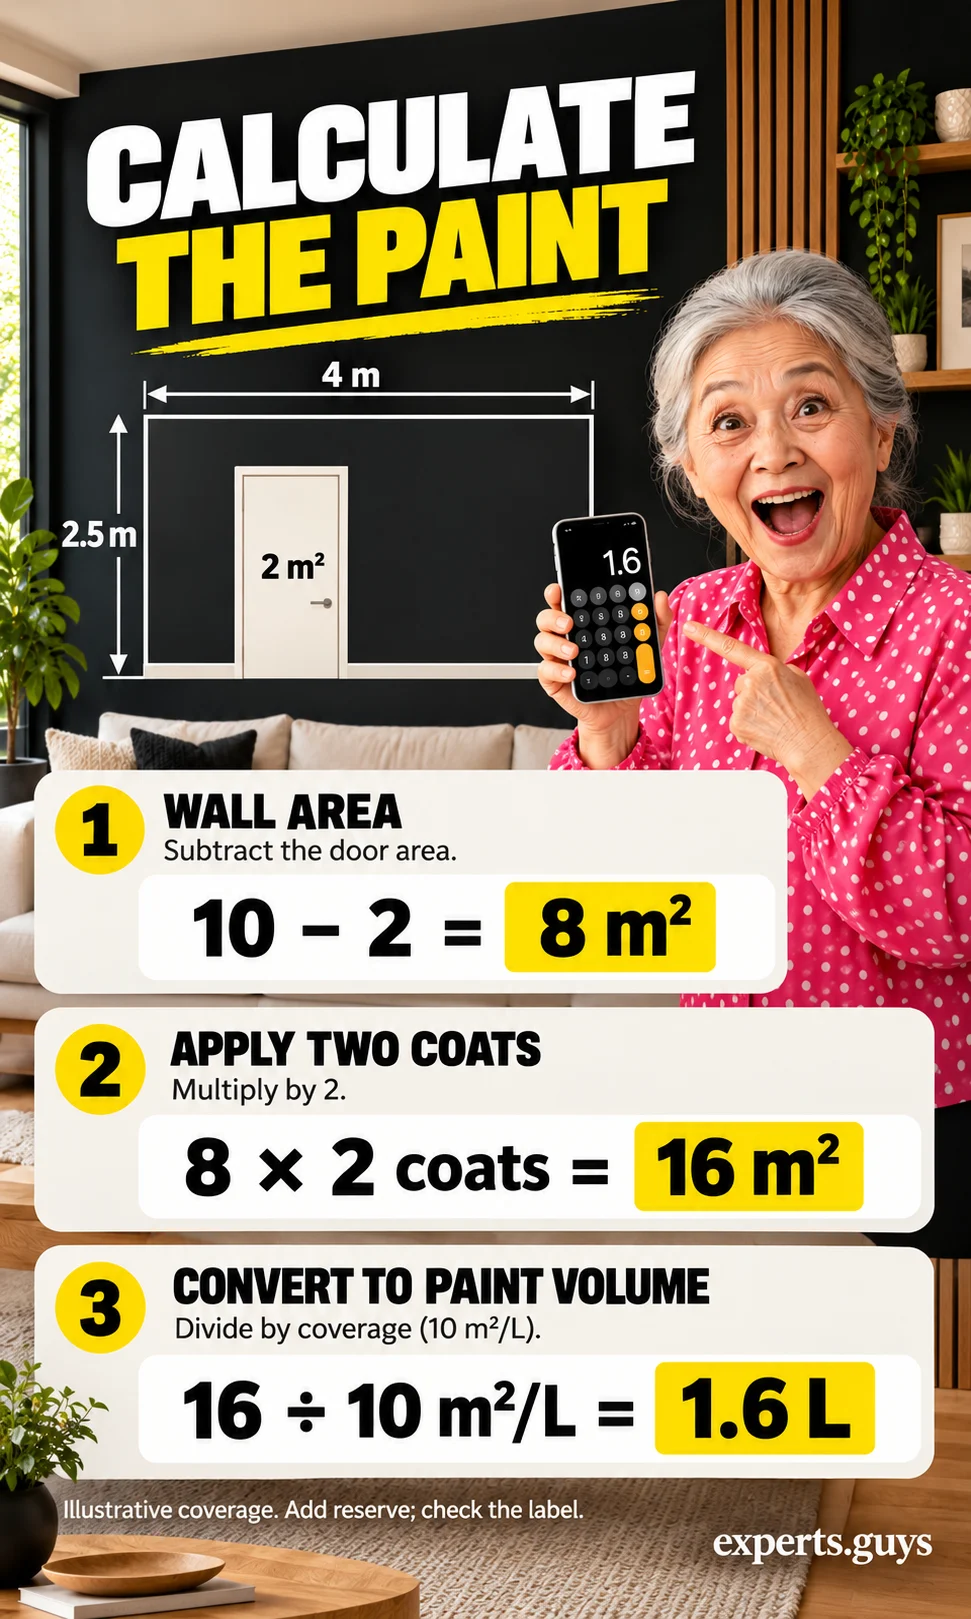
This example assumes a smooth prepared wall and a label rate of 10 m² per liter per coat; it is not a promise about your paint. Substitute the actual rate and coat count, allowing more if the label or surface calls for it. Primer is a separate quantity, and metric coverage must not be mixed with square feet or gallons without conversion.
6. Paint manageable sections and preserve the wet edge
Dark stripes can be an application problem rather than the wrong shade of black. Wet paint meeting a partly dried area can create differences in color depth or sheen. Organize the work so adjoining sections connect while they are still wet, using the paint’s specified spreading rate and roller.
- Stir as directed, protect adjoining surfaces and choose a suitable brush and roller sleeve. Plan to finish at a corner rather than stop midway across the wall.
- Cut in a short section of the edge. Roll the adjoining area before that brushed strip starts to dry.
- Load the roller evenly and work in manageable sections, overlapping the still-wet edge. Reload instead of squeezing a nearly dry roller hard against the wall.
- Leave paint that has become tacky alone. Let the coat dry for the label’s recoat interval before deciding whether another coat is needed.
- Inspect the dry wall from the doorway and seat under both daylight and your normal lamps. If broad overlap marks remain, correct the cause before recoating the full plane.

Common mistake: cutting in the entire wall slowly, then rolling much later, can leave a visible border. Shorten the working section if the edge dries before you reach it. Avoid a heater or strong fan blowing directly across fresh paint while still providing the ventilation the label requires.
Touch-dry, ready to recoat and fully cured are different stages. Wait for the specified curing period before washing or testing the finish with adhesive decorations. The manufacturer’s wet-edge guidance explains overlap marks; always use your selected product’s own instructions for timing.
How do you keep the finished room from feeling flat or too dark?
7. Test the wall with your evening lighting
A wall can look smooth during the day and reveal every ridge under a lamp aimed along its surface. That grazing light is useful for inspection but may be unflattering as the room’s everyday lighting. Decide whether you are seeing unwanted surface texture, a bright reflection or simply too little light on the things you use.
- After dark, turn on the room’s usual lights and view the wall from your normal seat. Note the location of glare or ridges with a phone photo.
- If a portable lamp grazes the wall, move it farther into the room or redirect it within its intended adjustment range. Keep the cord clear of walking routes.
- Use a shaded reading light for the task area and a broader source for ambient light. Compare the result with the same lamps and settings before buying more fittings.
- Check the television both off and on, if present. A dark wall may soften its outline, but reflected lamps still need their own placement correction.

Example: when a new floor lamp makes repaired areas look striped, reposition the lamp before repainting. If the stripes disappear only under one very narrow viewing angle, the finish and light interaction deserve attention. If a defect remains visible in ordinary diffuse light, revisit the surface or coating instead of trying to hide it with stronger lighting.
Changing a plug-in lamp’s position is a useful reversible test. New hardwired fittings require suitable electrical installation, and paint should never be used to cover switches, sockets or safety labels. If you cannot change the lighting, choose your finish under the existing conditions rather than an idealized showroom setup.
8. Restore one visible boundary before adding accessories
A dark sofa against a black wall may lose its outline even when the wall color itself is attractive. The first adjustment is to make the furniture shape readable, not to fill every blank area. A pale cushion, a lighter artwork field or an existing warm-wood surface may provide enough separation.
- Take a photo from the doorway and look for the largest shape that disappears into the wall. Ignore small ornaments at this stage.
- Introduce one contrasting item you already own: a pale throw over the dark sofa, light bedding at the headboard or a larger light-toned artwork.
- Repeat black quietly elsewhere only if the accent looks isolated, such as an existing lamp base or frame. Keep the main wall visually dominant.
- Photograph the same view again and compare. Keep the change if the room is easier to read; remove it if it creates a second competing focal point.
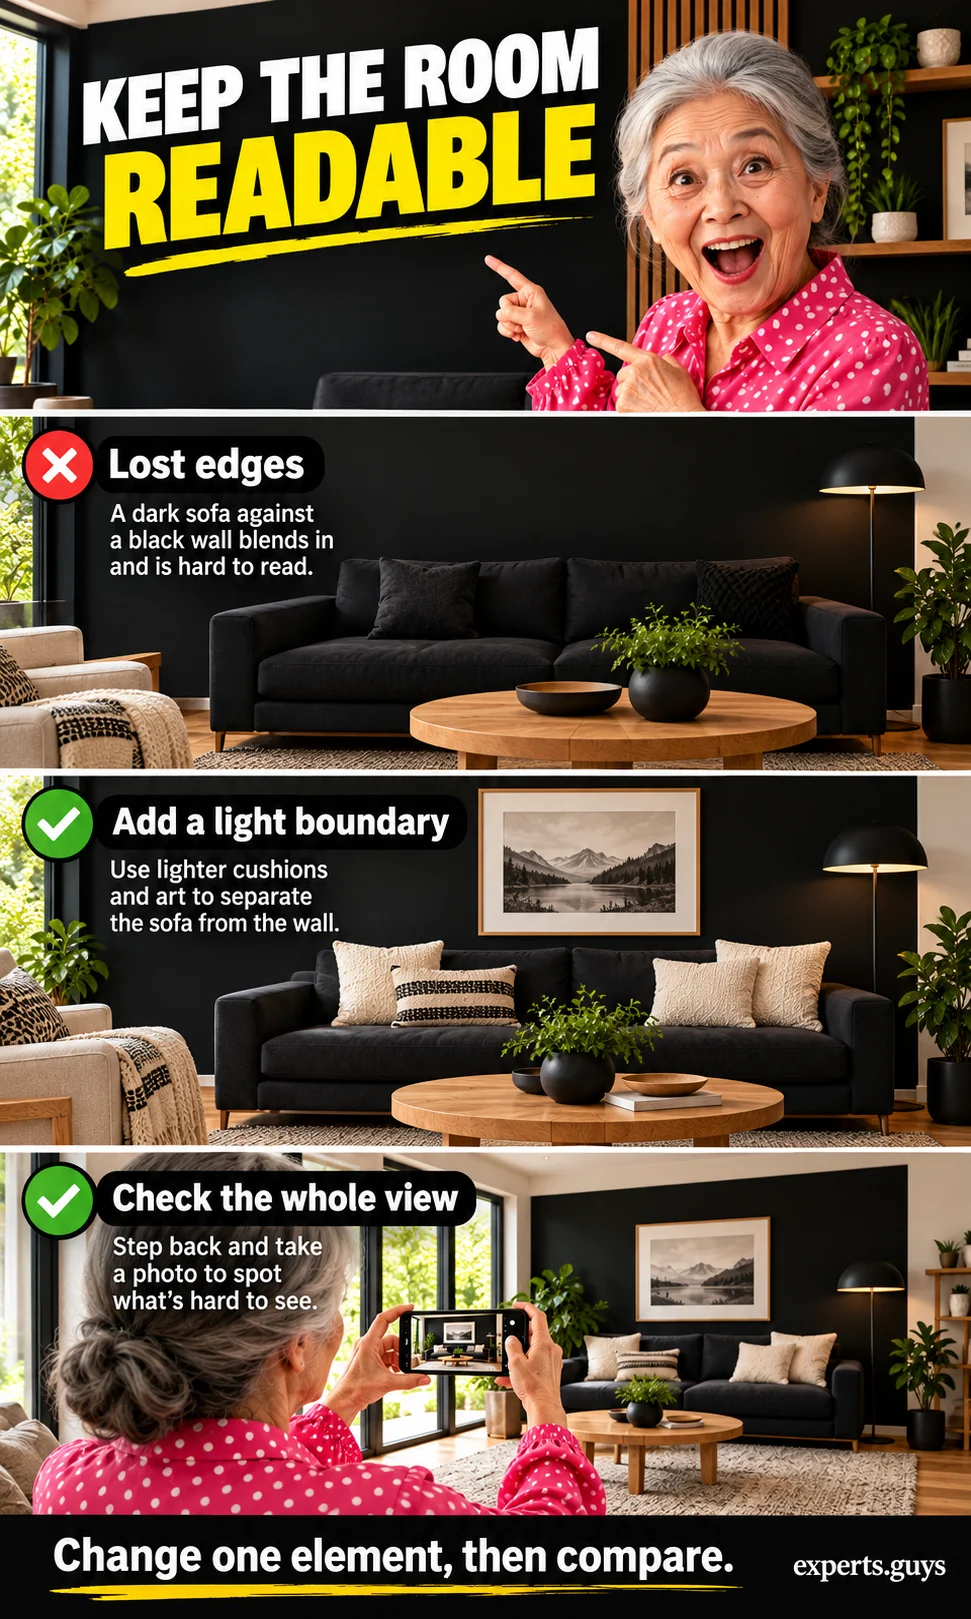
With a pale sofa, you may already have enough contrast; adding more white can make the room feel busier. With a black sofa, a warm timber table may help separate the foreground without changing the wall. Avoid replacing several finishes at once, because you will lose track of which adjustment solved the problem.
If the remaining decision is about metallic accents, use brass vs chrome vs polished nickel to compare those finish families. For an intentionally richer decorative direction, Neo Deco interior design covers the wider style. Here, the goal is narrower: make one black wall work with the room you already have.
Troubleshoot the result before starting again
| What you see | Likely explanation to check | Next adjustment |
|---|---|---|
| Black looks blue or brown | Undertone, surrounding finishes or light source | Repeat the sample comparison beside fixed materials; do not trust the phone alone |
| A dark border surrounds the wall | Cut-in texture, thickness or drying differences | Review Method 6 and recoat the continuous plane if needed |
| A repaired area has a halo | Uneven porosity, texture or a raised edge | Return to Method 4; confirm the repair and primer system |
| Room feels heavy but paint looks even | Large dark objects merge with the wall | Use the one-boundary check in Method 8 |
| Bright streak appears beside a lamp | Reflection or grazing light | Test lamp placement using Method 7 before changing paint |
| Paint lifts or bubbles | Poor adhesion, contamination or moisture | Stop adding coats; establish and correct the underlying cause |
Compare Local Home Specialists Near You
Tell us what kind of help you need, then compare nearby businesses by location, Google rating, review volume and contact options.
HomeFix Local Match
Turn a home problem into a practical local hiring decision. Check the clues, see the specialist types that fit, open focused surrounding-location searches, then compare the strongest three before you call.
 YOUR PROBLEM
YOUR AREA
COMPARE 3
✓ Ready to compare
What is happening?
Choose the closest problem type, then check every clue that applies. Your selections change the specialist order.
Where should the search focus?
Use Google’s “near me” context or enter the area you actually want a specialist to serve.
Simple local search: open nearby Google results, choose the businesses that look suitable, then compare your best three here before you call.
Problem snapshot
Who should you call first?
These are the specialist types most likely to fit the clues you selected.
Search around your location
Compare your top three
Use the same factors for each option so a high star rating does not hide a weak scope, poor diagnosis, missing credentials or unclear aftercare.
Comparison result
Your result combines the Google signals you entered with the practical hiring checks you completed.
Questions to ask every finalist
Use the same questions with each shortlisted business so the comparison stays consistent.
Frequently asked questions
Does a black accent wall make a small room look smaller?
Not automatically. Strong contrast can make a wall boundary more noticeable, while a dark background can make some objects recede. The useful test is whether the room still has readable furniture edges, adequate task lighting and an uncluttered route through it; floor area alone cannot decide the color.
Should the trim be black as well?
White or pale trim keeps the boundary crisp, while matching trim makes the wall read more continuously. Choose based on whether the trim deserves attention, especially around several doorways. Trim and wall surfaces may still need different compatible paint products, even when the color matches.
Is chalkboard paint the same as matte black wall paint?
No. Chalkboard paint is a specialty coating for writing with chalk, while matte describes a level of sheen. Chalk-finish furniture paint is another category again, so choose an interior wall product unless a functional writing surface is actually the goal.
Can a black wall work behind a television?
Yes, a dark backdrop can make the television’s outline less conspicuous when it is off. It does not eliminate reflections on the screen or guarantee comfortable viewing. Check lamps and daylight from the actual seat before committing to the finish.
Can I make an ordinary black wall magnetic with clear paint?
Ordinary clear paint does not make a wall magnetic. That function requires a suitable magnetic coating or substrate with its own installation and holding limits. Treat it as a separate material system, not a finishing step for a decorative black wall.
Is black paint difficult to cover when I redecorate?
Black is not permanent, but the replacement coating must hide the old color evenly. The new product, substrate and primer system determine the work; there is no reliable universal coat count. Budget for proper preparation and the specified primer and finish coats instead of assuming one light coat will be enough.
Your decision: choose the wall, then resolve the finish
If you have not painted yet, compare the candidate walls and sample boards before spending on accessories. If the wall is already black, separate an application defect from a lighting or contrast problem using the troubleshooting table. Keep the first change small enough that you can see whether it actually improves the room.
Images are AI-generated instructional illustrations, not photographs of a tested renovation. Color, sheen and room-lighting examples are illustrative; judge actual paint samples in your own space.