
Attic insulation slows heat moving through the top of your home, helping control the temperature differences that can contribute to condensation and ice dams. To reduce water-damage risk, fix moisture sources first, seal air leaks, preserve the roof’s intended ventilation, and only then add suitable insulation; insulation itself does not waterproof a leaking roof.
This sequence is for an accessible, unfinished vented attic with insulation at ceiling level. A roof insulated along its underside, a finished attic room, or an uncertain roof assembly needs a different design assessment before you add insulation or change vents.
- Water, mold, damaged wiring, or unsafe access: pause the insulation work and resolve the specific problem.
- Dry attic, but air leaks or an open exhaust duct: correct those paths before covering them.
- Dry, sealed, correctly ventilated attic: establish the required insulation specification and check the fit.
What must be fixed before attic insulation can help?
The first decision is whether the attic is ready to receive insulation, not which bag to buy. Roof leaks bring liquid water in; indoor air escaping through the ceiling can carry moisture to a cold roof deck; a disconnected bathroom exhaust can discharge moisture directly into the space. More than one source can exist, so a visible pattern is a clue rather than a diagnosis.
In cold weather, warm indoor air reaching cold sheathing can leave condensation or frost. Insulation reduces heat transfer, while an air barrier limits air movement; loose fibers do not perform both jobs. Ice dams involve another sequence: heat melts roof snow, meltwater reaches colder eaves, and refreezing can obstruct drainage. Air sealing and insulation can reduce that heat contribution, but roof geometry, weather, and roof details still matter.
1. Make a dry-before-covering inspection
Use a flashlight from a stable access position. Do not step onto ceiling drywall, probe unidentified insulation, climb onto the roof, or enter a cramped space just to finish this check. Suspected vermiculite should be left undisturbed under EPA’s asbestos precautions; appearance alone cannot establish that an old insulation material is safe.
- Look at the accessible roof timbers, underside of the roof, and insulation surface without disturbing them. Look for fresh wetness, frost, water tracks, matted material, or deterioration.
- If you see active water, mold, rot, or a sagging ceiling, stop the top-up. Keep away from wet electrical equipment and the area beneath a bulging ceiling. Arrange the relevant repair or urgent assessment.
- Resume planning only after the water source has been corrected and the affected materials have been assessed as dry and suitable to retain. A dry-looking surface does not establish that concealed material is dry.

Illustrative example: a patch becomes wet after rain while the surrounding insulation stays dry. That is a reason to investigate water entry, not proof of the exact roof defect. The guide to roof-water-damage causes owns that investigation; this article’s job is deciding when insulation can proceed. If access is unsuitable, a contractor can perform the same inspection from a safe working setup.
Swipe horizontally if needed to compare all columns.
| Observed condition | What it may indicate | Before adding insulation |
|---|---|---|
| Local wet patch after rain | Roof entry; water may travel before dripping | Have the source traced and repaired; assess affected materials. |
| Widespread frost or droplets in cold weather | Moist indoor air meeting cold surfaces | Check ceiling air leaks, exhaust routing, and the roof assembly. |
| Wetness near an air handler or pipe | Equipment or plumbing source | Arrange HVAC or plumbing assessment; do not cover the equipment. |
| Old stain, currently dry | Historic damage or an intermittent source | Establish the repair history and recheck under the relevant conditions. |
Avoid treating every wet material the same way. Suitability for retention depends on the insulation product, contamination, saturation, physical damage, and whether it can be dried and inspected. A flattened or contaminated layer is not made serviceable by adding another layer. Ask for a material-specific removal or retention decision rather than a blanket promise that it will dry by itself.
Which air paths should be dealt with before the top-up?
Deal with openings in the ceiling boundary and moisture-carrying exhaust routes while they remain visible. An accessible hatch gasket and a small joint around a positively identified cold pipe are limited repairs; electrical penetrations, recessed fittings, chimneys, large chases, and combustion appliances require their own approved details. A product sold as “fireblock” foam is not automatically a fire-rated penetration system.
2. Restore continuous contact at the hatch gasket
For an existing sound, safely reachable access panel, prepare a cloth and replacement weatherstrip compatible with its frame and closure. The gasket works only when the lid contacts it continuously. Attic-access guidance also treats the hatch’s insulation and closure hardware as parts of the same boundary; replacing a gasket does not compensate for an uninsulated lid.
- Clean and dry the gasket seating surface. Remove failed loose weatherstrip only where the frame is sound and safely accessible.
- Fit the new gasket along the intended contact line, following its adhesive and surface-preparation instructions. Join corners without gaps; do not stack layers to compensate for a warped lid.
- Close the panel normally. Check that it seats evenly and the existing latch engages without forcing it. If it rocks, will not close, or leaves a gap, correct the fit before accepting the seal.

Worked example: a lid closes on three sides but lifts at one corner after a thicker gasket is installed. The repair is incomplete: choose a compatible profile or have the distorted closure corrected. A lower-effort option is checking the existing lid’s seating from the room side and arranging a fitted access-cover replacement when the panel is too heavy or awkward to handle safely.
3. Seal a small joint around a known cold pipe
This limited method suits an accessible, dry gap around a positively identified cold plumbing vent penetration, away from heat sources and electrical equipment. Use a compatible sealant rated for the substrate and gap size. If the penetration forms part of a required fire-resistance assembly, use the specified tested system instead; uncertain pipe identity is a stop condition.
- Confirm the pipe’s purpose and the joint’s construction. Clean and dry the accessible contact surfaces without disturbing suspect insulation.
- Apply a continuous bead of the specified compatible sealant to the small joint. Follow the product’s gap limits and preparation instructions; a large opening needs a suitable supported closure, not a mound of caulk.
- Inspect the whole ring for breaks, allow the product’s stated cure time, and only then restore appropriate insulation coverage.

Worked example: a narrow gap around a known plumbing vent is sealed continuously rather than packed with loose fiberglass. The fibers could slow airflow locally without making a durable air seal. If the gap disappears behind wiring or the pipe cannot be identified, leave it accessible for a qualified installer instead of experimenting with foam. Whole-attic sealing should include ventilation and combustion-safety assessment, as described in ENERGY STAR’s air-sealing guidance.
4. Trace the bathroom exhaust to an outdoor outlet
An exhaust fan can sound normal while its duct has separated above the ceiling. From safe access, visually trace the route; this is an inspection, not an instruction to reconnect wiring or cut a roof opening. Have a flashlight available, leave duct insulation intact, and do not stand on the ceiling to follow a hidden section.
- Find the visible connection between the bathroom fan housing and its exhaust duct. Look for a detached joint or an open end.
- Follow the visible route toward its termination. Flag crushed, disconnected, unsupported, or inaccessible sections rather than pulling on them.
- Confirm that the route leads to a proper exterior termination, using a ground-level view where possible. If the outlet cannot be verified or ends inside the attic, resolve it before insulating.
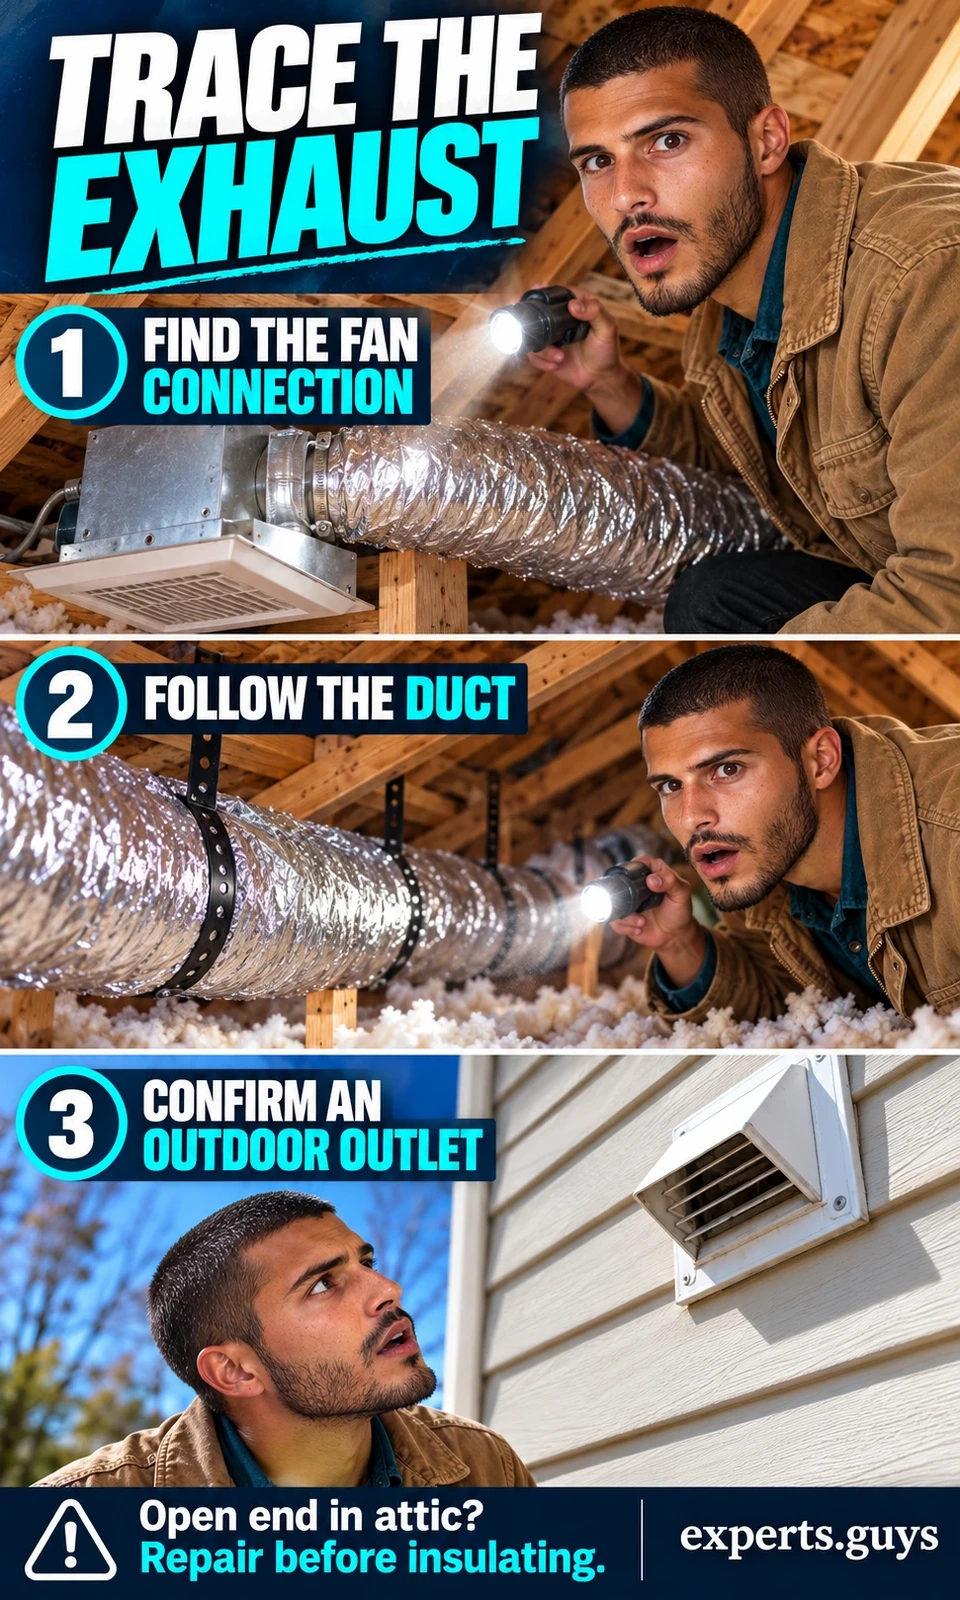
Worked example: the duct appears to head toward an eave, but its end stops short inside the attic. That does not count as outdoor exhaust. The useful result is identifying the unfinished route so it can be corrected, not declaring the fan defective. Bathroom and kitchen exhaust guidance requires discharge outdoors; appropriate duct insulation and termination details depend on the installation. A ground-level outlet check is the easier option when the attic route is inaccessible.
How do you add insulation without blocking drying paths?
Keep the insulation on the correct boundary and preserve the vented attic’s intended air path. A vented roof normally separates ceiling-level insulation from roof-level ventilation. An unvented roof uses a different moisture-control design, so removing vents, adding vents, or spraying foam onto the roof deck is not a simple variation of this top-up method.
5. Check the eave channel before increasing depth
Use a flashlight from a safe working position to inspect existing baffles at the eaves. A baffle holds an air channel open above the insulation; a retaining dam prevents loose fill from entering the soffit. The opening must remain connected to the intended ventilation route, not merely resemble a small empty pocket beside the insulation.
- Identify the existing soffit intake and the baffle separating insulation from the roof-side air channel. Do not assume every roof has this arrangement.
- Check visually that insulation has not filled the channel or covered its upper exit. Compare the baffle’s height with the planned insulation depth.
- If the channel will be buried, the baffle is missing, or the route is uncertain, pause the top-up in that area and have the detail corrected. Do not crawl into an unsafe eave or push insulation blindly out of sight.
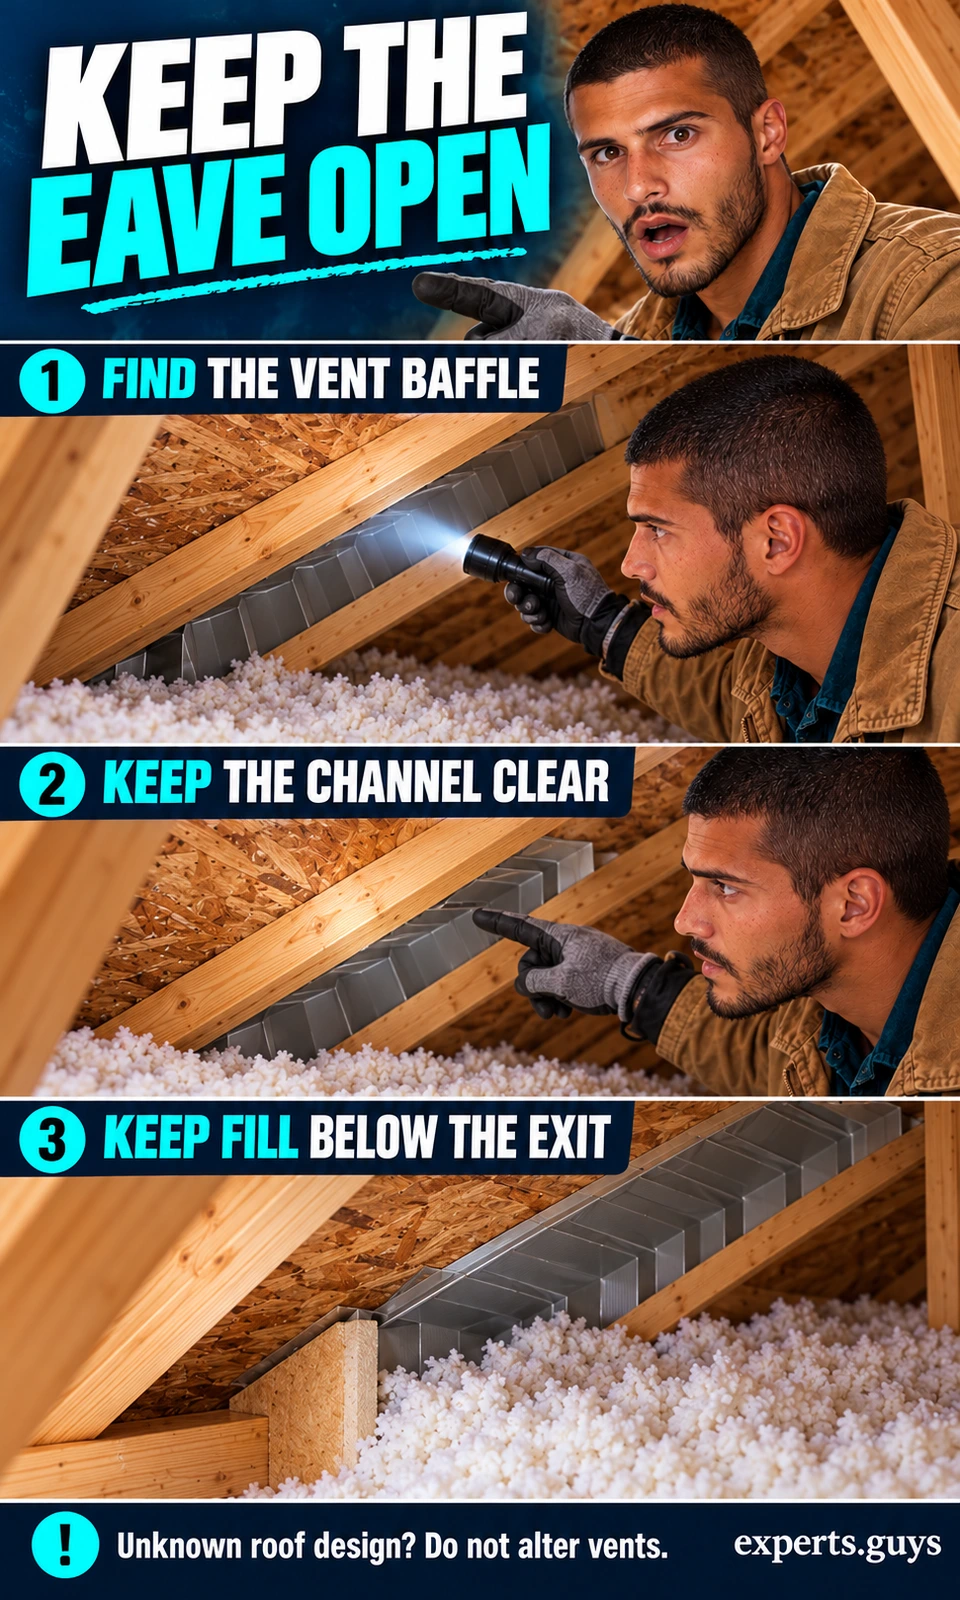
Worked example: the current baffle just clears the old insulation. A deeper top-up could bury its exit even though the soffit vent outside looks unobstructed. Have the baffle and retention detail extended appropriately before filling. Attic ventilation guidance explains this separation. Exterior drainage is a different system; roof runoff management addresses water leaving the roof, not air moving above attic insulation.
6. Measure existing depth without compressing it
After the attic has been cleared for safe access and the insulation is known and dry, use a rigid ruler from a secure platform to check several reachable locations. Wear the protection specified for the material, including suitable gloves, eye protection, clothing, and respiratory protection. Depth describes the installed layer; it does not identify the material or establish its R-value on its own.
- Place the ruler vertically from the ceiling plane to the top of the insulation without pushing the fibers down. Do not use the top of a joist as the zero point for the total layer.
- Compare several accessible areas, including a shallow area and the central field. Do not enter a hazardous location to obtain another reading.
- Use confirmed material information and the manufacturer’s installed or settled-depth coverage chart, as applicable, to interpret the layer. Compare it with the local requirement and the specified upgrade target.
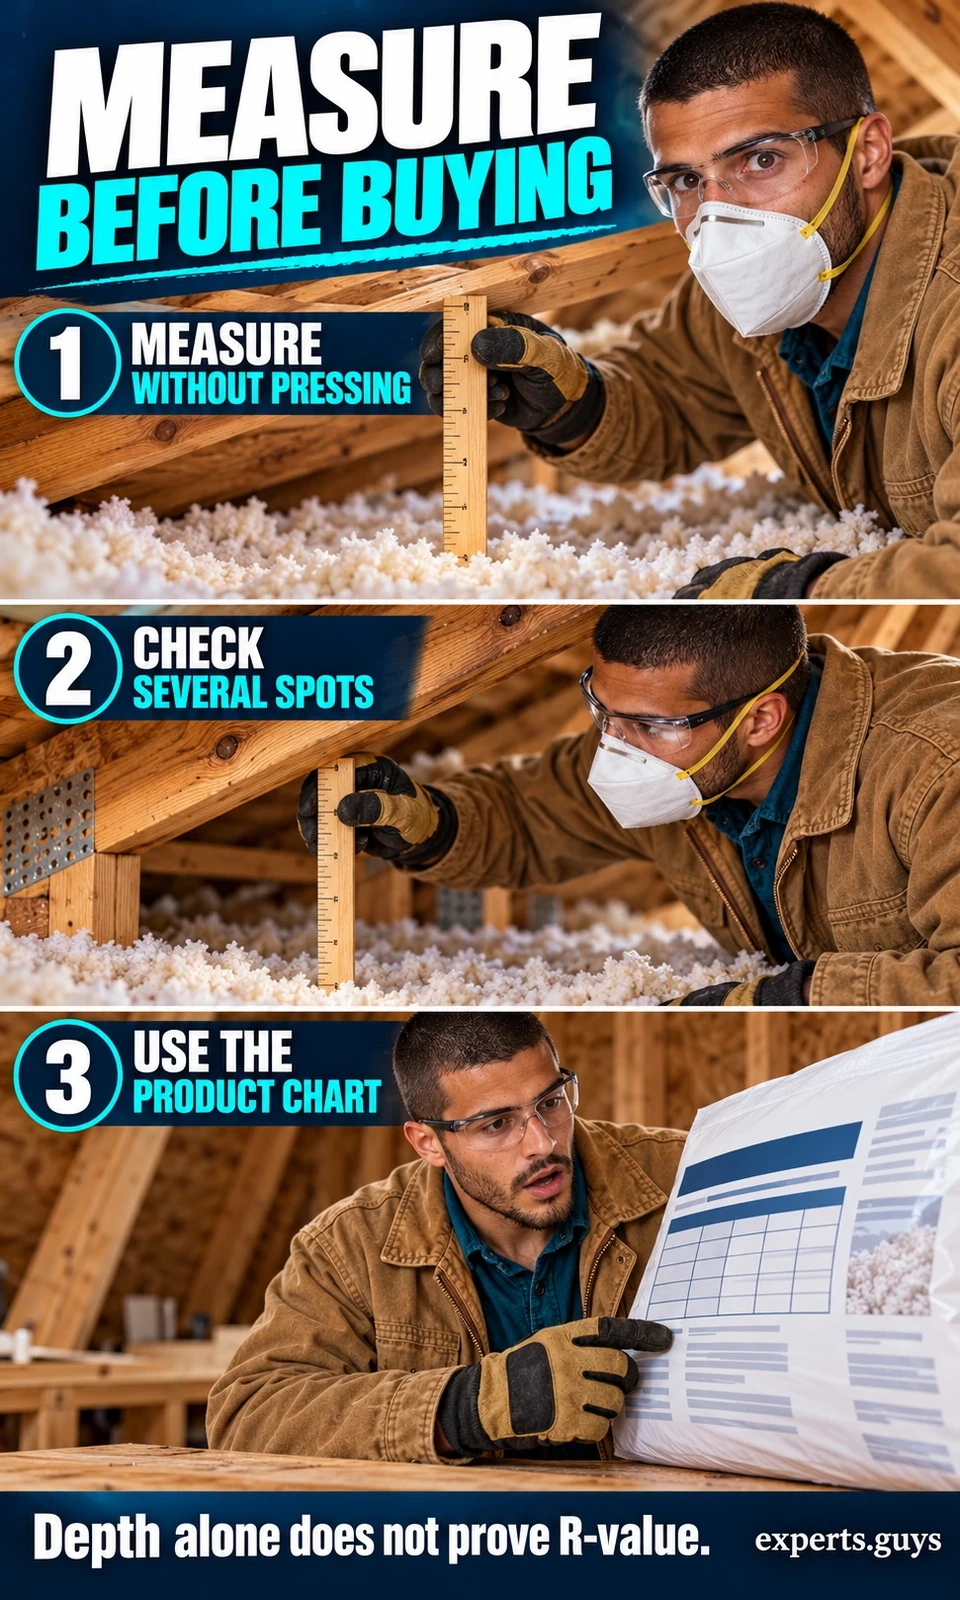
Illustrative example: the center measures 200 mm while a reachable perimeter section measures 100 mm. Those readings reveal uneven coverage; they do not prove either area meets the target. If the product is unknown, ask for identification and an assessment rather than multiplying by a generic R-value-per-inch figure. U.S. R-values and metric RSI values are different units, and the upgrade specification must name the unit system.
Swipe horizontally if needed to compare all columns.
| Decision | Useful specification | Failure to avoid |
|---|---|---|
| Thermal target | Locally appropriate total resistance and unit system | Treating one universal depth as adequate everywhere. |
| Existing layer | Material, condition, distribution, and any facing | Counting wet, compressed, or unknown material as a verified rating. |
| Top-up product | Suitable unfaced batt or specified loose fill | Adding a new vapor-retarding facing without assembly review. |
| Installation | Coverage, loft or settled depth, and product requirements | Hiding gaps beneath a high central mound. |
| Constraints | Vent route, heat-source clearances, access, and load capacity | Burying vents, fittings, service routes, or unsupported ceilings. |
7. Fit an unfaced batt top-up without squashing it
This method is for straightforward, accessible areas of a dry, air-sealed vented attic where batts are suitable and all required clearances have been established. Prepare correctly sized unfaced batts, the manufacturer’s instructions, protective equipment, and a secure working platform. Unfaced means no paper or foil backing; do not add a new vapor-control layer simply because it is attached to a product on sale.
- Confirm that the existing insulation can stay, the selected batt fits the available space, and baffles and protected clearances are ready. Keep required equipment access open.
- Place the top-up layer across the joist lines where the assembly permits, meeting adjacent pieces snugly without gaps or folding material into a smaller space. Follow the product’s fitting instructions around obstructions.
- Allow the material to retain its specified loft. Keep the eave airway and required clearances open, and do not lay storage boards directly onto the finished insulation.

Worked example: a batt is too wide for the remaining strip, so folding it doubles the material and compresses its loft. Use the correctly sized piece or follow the manufacturer’s cutting and fitting instructions instead. If services or tight access prevent a good fit, a professionally installed loose-fill system may be the more practical alternative. Guidance on adding attic insulation distinguishes suitable unfaced top-ups from faced layers; the exact product specification still controls.
Do not bury recessed lights unless their listing and the installed detail permit insulation contact and coverage. Keep junction boxes accessible and obey the specified clearances around flues and chimneys. These are component-specific constraints, not places to improvise with ordinary foam. A roof-deck foam conversion also changes the assembly’s moisture behavior and belongs in a separate design scope.
How can you tell whether the finished work is acceptable?
Judge the work by continuous insulation, preserved ventilation, sound closures, and the absence of unresolved moisture—not by how deep the center looks. A tidy surface cannot demonstrate airtightness or prove a concealed roof repair. Separate what you can observe from performance checks that require instruments or a qualified assessment.
8. Check the installation, then revisit the original trigger
Use the same safe access position and flashlight. This is an acceptance inspection, not a reason to disturb the new layer. A contractor handover should explain the material, installed specification, air-sealing scope, retained clearances, and any areas that could not be completed.
- Look across the reachable area for gaps, compressed sections, buried ventilation exits, and blocked service access. Ask for correction of an incomplete area before treating the job as finished.
- Close the hatch and confirm that the lid seats and the latch works. Its insulation or cover should remain secure and should not obstruct safe operation.
- Recheck from safe access after the weather or equipment-use condition that previously exposed the problem. Fresh wetness, frost, or worsening staining means the moisture diagnosis needs to be reopened; do not add another layer to hide it.

Worked example: insulation looks even immediately after installation, but frost returns during the next cold spell. That result calls for another look at air leakage, indoor moisture, exhaust routing, and the roof assembly; it does not prove that the insulation material is defective. If a physical revisit is unsafe, arrange a follow-up inspection instead. No single waiting period or photograph proves that every concealed part is dry.
Choose your next step with Attic Ready
Use the readiness check to sort unresolved conditions before you order material. It prioritizes the next conversation or repair; it cannot inspect the building, identify asbestos, certify dryness, or approve an insulation design. The eight methods above remain usable without completing the form.

Attic Ready
Find the first unfinished condition before you buy insulation.
No scoreNo accountFor vented attic insulation planning. Answers cannot certify safety, dryness, code compliance, or a suitable roof design. Stop work if a hazard appears.
Loading the readiness check. If it does not load, use the article’s eight methods and resolve any unknown condition before proceeding.
Your next step
Choose the conditions you can verify, then show your next step. Unknown is a valid answer.
Find appropriate local help
Use the provider category in your result. Search results are not vetted recommendations.
Compare three candidates
Use the same questions: relevant attic work, diagnosis before top-up, written scope, applicable credentials and insurance, access arrangements, price, availability, and aftercare. Ratings alone do not establish competence.
Your answers stay in this page and are cleared on reload. Search / Maps sends the provider category and area to Google only when you open a link. Candidate details are not transmitted by this experience.
Compare Local Home Specialists Near You
Tell us what kind of help you need, then compare nearby businesses by location, Google rating, review volume and contact options.
HomeFix Local Match
Turn a home problem into a practical local hiring decision. Check the clues, see the specialist types that fit, open focused surrounding-location searches, then compare the strongest three before you call.
 YOUR PROBLEM
YOUR AREA
COMPARE 3
✓ Ready to compare
What is happening?
Choose the closest problem type, then check every clue that applies. Your selections change the specialist order.
Where should the search focus?
Use Google’s “near me” context or enter the area you actually want a specialist to serve.
Simple local search: open nearby Google results, choose the businesses that look suitable, then compare your best three here before you call.
Problem snapshot
Who should you call first?
These are the specialist types most likely to fit the clues you selected.
Search around your location
Compare your top three
Use the same factors for each option so a high star rating does not hide a weak scope, poor diagnosis, missing credentials or unclear aftercare.
Comparison result
Your result combines the Google signals you entered with the practical hiring checks you completed.
Questions to ask every finalist
Use the same questions with each shortlisted business so the comparison stays consistent.
Frequently asked questions
Should every piece of old insulation be removed?
No. Dry, uncontaminated material in serviceable condition may be retained when it suits the planned assembly. Removal is a separate decision when there is contamination, persistent moisture, damage, unsafe material, or a need to reach concealed defects. Do not disturb suspected vermiculite to investigate it yourself.
Will a powered attic fan solve the moisture problem?
Not necessarily. A fan does not repair a roof leak or a disconnected exhaust duct, and its effect depends on the attic’s intake provision and the ceiling’s airtightness. Establish the moisture source and the intended roof ventilation design before adding powered extraction.
Can I add plastic over the existing insulation?
Do not add polyethylene or another vapor-retarding layer as a universal moisture fix. Correct placement depends on climate, the existing air and vapor controls, and how the assembly can dry. An extra layer in the wrong place can limit drying; have an uncertain assembly assessed before covering it.
Can I use the attic for storage afterward?
Only where the structure and access are suitable and a properly supported storage platform preserves the required insulation depth and service clearances. Boards laid directly over soft insulation compress it and do not establish that the ceiling can carry the load.
Does a moisture-free inspection guarantee the roof will stay dry?
No. A safe visual check can identify obvious problems, but it cannot rule out concealed or intermittent leaks. Reappearance during rain, snowmelt, cold weather, or equipment operation should trigger a source-specific investigation rather than another insulation top-up.
Start with the first unfinished condition
A successful top-up starts with a dry, understood roof assembly and ends with continuous insulation that leaves ventilation, heat-source clearances, and access intact. Resolve the first failed condition in that sequence before buying more material. When the preparation is sound, insulation can do its thermal job without concealing the moisture problem you wanted to prevent.