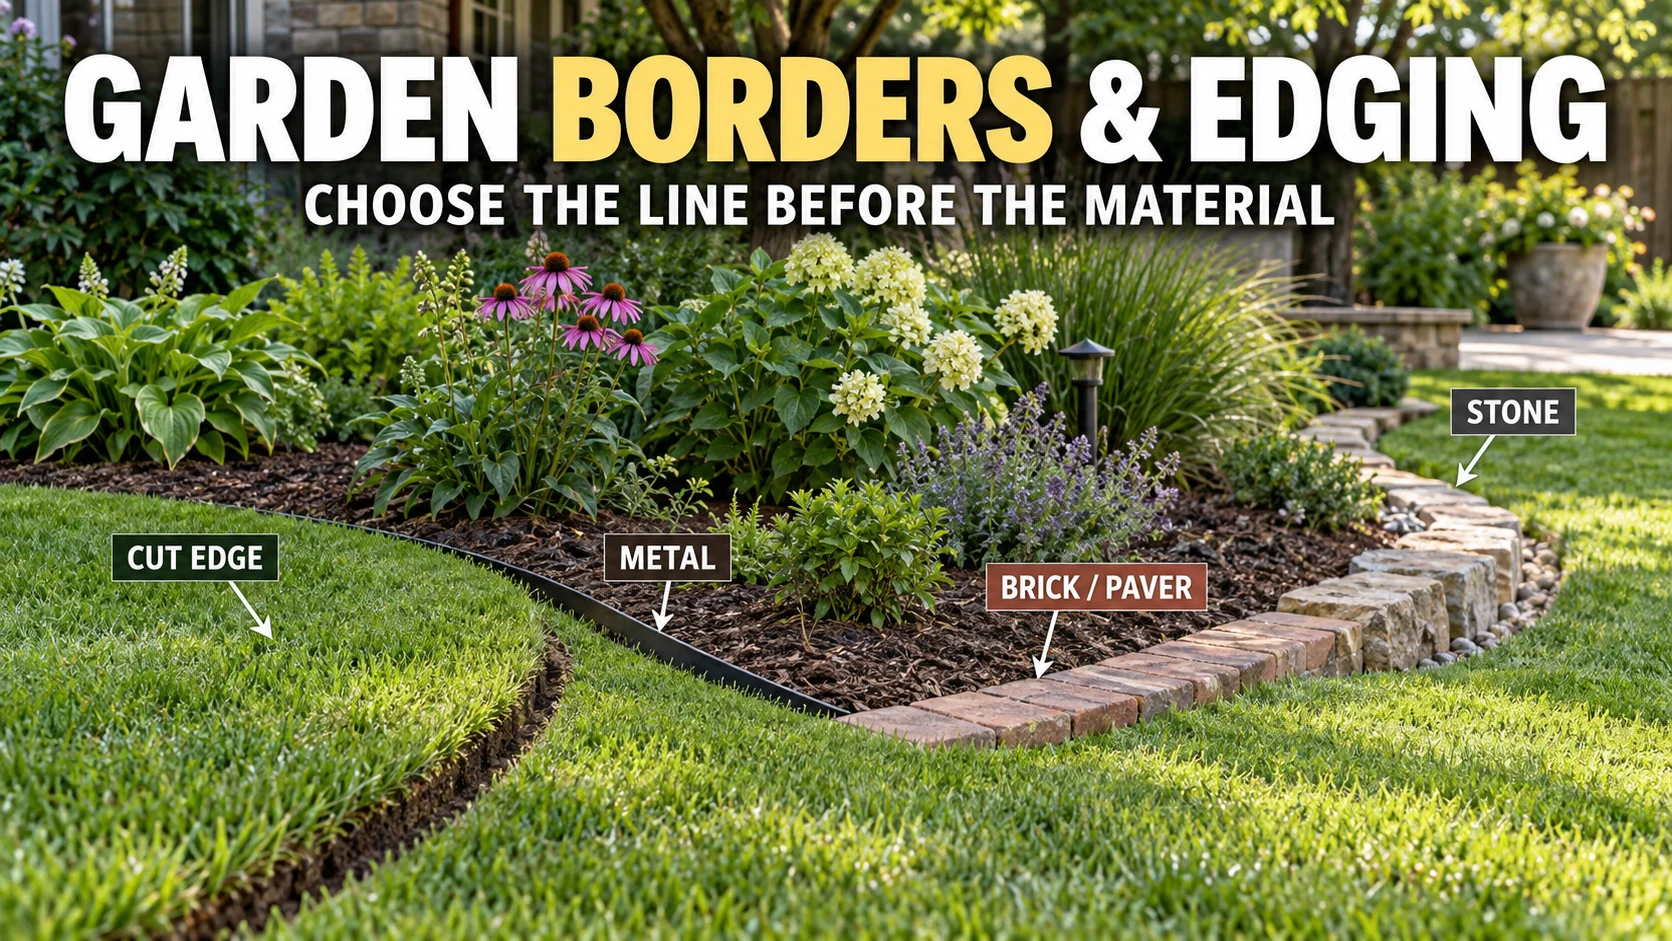

Good garden edging starts with the job the boundary must do, not with the material you happen to like. A lawn-to-bed edge, a gravel-retaining edge and a slightly raised border may all look similar in a photo, but they need different construction if you want the line to stay neat and easy to maintain.
The simplest option can also be the right one: a clean spade-cut edge is inexpensive, easy to reshape and especially useful while a new planting bed is still evolving. Permanent metal, brick, paver, stone, timber or composite edging makes more sense when the bed shape is settled or the edge must physically contain gravel, mulch or a change in level.
Before buying anything, walk the boundary and decide what you are trying to stop, hold, guide or frame. That one decision removes most of the guesswork and prevents an attractive border from becoming an awkward mowing line or a recurring repair job.
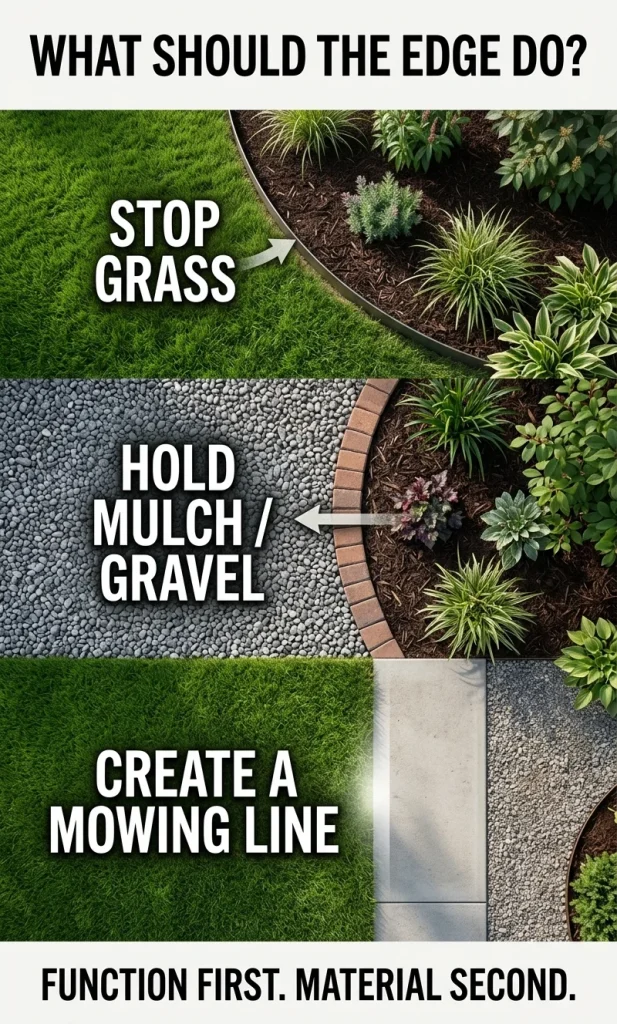
Choose the edge by its job first
- Stop lawn grass entering a bed: use a maintained cut edge or a continuous physical barrier that is installed deeply and consistently enough for the grass you grow.
- Hold mulch or loose soil: create a visible drop or a physical lip so material does not spill onto the lawn or path.
- Contain gravel: use a solid edge. A trench alone gives visual separation but does not reliably keep loose aggregate from migrating.
- Create a mowing line: prefer a flush or very low edge that lets the mower wheel travel cleanly without leaving an inaccessible strip of grass.
- Raise the planting area: treat the border as a small retaining element rather than decorative edging. The higher the retained soil, the more the base, stability and local construction requirements matter.
The Royal Horticultural Society’s lawn-edge guidance makes a useful design point: broad, sweeping curves are easier to maintain than intricate curves, and a defined drop from lawn to border can help keep mulching material where it belongs. That is why the best-looking line on paper is not always the best line to build.
New beds deserve extra flexibility. University of Illinois Extension notes that simple hand edging can be a sensible starting point because perennial and shrub beds often expand as plants mature, and moving a permanent edge later adds unnecessary work.
If the rest of the garden is still being developed, keep the edge reversible. You can also use the border to support a broader small garden design by simplifying awkward lawn corners, widening planting where it improves circulation and avoiding fussy shapes that are difficult to mow.
Choose by function, geometry and maintenance
Border Fit Studio
Match the boundary to a practical edging family, then see the installation detail most likely to make or break it.
Start with the boundary, not the material
Pick one answer in each section. The result does not invent prices or lifespans; it uses explicit functional rules to narrow the material family.
Product dimensions, fixing methods and structural requirements still come from the selected system, site conditions and local rules.
Your material shortlist
Use the first card as the starting family, then compare the alternatives against the actual product and site.
Measure the real run, verify the product can handle your curve or retained height, and read the fixing instructions.
Test the mower line, foot traffic, drainage and material containment before completing the entire border.
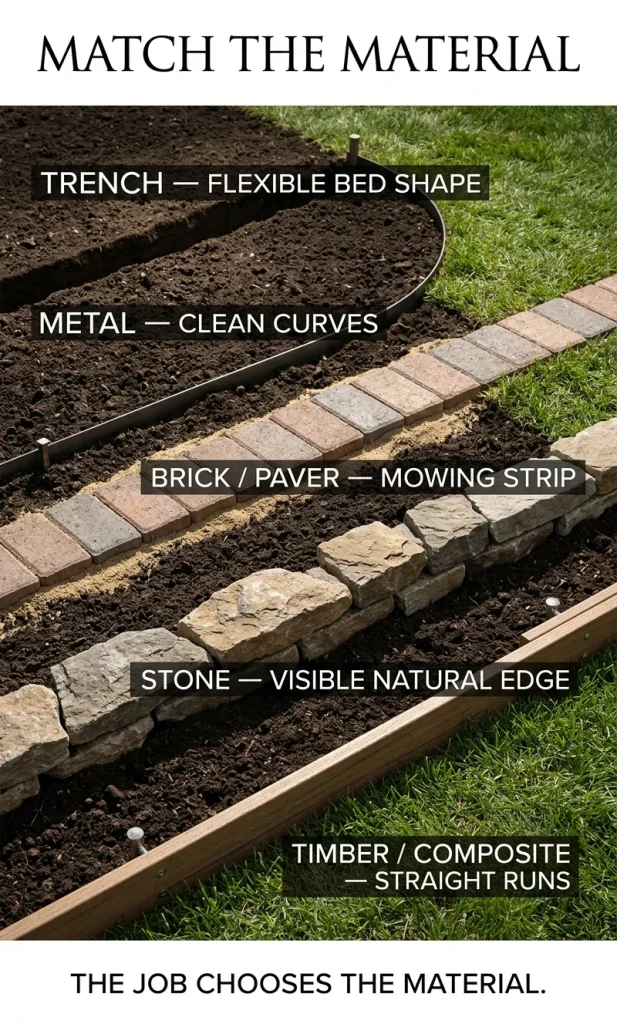
Garden edging materials compared
| Option | Best use | Main trade-off | Installation priority |
|---|---|---|---|
| Spade-cut trench | Lawn-to-bed edges that may change | Needs periodic re-cutting | Make one smooth line and maintain the drop |
| Metal strip | Clean straight lines and curves | Requires secure staking and safe top-edge detailing | Keep height consistent and anchor curves well |
| Brick or paver | Traditional borders and mowing strips | More base preparation; tight curves need planning | Compact and level the base before setting units |
| Natural stone | Naturalistic gardens and permanent visual borders | Irregular shapes can complicate mowing and leveling | Set each piece firmly rather than balancing it on loose soil |
| Timber or composite | Straight runs, informal beds and modest height changes | Timber eventually decays; rigid boards dislike tight curves | Support long runs so they do not bow or lean |
| Plastic edging | Temporary, hidden or very budget-sensitive boundaries | Cheaper profiles can move, warp or become brittle | Use enough anchors and keep the visible reveal controlled |
There is no universal “best” edging material. A Singapore community-garden design guide recommends weighing structural integrity, appearance and cost, and its material examples show why: metal handles curves, timber is economical but less durable, and brick or natural stone can deliver a longer-lived edge when properly installed.
That distinction is more useful than a price ranking because local material costs vary widely. Salvaged brick may be nearly free in one area and expensive to prepare in another, while metal may cost more upfront but reduce the amount of seasonal re-edging.
Six border ideas that cover most gardens
1. Cut a natural trench edge when the bed may still move
A clean trench edge gives a sharp visual line with almost no material cost, and it is easy to widen or reshape later. It works best between lawn and a planting bed where you are willing to refresh the line periodically; it is not the right choice for keeping gravel in place or holding back a raised soil level.
Use a hose or rope to test a curve before cutting, then step back and view it from the house, path and main seating area. If the curve contains repeated little bumps, simplify it into one or two larger sweeps so mowing and maintenance remain predictable.
2. Use metal when you want a thin, controlled line
Metal edging is useful when the border should almost disappear and the shape includes long curves. It can separate lawn, mulch and planting cleanly, but the installation still needs enough anchoring to stop the line from wavering or lifting as soil conditions change.
Keep exposed tops consistent and follow the manufacturer’s edge-safety instructions, especially near children’s play areas, pets and barefoot circulation. If you like this restrained look, the specialist guide to modern landscape edging ideas goes deeper into contemporary bed detailing without turning this broad guide into a style catalogue.
3. Lay brick or pavers when mowing convenience matters
A row of bricks or pavers can do more than decorate the bed: laid flush at lawn level, it can become a mowing strip. The result is strongest when the units sit on a properly prepared, level base rather than directly on loose soil, where settlement can create a wavy line and mower obstacles.
Reclaimed units are especially useful when you want character without buying a fully new hardscape. Check that they are sound enough for outdoor exposure, sort them before installation and use the variation deliberately rather than forcing inconsistent units into a precision pattern.
4. Choose natural stone when the border should be seen
Stone works when the edge is part of the garden’s visual language rather than a hidden separator. It suits naturalistic planting, cottage-style beds and paths where irregular texture looks intentional, but near turf the same irregularity can create small pockets that require hand trimming.
If you want lower maintenance, either set the stones to create a consistent mowing relationship or separate them from the turf with a narrow flush strip. That small construction decision matters more than choosing the “prettiest” stone.
5. Use timber or composite for long straight runs
Boards and landscape timbers make sense where the geometry is simple and the edge needs a little height. Timber brings warmth and can be economical, while composite products trade some natural character for resistance to rot and more predictable dimensions.
Do not ask a rigid board to perform a tight curve. Break the design into straighter segments, choose a material made to bend, or change the geometry so the border works with the material rather than fighting it.
6. Use plastic selectively, not automatically
Plastic edging can be practical when it is mostly hidden, the project is temporary or the budget is very tight. The weakness is that low-quality sections can become visually obvious when they lift, warp or lose their line, so it is better treated as a functional separator than as the main decorative feature.
If the goal is to reuse what you already have, look at repurposed garden decoration ideas and then apply one filter: the reused material still needs to be stable, non-hazardous and suitable for repeated outdoor exposure. “Free” is not cost-effective if you must keep rebuilding the edge.
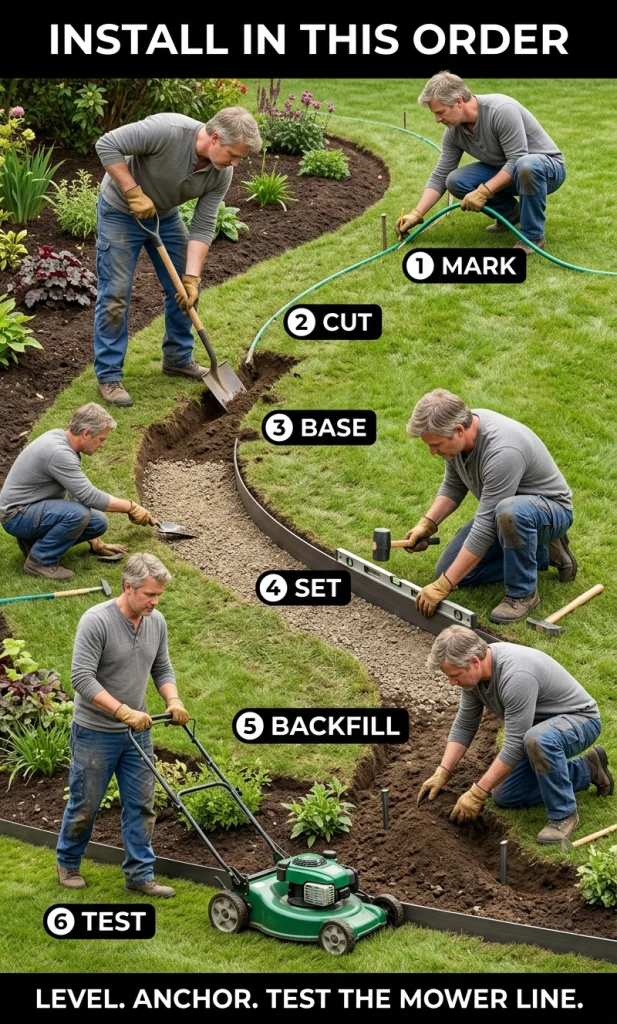
Install the border in the order that prevents failure
- Mark the line: use a string line for straight work and a hose or rope for curves. Walk the route and simplify awkward turns before digging.
- Check what is below: follow local utility-location and digging requirements before driving long stakes or excavating a deeper edge.
- Cut a consistent trench: remove turf and loose organic material so the edging is supported by firm ground rather than a soft mat.
- Prepare the base: unit materials such as brick, pavers and stone need stable, level support; the exact base depends on the product, soil and climate.
- Set height deliberately: decide whether the border is flush for mowing, slightly proud for containment, or structurally raised. Do not let height vary randomly along the run.
- Anchor or bed the material: follow the system’s fixing method and add support where curves, soft ground or retained material increase pressure.
- Backfill and test: compact gently on both sides, then test mowing, walking, drainage and material containment before finishing the bed.
Most edging failures start before the material is set. A beautiful brick line on an uneven base settles; a flexible strip with too few anchors waves; a raised edge without adequate support leans; and an edge set at the wrong height creates more trimming instead of less.
For a lawn-heavy garden, the RHS specifically recommends simplifying difficult angles and using a permanent low edge or lower gravel strip when the goal is easier mowing. The same principle supports low-maintenance front yard landscaping: remove maintenance traps instead of decorating around them.
Where cheap edging stops being cost-effective
The cheapest material is not always the cheapest system to live with. If a border pops out of soft ground, cracks in local weather, creates a string-trimming strip or must be reset every season, labor becomes the hidden cost.
On the other hand, permanent hard edging can be wasteful when the planting bed is still changing. Illinois Extension’s advice to keep new bed edges simple is a useful reminder that adaptability has value, especially around shrubs and perennials that will occupy more space as they mature.
Material sourcing can also change the environmental and budget equation. Penn State Extension notes that local or reused hardscape can reduce transport and resource impacts, but durability still matters; wood decomposes sooner than stone or metal, so the appropriate choice depends on how long you need the edge to remain fixed.
A practical decision rule
| Your condition | Start with | Question before you commit |
|---|---|---|
| New bed that may expand | Spade-cut edge | Will the mature planting push the border outward? |
| Long clean curve | Metal or bendable composite | Can the system hold the radius without waviness? |
| Mower-friendly lawn edge | Flush brick/paver or low metal edge | Can a mower wheel run the line without scalping or leaving a grass strip? |
| Visible natural border | Stone | How will irregular pieces affect mowing and leveling? |
| Small raised edge | Brick, stone or supported timber/composite | Is this still edging, or has it become a retaining structure? |
| Very low budget | Cut edge or sound reclaimed material | What maintenance or preparation are you trading for the low purchase price? |
Use the decision rule before you browse styles. Once the functional family is right, color, texture, pattern and planting can do the aesthetic work; for broader DIY layout choices, the site’s easy garden design DIY ideas can help connect the border to the rest of the space.
Garden border and edging FAQ
What is the cheapest way to edge a garden bed?
A spade-cut lawn-to-bed edge is usually the lowest-material-cost option because it uses no permanent edging product. The trade-off is maintenance: the line needs periodic re-cutting, and it is not suitable when you must physically contain gravel or retain a raised soil level.
What garden edging is easiest to mow around?
A flush brick or paver mowing strip can be very mower-friendly when it is level and stable. Low-profile metal can also work well; the important detail is avoiding a height or narrow grass gap that forces you to return with a string trimmer.
Is metal edging better than plastic?
Metal generally makes sense when you want a thin, durable line that can hold a clean curve, while plastic can be useful for temporary, hidden or highly budget-sensitive work. Product quality and installation matter, so compare the actual system rather than assuming every metal or plastic product performs the same way.
Can I use old bricks for garden edging?
Yes, if the bricks are sound enough for the intended outdoor exposure and you can prepare a stable base. Sort reclaimed bricks first so changes in size and condition become part of the design instead of creating random high spots or weak sections.
Should garden edging sit above the lawn?
Only when the edge needs a visible lip for containment or the product specifically requires it. If mowing convenience is the priority, a flush or very low relationship is usually easier; raised edges can leave grass that the mower cannot reach.
Do I need a permanent edge around every flower bed?
No. A maintained cut edge can be the better choice for evolving beds, while permanent edging earns its place when shape retention, gravel control, mowing convenience or a settled long-term design makes the extra material worthwhile.
Decide the line before you buy the material
Stand at the main viewing point, mark one simple edge and decide what that edge must contain, separate or support. Then choose the least complicated material that can perform that job for the length of time you expect the border to stay in place.
If the bed is new, start reversible; if the boundary must hold loose material, build a physical barrier; if mowing is the frustration, design the mower path first. That sequence turns edging from a decorative afterthought into a small piece of landscape infrastructure that keeps the garden easier to use.